
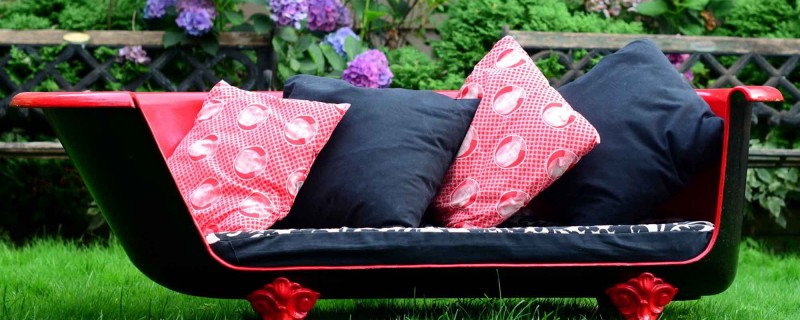
This amazing cast iron vintage clawfoot bath can be transformed into an upcycled vintage sofa couch. The bathtub is surprisingly comfortable; after all, it’s designed to have people lounging in it! No matter the condition of the bathtub, you can transform it into a conversation piece couch that is as practical as it is funky.
Step 1: Start by outlining a cut out on the edge of the bathtub.

Step 2: Cut out with an angle 4 1/2 inch angle grinder. This puts enormous strain on the grinder, so work slowly and carefully. Wear gloves, protective clothing, goggles and a face mask.

Here is a video of the cast iron cutting to give you a better idea of how to proceed.
Step 3: Sand down any rusted areas and clean cast iron bathtub surface prior to painting.

Step 4: Paint the bottom of the claw-foot tub with Krylon paint. Using a paint sprayer will reduce streaks and runs. When it is completely dry, turn the tub over and paint the interior using a sprayer if you can.

Step 5: Sand and paint feet separately.
Step 6: Place a cushion in the bottom of the cast iron claw-foot bathtub sofa
This book contains over 80 DIYs, recipes and tips on how to live greener and leaner. Learn to make fun upcycling crafts and furniture, make your own cleaning products, grow your own food and make ALL your own beauty products from face creams to mascara.
Click HERE.
COOLNESS! Way to go guys, this looks awesome!
super duper sick. I want one.
How did you get your measurement for your layout for the cut
Hi John,
Thanks for your question. The cut will depend largely on the size of your bath, but mine is 14 inches from the top rim and 45 inches wide. Be sure to cut the bath at the bottom just after it starts to curve up – leaving too much space above the curve means it will cut into your legs when you sit on it. Use a level to ensure that the lines are straight.
I love this!! I have wanted a “holly golightly” sofa for a long time and your blog makes me feel like this is a project I can take on. How long did it take you? Do you feel like it could be used outside or needs to be an indoor fixture? Thanks, K
Hi Kristen! I love this sofa, its my favorite piece of furniture and a real hit with visitors. I use it inside, but you can just as easily leave it outdoors too. From start to finish, the sofa took about a day to complete. It does depend on the condition the bathtub is in when you start. Ours had been outside for decades and was covered in rust. We had to sand it down and that took some time. We also used a primer and a couple of coats of paint to get it up to scratch. If your bathtub is in a good condition, it should only take you a couple of hours. If you make this sofa, please send us a picture or a video – we would love to see your handy work. Good luck and let me know if you need any help along the way.
Great work! Can you post a video of the full cut? I’d like to see how long it took, how many blades, and how you cut the curves.
Thanks!
HI Erik,
Unfortunately this is the only video we shot. http://www.youtube.com/watch?v=sx7rlbySkig
The full cut took about 30 minutes. We used a 2mm cut off disc. We didn’t even get through a full blade.
my daughter saw this and wants one for her room. thanks for the instructions! picking up a tub tomorrow.
That’s great – if you need any help with the build, let me know!
PS: Sheldon, send us a pic of your completed work.
Pingback: Our favourite upcycling projects of the week | 1 Million Women
Very sorry for the ancient bath, it can be recovered and used for other purposes or to sell those to whom it is most needed.
Pingback: 1 Million Women
How long did this take? Is it a weekend project or something that needs a lot more time? Absolutely beautiful finish! I love the boldness of the red. FANTASTIC!
Thanks Jen – I love this couch! It took my husband a weekend to make it, but its surprisingly easy to make. He spent a lot of time working on rust removal because the tub was in bad shape to start with. If you start with a rust-free tub, you could cut it and paint it in a day.
Pingback: DIY Christmas Gift Ideas You'll LOVE!
What kind of grinder do you have? I’m trying to cut, but after 2 hours, i’ve only made it 4 inches. I’m aghast that it only took you 30 minutes. According to the guys at Home Depot, i’m using the right disk. I’ve blown through 2 in that 4 inches 🙁
Hi there,
I was using a very standard Bosch 4.5″ 6A grinder (http://www.canadiantire.ca/en/pdp/bosch-6a-angle-grinder-4-5-in-0547054p.html#.UtWGoZ5dU2E)
The trick is to use as thin a cut off wheel as possible – (something like this: http://image.made-in-china.com/2f0j00LCMTPEBaqtpw/Super-thin-Cut-Off-Wheel.jpg). The thinner the wheel, the less material it has to cut through – when I say thin, I mean like 2-3mm thick – anything thicker and it will take a very long time. Be sure to have a clear and as accurate a line as possible to follow, cut along it and use a thicker (like the one you have been using) wheel to round the edge afterwards. Do not force the grinder against the cast iron either, as this will put undue resistance on the electric motor of the grinder and can burn it out very easily, ruining it.
No offence to whoever recommended whatever to you – but I made it all the way through on one disc (which I was very surprised about)…and it wasn’t fancy – it was the cheapest (10 for $9) one I could find…
Another point of note – grinding cast iron creates a TON of tiny iron particles. these particles are tossed all over the place seeing as that is the nature of grinding. if you’re doing this out of doors, these particles will rust during the first rain, creating rust stains. I did mine on a paved area – which ended up getting CRAZY rust stained….word to the wise – either thoroughly clean up immediately after, or do the grinding somewhere of no consequence…
Thank you SO much for your help! i’ll give it another try 🙂
Nice idea
Thanks Sandy! I have this in my living room and its my most loved piece of furniture
Pingback: What was once a tub… | aeholstein
Hi! I know this is kinda off topic however , I’d
figured I’d ask. Would you be interested in exchanging links or maybe guest writing a blog article or vice-versa?
My blog discusses a lot of the same topics as yours and I believe we could
greatly benefit from each other. If you’re interested feel
free to send me an e-mail. I look forward to hearing from you!
Terrific blog by the way!
Feel free to visit my web site Bathtub Reglazing Orlando
I’m about to embark on making one of these tub couches, and am really excited about it! I will definitely post pictures along the way.
Wondering, if I wanted to fill the holes where the faucets were how would I go about doing that?
If you would like to plug the holes, the first thing to do would be to create a substrate in them, that would allow you to apply body filler. I would suggest you cut two pieces of sheet metal, one for either side of each hole, cut these two pieces just slightly larger than the diameter of each hole so that each circle could not be pulled straight through. Then drill a hole through the center of each circle and pass a short countersunk head bolt through them both and secure on the other end with a thing nut. Cut off any excess bolt passing through the nut using your angle grinder. You should now have the hole ‘plugged’, yet beneath the surface of the cast iron, as this will generally be ~1/2 inch thick. Now apply a layer of body filler (Bondo or the such) and smoothly apply it to the surface of the tub around and over the plugged holes using a rubber straight edge to smooth over the holes, blending them into the surface of the cast iron. Allow for the body filler to dry, then sand it smooth to the surface of the tub. Good luck with it – the tub couch is my FAVORITE thing and its really comfortable. We would love to see the process and finished product so send us some pictures. If you have any problems or questions, just drop us a line and we will be happy to help!
How do I go about the cushion? What shape & how thick
You can use sofa cushions that you already have or upcycle some sofa cushions if you prefer. We got a piece of foam from a mattress store and covered it with upholstery fabric which matched our living room. The thickness really depends on how comfy you want it to be. Let me know if you have any other questions.
This is thrilling! My wife LOVES these tubs, but of course, we couldn’t fit one in a tiny house with kids! Great way to integrate something she loves into the living room!
Pingback: 7 Uses for Old Bathtubs | JL Bathrooms Blog
Hi Nikki,
I’ve made one of these too and absolutely love it. Problem with mine is that i didn’t get a perfectly smooth cut with my angle grinder – did you manage to get a smooth finish when you cut yours? If not how fix you smooth yours down?
Thanks
Lauren
Your style is unique compared to other people I have read stuff from.
Many thanks for posting when you’ve got the opportunity,
Guess I will just bookmark this page.
Pingback: Giving your home a unique edge - Design Reviver - Web Design Blog
Pingback: 40 Impressive DIY Ways To Repurpose and Reuse Broken Household Items Part 1 | eKanpSack
Pingback: Giving your home a unique edge | Lunarium Design
Pingback: 40 Impressive DIY Ways To Repurpose and Reuse Broken Household Items Part 1 | HeySup
This is an ingenious way to recycle and be green! For those of us who are not such master craftsmen though, you might like to know that you can stay ecofriendly, and have a real hot tub, because the hot tubs of today actually have reduced the amount of energy and water they use. Check out some of the most eco friendly tubs at http://www.coloradospringshottubs.com/hot-tubs/71-hotspring-jetsetter-used—refurbished
Hi Nikki, I have just bought an old tub. I so want to do this and it be as beautiful as the picture above. I know this is asking a lot……..but can you walk me through start to finish. How do you prep tub to get start and what do you use so that it will stay beautiful for a long time. After cutting isn’t the edges sharp? how do you get them to be not sharp and the polished look. What products do you use and what type of paint. If you can answer these questions I think I will get started!!! Thanks in advance and I look forward to hearing from you soon/ Johnna Bickerstaff
Just removed and old iron bath tub from upstairs and fitted a new one. The old bath was just about to be taken to the tip. Also been looking for a small sofa for the kitchen. I think this might save a trip to the tip and a few hundred pounds.
That would be a result if it’s as easy as it looks here!
Can you recommend disks for sanding the edges?
Pingback: 13 The Most Creative DIY Ideas - How to Recycle Broken Item
Pingback: Nikki & Ian's Quirky, Upcycled & Nature-Inspired Home — House Tour Sell Ur Shit | Make Money Selling Your Shit online for Free | Sell Ur Shit | Make Money Selling Your Shit online for Free
Pingback: Nikki & Ian's Quirky, Upcycled & Nature-Inspired Home — House Tour – Pioneers Discovers
What better way to help your child’s dreams come true then by surrounding them with their favorite things! Decorating your child?s bedroom can be both a fun and rewarding experience for both of you.
Artemide Lighting http://www.charityhayesillustrator.com/spryassets/?p=id-7403
Pingback: DIY Repurposed Old Bathtubs Into Furniture Ideas That You Will Love To See - feelitcool.com
Pingback: Viralility » Stories that make you think » 30 Pieces Of Junk That Were Transformed Into Something Awesome.
Pingback: 30 Pieces Of Junk That Were Transformed Into Something Awesome. – Viral Bone – News That Makes You Think
Pingback: 30 Pieces Of Junk That Were Transformed Into Something Awesome. – InsiderViral
Pingback: 30 Pieces Of Junk That Were Transformed Into Something Awesome. - Oplus
Pingback: Abfall - Recycling statt Verbrennung -
Pingback: 11 Creative Uses For Old Bathtubs | Good Ideas For You
Pingback: La vecchia vasca diventa divano! 20 esempi bellissimi + VIDEO Tutorial...
I love this and it is a great way to recycle…I want to see how long it took?
Pingback: 18 Spectacular DIY Ways To Repurpose and Reuse Broken Household Items - The ART in LIFE
I will need towards be the most straightforward
Great post! Have nice day ! 🙂 fenff
Pingback: 30 coisas que iam para o lixo mas ganharam uma nova vida - TREND VIRAL
Pingback: 16 Spectacular DIY Ways To Re purpose and Reuse Broken Household Items – Dreams in Life
Pingback: 100 Ways to Repurpose and Reuse Broken Household Items - DIY & Crafts
Pingback: Reuse everyday items around your home for a making each moment into an incident ⋆ BrassLook
How long did this take?
About 4 hours
I’m in the middle of a similar project and wondering what kind of paint you used for the inside? My tub has the original enamel and I’m not sure what to use on it. Cheers!
Informative article. Thanks
Great idea. Thanks
A well-designed pallet rack layout enhances warehouse storage efficiency and workflow. Take into account ceiling height, doorways, and aisles to ensure compatibility.
Aligning racks with traffic flow improves productivity. Choose selective racking for frequent stock rotation or drive-in racking for larger inventory loads.
Incorporate safety measures like adequate aisle width and rack anchors. Technology can improve accuracy.
A well-thought-out layout boosts efficiency and improves storage capacity.
[url=https://rgpalletracking.com/]Industrial Racking[/url]
[url=https://finazle.com/hello-world/#comment-4306]Frequently Asked Questions on Warehouse Racks[/url] f619004
Подробная инструкция по применению супрастинекса, прочтите перед началом приема.
Оптимальный режим приема супрастинекса: инструкция, рекомендации от специалистов.
Как правильно использовать супрастинекс: шаг за шагом, эффективные стратегии лечения.
Секреты эффективного применения супрастинекса, информация от специалистов.
Полезные советы по использованию супрастинекса, подсказки для эффективного лечения.
Супрастинекс: секреты правильного применения, рекомендации для пациентов.
Инструкция по применению супрастинекса: все советы и рекомендации, эффективные стратегии использования.
Оптимальный режим приема супрастинекса: полная инструкция, секреты успешного восстановления.
Подробная инструкция по использованию супрастинекса: все секреты и рекомендации, стратегии эффективного лечения.
Секреты успешного применения супрастинекса, подсказки для эффективного лечения.
супрастинекс инструкция по применению https://suprastinexxx.ru/ .
Exploring the Future of Learning with 3D Printing, Innovative Ways to Integrate 3D Printing in the Classroom, Transforming School Projects with 3D Printing, The Benefits of Using 3D Printing in School Assignments, Creative Ideas for 3D Printing in Education, Exploring the Possibilities of 3D Printing in Student Work, Inspiring the Next Generation with 3D Printing, Encouraging Creativity with 3D Printing in Education, Incorporating 3D Printing into School Curriculum, Inspiring Innovation in School Projects with 3D Printing.
3D Printing in School Projects https://www.habr.com/ru/companies/top3dshopinc/articles/792658 .
A 3D printed play space for children, that will interest every little explorer.
Immerse yourself in an exciting creative process with your child, using the most modern technologies and materials.
Help your child develop imagination and creativity, using 3D printing as a means of self-expression.
Best Ways to Apply 3D Printing in Children’s Education, and what advantages it gives your child.
Exploring the world of 3D Printing for kids, and how it inspires young creators to bold experiments.
Practical lessons and projects for developing 3D modeling skills, that your child can easily handle.
3D Printing for Kids https://www.habr.com/ru/companies/top3dshopinc/articles/792134 .
Каркасные дома под ключ: заказать дом мечты по разумной цене
каркасные дома санкт петербург http://www.karkasnye-doma-pod-klyuch-v-spb178.ru/ .
Быстрое строительство каркасных домов без потери качества
строительство каркасных домов под ключ http://karkasnye-doma178.ru/ .
Каркасные дома для дачи: стильный и экономичный вариант под ключ
каркасные дома спб https://karkasnye-doma-pod-kluch178.ru/ .
on line pharmacy
Experience Luxury and Taste with Our [url=https://seattle-towncar.com/seattle-winery-tour/]Seattle Winery Tour[/url] Limo Service
Indulge in the finest flavors of the Pacific Northwest with our premier Seattle Winery Tour limo service. Combining elegance, convenience, and a passion for exceptional wine, we offer an unforgettable experience tailored just for you.
[url=https://seattle-towncar.com/service/]Limousine services[/url] for Every Occasion
Our limousine services are designed to cater to every special occasion. Whether you’re planning a romantic getaway, a corporate event, or a memorable day out with friends, our fleet of luxurious limousines ensures a seamless and stylish journey. Each vehicle is equipped with state-of-the-art amenities to make your ride as comfortable and enjoyable as possible.
Seattle Winery Tour: A Journey through the Vineyards
Embark on a Seattle Winery Tour and discover the hidden gems of Washington’s wine country. Our expert chauffeurs will guide you through a carefully curated selection of the region’s top wineries, offering breathtaking views and exquisite tastings. Sit back, relax, and let us handle the logistics while you savor the best wines the area has to offer.
[url=https://seattle-towncar.com/services-nearby-seattle/]Services Nearby Seattle[/url]
Located conveniently near Seattle, our limousine services provide easy access to some of the city’s most popular attractions. From the bustling downtown area to the serene countryside, our knowledgeable drivers ensure that you reach your destination efficiently and in style. Whether you’re planning a night out in the city or a day trip to the surrounding areas, our services nearby Seattle have you covered.
Why Choose Our Limo Service?
– Luxury and Comfort: Our fleet of limousines is designed with your comfort in mind, featuring plush interiors, advanced entertainment systems, and ample space for you and your guests.
– Professional Chauffeurs: Our trained and experienced chauffeurs are dedicated to providing a smooth and safe ride, ensuring your journey is as enjoyable as your destination.
– Customized Itineraries: We offer customized itineraries for your Seattle Winery Tour , allowing you to visit your preferred wineries and experience the best of what the region has to offer.
– Seamless Booking: Our user-friendly booking process ensures that reserving your limousine is quick and hassle-free. Simply choose your preferred date and time, and we’ll take care of the rest.
Experience the Best of Seattle with Us
Elevate your wine tasting experience with our premier Seattle Winery Tour limo service. From the moment you step into one of our luxurious limousines, you’ll be treated to a level of service and comfort that is unparalleled. Contact us today to book your journey and explore the finest wineries nearby Seattle in style.
Let us be your guide to an unforgettable adventure in the heart of Washington’s wine country.
Основные критерии выбора конкурсного управляющего, Изучаем профессию конкурсного управляющего, путь к успешной карьере, инсайдерская информация, полезные советы, Требования к профессионалу конкурсного управления, секреты профессии, Как выбрать лучшего конкурсного управляющего для своей компании, Эффективное управление в условиях конкурсных процедур, Как стать лучшим конкурсным управляющим, эксклюзивные советы
конкурсный управляющий konkursnyj-upravlyayushhij.ru .
Как найти проект каркасного дома, который точно станет вашим домом мечты
каркасные дома спб под ключ karkasnye-doma-spb178.ru .
накрутка любых реакций в Телеграмме накрутка любых реакций в Телеграмме .
купить диплом о высшем образовании старого образца
Каркасный дом: строительство, которое вы можете себе позволить без ущерба для стандартов
каркасные дома под ключ проекты и цены https://www.spb-karkasnye-doma178.ru/ .
Оформление временной регистрации через компанию: Какие преимущества вы получите
регистрация временного пребывания http://rega-msk99.ru/ .
I appreciate, result in I found just what I was looking for. You have ended my 4 day long hunt! God Bless you man. Have a nice day. Bye
Идеи для покупки мебели в Италии – подробный обзор
мебель из италии купить https://kupit-mebel-italii.ru .
диплом о высшем образовании купить корочку
ebtq7z
купить диплом в брянске о высшем образовании
Hi! I just wanted to ask if you ever have any problems with hackers? My last blog (wordpress) was hacked and I ended up losing many months of hard work due to no data backup. Do you have any solutions to stop hackers?
Лучшие услуги сантехника в вашем городе
вызов сантехника на дом спб вызов сантехника на дом спб .
Машинка на пульте: топ аксессуаров для улучшения вашей игрушки – всё доступно в нашем каталоге
машины радиоуправляемые https://wildberries.ru/catalog/281617142/detail.aspx .
I do not even know how I ended up here, but I thought this post was good. I do not know who you are but definitely you’re going to a famous blogger if you are not already 😉 Cheers!
купить диплом среднем образовании
Комплексные услуги сантехника – доступные цены и профессиональный подход
сантехник спб срочно https://www.uslugisantehnika-spb.ru/ .
ставрополь диплом купить
курган купить аттестат
Привет, друзья!
Начальники довольно часто предпочитают принимать соискателей, которые закончили высшее учебное заведение. Особенно в приоритете топовые заведения. Однако учиться 5 лет – это дорого, не у всех существует подобная возможность. Приобрести документ – оптимальный выход.
Бывают и непредвиденные случаи, когда диплом ВУЗа утерян. Не всегда можно быстро и беспроблемно восстановить его, особенно когда университет закрыт или располагается в другом регионе России. Бюрократические проволочки отнимут массу времени и нервов.
Для эффективного продвижения вверх по карьерной лестнице потребуется наличие диплома о высшем образовании. Но нередко в жизни случается так, что сложные обстоятельства мешают с успехом закончить учебу и заполучить важный документ.
Заказать диплом любого ВУЗа
Наши специалисты предлагают выгодно и быстро заказать диплом, который выполнен на оригинальном бланке и заверен мокрыми печатями, водяными знаками, подписями. Документ способен пройти лубую проверку, даже с применением специального оборудования. Достигайте цели быстро с нашими дипломами.
Где заказать диплом специалиста? rdiploman.com
Добрый день!
Где купить диплом по актуальной специальности?
Мы готовы предложить дипломы любой профессии по приятным ценам. Цена будет зависеть от выбранной специальности, года получения и университета. Всегда стараемся поддерживать для клиентов адекватную политику цен. Важно, чтобы документы были доступными для большого количества наших граждан.
Покупка документа, подтверждающего окончание института, – это выгодное решение. Попросту подсчитайте, сколько понадобится вложить денежных средств на оплату пяти лет обучения, на аренду квартиры (если учащийся иногородний), на проезд до института и многие другие расходы. Получается приличная сумма, в разы превосходящая цены на наши документы. А ведь все эти пять лет можно уже успешно работать, продвигаясь по карьере.
Готовый диплом со всеми печатями и подписями отвечает запросам и стандартам Министерства образования и науки России, неотличим от оригинала. Не следует откладывать собственные мечты и цели на несколько лет, реализуйте их с нами – отправляйте простую заявку на диплом прямо сейчас!
Получить диплом о среднем образовании – легко! diplomans.com
Комплексный монтаж водопровода и отопления – надежные услуги сантехника
сантехник на дом спб https://santehniknadom-spb.ru/ .
Generate cover letters that match your resume style seamlessly
cover letter creator ai http://createcoverletterfree.com/ .
Добрый день!
Покупка документа о высшем образовании через надежную компанию дарит ряд плюсов для покупателя. Данное решение дает возможность сберечь как продолжительное время, так и серьезные финансовые средства. Однако, на этом выгода не ограничивается, плюсов гораздо больше.Мы изготавливаем дипломы психологов, юристов, экономистов и любых других профессий. Дипломы производят на подлинных бланках. Доступная цена в сравнении с крупными затратами на обучение и проживание в другом городе. Покупка диплома об образовании из российского института является разумным шагом.
Купить диплом о высшем образовании: modx.pro/users/diplomygroup
проекты домов проекты домов .
Cover letter generator with tips from HR professionals
generate cover letter https://www.writingcoverletterai.com/ .
конкурсный управляющий это кто простыми словами https://www.konkursnyj-upravlyayushhij-po-bankrotstvu.ru/ .
Создайте идеальный домашний спортзал с тренажерами Матрикс и тренируйтесь без ограничений
матрикс фитнес http://matriks-trenajeri.ru/ .
Доброго времени суток!
Где заказать диплом по актуальной специальности?
Мы предлагаем дипломы психологов, юристов, экономистов и других профессий по приятным ценам. Цена может зависеть от определенной специальности, года выпуска и образовательного учреждения. Всегда стараемся поддерживать для покупателей адекватную политику тарифов. Для нас очень важно, чтобы документы были доступными для большого количества наших граждан.
Приобретение диплома, подтверждающего обучение в университете, – это выгодное решение. Для сравнения просто посчитайте, сколько вам пришлось бы потратить денежных средств на оплату 5-летнего обучения, на аренду квартиры (если студент иногородний), на проезд до ВУЗа и обратно. Получается приличная сумма, намного превосходящая расценки на нашу услугу. А ведь все это время можно работать, занимаясь собственной карьерой.
Получаемый диплом со всеми печатями и подписями отвечает требованиям и стандартам Министерства образования и науки, неотличим от оригинала. Не стоит откладывать свои цели на потом, реализуйте их с нашей компанией – отправляйте быструю заявку на изготовление документа сегодня!
Диплом о среднем образовании – легко! diploman-russian.com
мебель из италии в москве kupit-italyanskuyu-mebel.ru .
Choose the best online schools for teaching children, which offer high-quality education.
Looking for home-based learning? Online schools will help you choose, detailed review.
Online School Selection: important selection criteria, understand the main points.
How to make learning interesting for your child at an online school, apply proven techniques.
How to prepare for online learning, get the right skills.
Choosing between online and offline learning: which is better?, understand the main points.
Choose a suitable online school for learning foreign languages, get the most out of it.
Secrets of maintaining interest in learning online, overcome difficulties.
Secrets of comfortable learning at home, create your own cozy learning space.
Compare online and offline education, get a full review.
Choose interesting courses for adults in an online format, reach new heights.
How to properly study online, overcome difficulties.
How to choose the best online school for learning programming, improve your skills.
Online learning: a new format of education, develop with us.
The best online courses for teaching children, get the most out of it.
Support your child’s learning: the best online courses, get useful tips.
Best Online Schools for Your Child, get new knowledge.
k12online http://www.onlk12-st5.com/ .
купить диплом с проводкой спб
Как получить займы онлайн на карту без лишних документов и визитов
займы http://www.vsezajmyonline.kz/ .
проект дома https://proekty-zagorodnykh-domov.ru/ .
купить диплом легальный
Экран для проектора с высоким коэффициентом отражения – яркое изображение даже в освещенной комнате
экран проектора купить https://proekcionnye-ehkrany01.ru/ .
Лучшие предложения микрокредитов – сравните и выберите выгодные условия
микрокредиты на карту https://www.allmikrokredits.kz .
Займы онлайн без отказа – даже с плохой кредитной историей и просрочками
займы онлайн http://vsemiikrozajmy.kz/ .
Микрокредиты онлайн – быстрое оформление, низкие ставки, моментальный перевод
микрокредиты онлайн https://www.mikrokredityvsem.kz .
Заказать документ ВУЗа можно у нас. diplomh-40.ru/kupit-diplom-ekonomista
Мгновенные займы онлайн без звонков и подтверждений – деньги на вашу карту
взять займ http://www.news365.kz/ .
Engaging the services of a attorney specializing in disabilities for claims concerning disabilities in Albuquerque region carries immense value. Individuals who pursue the guidance of a disability lawyer in disability court trials can derive countless advantages and priceless support throughout the disability claims process. These legal professionals have the necessary skills, understanding, and capability to efficiently sail through the intricacies of the law system and represent for their clients’ optimal benefits.
One of the main functions of a disability attorney in court proceedings related to disabilities entails adeptly guiding and overseeing the court proceedings. Lawyers for disabled individuals shine at navigating the subtleties of court proceedings on disabilities, which can be overwhelming for those unfamiliar with the law system. By utilizing the assistance of a attorney specializing in disabilities, individuals with disabilities greatly enhance their likelihood of success in court for disability claims.
Throughout court proceedings for disability claims, a lawyer for disabled individuals plays a pivotal and dynamic position in providing vital
assistance. They vigorously work together with clients in compiling and submitting claims applications for disabilities, petitions, and pleas, simplifying the method and guaranteeing all necessary records is precisely submitted. Additionally, attorneys specializing in disabilities offer critical assistance during court proceedings related to disabilities, leveraging their specialist expertise of legislation on disabilities and guidelines to provide direction, recommendations, and strategic representation.
The positive aspects of engaging a disability attorney for claims concerning disabilities are diverse. These legal professionals supply specialized guidance and recommendations, providing their clients with a upper hand in court proceedings related to disabilities. Through their thorough understanding of the lawful environment, attorneys specializing in disabilities can successfully traverse the intricate network of rules and legislation governing disability claims, making sure that their clients’ privileges are secured and their utmost interests are represented.
Moreover, attorneys specializing in disabilities make simpler the disability claims process, easing the burden on individuals with disabilities. They serve as supporters, communicating with official institutions, insurance companies, and other applicable entities on behalf of their clients. This holistic assistance permits individuals with disabilities to concentrate on their well-being and private affairs, being informed that their disability claims are being handled with utmost care and thoroughness.
In the framework of claims related to disabilities in Albuquerque region, it is vital to recognize the distinctive proficiency provided by attorneys specializing in social security. These lawyers concentrate on social security laws and guidelines, making them highly valuable resources for individuals seeking social security disability benefits. Social security lawyers have comprehensive expertise of the intricate regulations and processes governing social security disability claims, enabling them to offer customized guidance and direction to their clients.
By acquiring a disability attorney, individuals with disabilities obtain a wealth of assets and aid. These lawyers serve as devoted champions, diligently striving for their clients’ entitlements and privileges. Lawyers for disabled individuals grasp the difficulties faced by individuals with disabilities and strive to guarantee they obtain the benefits for disabilities they should rightfully have.
In conclusion, the act to acquire a disability attorney is a crucial one for individuals with disabilities looking for disability compensation in the city of Albuquerque. These lawyers play a essential function in simplifying the legal process, increasing the probability of success in disability court trials, and offering expert guidance and advice tailored to their clients’ distinctive circumstances.
https://www.disabilityalbuquerque.com – Overcoming obstacles in handicap claims with an unum attorney
Приветствуем вас на нашем веб-сайте!
Здесь вы найдёте всё необходимое для успешного управления своими финансами.
Мы предлагаем широкий спектр финансовых продуктов, которые
помогут вам достичь ваших целей и обеспечить стабильность в будущем.
В нашем ассортименте представлены различные
виды банковских продуктов, инвестиции, страхование,
кредиты и многое другое.
Мы постоянно обновляем нашу базу данных, чтобы
вы всегда были в курсе последних тенденций и инноваций на финансовом рынке.
Наши специалисты помогут вам выбрать наиболее подходящий
продукт, учитывая ваши индивидуальные потребности и предпочтения.
Мы предоставляем консультации и рекомендации, чтобы вы могли принять обоснованное решение и избежать возможных рисков.
Не упустите возможность воспользоваться нашими услугами и откройте для себя мир финансовых возможностей!
Заходите на наш сайт, ознакомьтесь
с каталогом продуктов и начните свой путь к финансовой стабильности прямо сейчас!
дебетовая карта с функцией мобильного банкинга
Клининг в Москве для занятых людей: Ваш дом сияет чистотой, пока вы отдыхаете или работаете
лучший клининг в москве http://www.kliningovye-kompanii-0.ru .
Клининг для больших семей: Специальные тарифы на еженедельную уборку домов и квартир
клининг москва http://klining-v-moskve0.ru/ .
Клининг Москва: Прозрачный договор и честные отзывы от клиентов
клининговые компании москвы рейтинг https://www.kliningovye-kompanii-1.ru .
Эффективный пылеотвод для болгарки на углу 45 градусов, узнайте.
Максимальная эффективность: пылеотвод для болгарки под 45 градусов, который должен быть у каждого мастера.
Пылеотвод для болгарки: советы по выбору и установке, для комфортной работы.
Пылеотвод для болгарки: чего ожидать от 45-градусной модели, если стремитесь к безопасности.
Как установить пылеотвод для болгарки с углом 45 градусов, позволит избежать лишнего мусора.
Сравнение пылеотводов для угловой шлифовки, на основе характеристик.
Как пылеотводы для болгарки под 45 градусов изменяют работу, что влияет на выбор.
Технологические новшества в пылеотводах для угловых шлифовок, на которые стоит обратить внимание.
Пылеотвод для болгарки под 45 градусов: отзывы пользователей, анализируйте перед покупкой.
Удобство и эффективность: пылеотвод для болгарки под 45 градусов, для лучшего результата.
Как пылеотвод для болгарки под 45 градусов улучшает качество работ, если хотите работать с комфортом.
На что обратить внимание при выборе пылеотвода для болгарки, чтобы получить лучший результат.
Настройка пылеотвода для болгарки с углом 45 градусов: советы, для уменьшения пыли.
Пылеотводы для болгарок под 45 градусов: стоит ли инвестировать?, и как это затрагивает ваш бизнес.
Подбор пылеотводов для болгарок с углом 45 градусов: краткий гид, чтобы выбрать лучшее предложение.
Различия между пылеотводами для болгарок разных углов, для защиты от пыли.
Как защитить себя при работе с болгаркой: роль пылеотводов, что важно помнить.
Работа с пылеотводами для болгарок: что нужно знать, чтобы избежать ошибок.
Советы по модернизации вашего пылеотвода для болгарки, для любителей.
пылеотвод для резки плитки под 45 http://ozon.ru/product/nasadka-pyleotvod-na-bolgarku-ushm-dlya-rezki-45-gradusov-1735664956/ .
Пропуск на МКАД для международных грузоперевозок: Помощь с переводом документов и таможенными нюансами
пропуск на мкад https://propusk-na-mkad-v-moskvu1.ru/ .
Оптимизируйте расходы на чистоту — цены на клининг для больших и малых помещений
цены на клининг https://stoimost-kliningovykh-uslug.ru/ .
Thanks for any other informative blog. Where else may just I get that type of information written in such a perfect approach? I’ve a undertaking that I’m simply now operating on, and I’ve been on the look out for such information.
Our drone light show service provides an unparalleled visual experience with mesmerizing aerial displays
drone shows https://1drone-show.com/ .
Лучшие марки питьевой воды, изучите, питьевую воду.
горные вершины вода заказать http://www.fountain-water.com/voda-gornaya-vershina-dostavka .
How to choose an online school in Illinois, studying online.
Best Online Schools in Illinois, get an education.
Illinois: Online Schools for Kids, what you need to know.
How to choose the ideal online school, in Illinois, paying attention to.
Advantages of learning in online schools in Illinois, affordable programs.
All about virtual classrooms in Illinois, distance learning.
Learning at an online school: pros and cons, in the age of technology.
Online Education: Online schools in Illinois, for future specialists.
How is learning going in online schools in Illinois?, variety of methods.
Review of online schools: pros and cons, for successful learning.
What parents think about online education in Illinois, important to know.
The best programs in online schools in Illinois, for different levels of study.
How to succeed in Online Education, for schoolchildren.
How online courses in Illinois work, goals and objectives.
Best Online Schools for High School Students, new opportunities.
Frequently Asked Questions about Online Schools in Illinois, for anyone interested.
Online Education Trends in Illinois, for a successful career.
Illinois: Online Adult Learning Opportunities, for career growth.
How Online Education in Illinois will Change, and the education system / in the light of new technologies.
Online Schools in Illinois http://neools-illin.com .
Descubre el poder transformador de un show de drones en cualquier celebracion
empresa de espectaculos de drones http://1show-de-drones.com/ .
Students in Nevada choose online learning, new opportunities in online education.
Best Online Schools in Nevada, learn.
Online Learning Programs in Nevada, best options.
Secrets to Successful Online Learning in Nevada, attention.
Online training in Nevada: what you need to know, explore.
Online Education: The Key to Success, learn.
What to look out for when choosing an online school in nevada, the main factors.
Distance Learning in Nevada: how to make the right choice, pros.
How to choose an online school in Nevada, recommend.
Online Learning: Opportunities for Nevada residents, get to know.
Postcards from Nevada’s Online schools, get.
Education in Nevada: online format, opportunities.
Nevada: Online Learning for Everyone, your choices / choices.
The Future of Education in Nevada: an online format, learn.
Nevada: New Approaches to Online Learning, innovation.
Education without Borders: Online Schools in Nevada, find out.
Online schools in Nevada: Learning from comfort, learn.
All about online education in Nevada, explore.
Nevada: Online Career Training, understand / career / changes.
How to choose an online school in Nevada for children, understand.
Online Schools in Nevada https://onlineschoolnv8.com .
Запчасти для автомобилей с авторазборки – выгодные условия покупки
авторазборка в москве https://www.avtorzborka3-moskva.ru/ .
**Добро пожаловать на наш сайт! Откройте лучшие финансовые решения
прямо сейчас!**
**Наши предложения**
Мы предлагаем широкий ассортимент финансовых продуктов:
автокредиты, ипотека и кредитные карты, чтобы помочь вам воплотить свои мечты в реальность.
**Автокредиты для комфортного
вождения**
Хотите приобрести новый автомобиль?
Наши автокредитные программы созданы для вас.
Оформите кредит на нашем сайте за несколько минут,
выбрав лучшие условия и сроки погашения.
**Преимущества наших кредитных карт**
Наши карты обеспечивают удобство безналичных платежей и множество
бонусов:
– **Кэшбэк на топливо и обслуживание
авто**
– **Специальные программы лояльности**
Оформите карту онлайн и получите все преимущества уже сегодня!
**Быстрые займы для непредвиденных расходов**
Нужны деньги до зарплаты или на неожиданные расходы?
Наши займы – это быстро и удобно.
Мы предлагаем прозрачные условия и
мгновенное одобрение заявок.
**Наши преимущества:**
– **Простота и Удобство:** Оформите заявку онлайн за считанные минуты.
– **Надежность и Прозрачность:** Честные условия без скрытых комиссий.
– **Индивидуальный Подход:** Мы учитываем ваши личные обстоятельства.
Не упустите шанс улучшить свою финансовую ситуацию!
Оформите автокредит, кредитную карту или займ на нашем сайте уже сегодня
и насладитесь всеми преимуществами сотрудничества с надежным финансовым партнером.
Переходите на наш сайт и сделайте шаг к своим мечтам!
Кобрендинговая кредитная карта в Владивостоке
Купить Супер Тадарайз в спб https://vk.com/super_tadarajz_kupit_v_spb с доставкой недорого
Контрактный двигатель по доступной цене – восстановите мощность автомобиля
двигатель купить https://kontraktnye-dvigateli3-moskva.ru/ .
Продажа бу запчастей с фото и подробным описанием – заказывайте онлайн
запчасти для иномарок бу https://zapchasti-bu3-moskva.ru .
Купить Видалисту в Санкт-Петербурге https://vk.com/vidalista_kupit_v_spb с доставкой
в день заказа
Купить Супер Вилитру в спб https://vk.com/super_vilitra_kupit_v_spb недорого
с доставкой курьером в день заказа
https://adamex-online.ru
https://akril-servis.ru/
Дженерики для повышения потенции на сайте https://aptekaviagry.ru
высокое качество по доступной цене с доставкой
Оформите займ онлайн на карту без ожидания и сложных документов
займ онлайн http://www.vsemiikrozajmy.kz/ .
Микрокредиты с мгновенным зачислением на карту без сложных анкет
микрокредиты http://mikrokredityvsem.kz .
Надежные микрокредиты без рисков – прозрачные условия
микрокредит онлайн микрокредит онлайн .
Легкие займы онлайн без справок и поручителей – просто получите деньги
онлайн займ https://news365.kz/ .
Забудьте о грязи Клининг в Москве с выездом на дом — удобный график и индивидуальный подход к каждому клиенту
топ клининговых компаний москвы http://kliningovye-kompanii-0.ru/ .
Клининг с заботой о вашем бюджете: Чистота без переплат и скрытых комиссий
клининг мск http://klining-v-moskve0.ru/ .
Купить дженерики недорого с доставкой https://apteka-x.ru/ высокое качество
по выгодным ценам гарантия от производителя
https://arenda-t.ru
Пропуск на МКАД с гибким графиком: Выбирайте дни и часы въезда для вашего транспорта
пропуск на мкад для грузовых машин https://www.propusk-na-mkad-v-moskvu1.ru/ .
Прозрачные цены и профессиональный подход — ваш идеальный клининг начинается здесь
клининг цены http://www.stoimost-kliningovykh-uslug.ru/ .
Клининг для арендодателей в Москве: Подготовим квартиру к сдаче за 1 день
топ 10 клининговых компаний москвы https://kliningovye-kompanii-1.ru .
https://bal-ufa.ru/
Online Learning in Mississippi, anywhere.
Meet.
Tips for choosing.
in Mississippi / in the context of Mississippi.
Analysis.
Top 10 Online Schools.
in online Schools.
in Mississippi.
How to organize.
Potential.
for students.
in the state / among students.
for your children.
Digital Tools.
Data on distance learning.
Real Examples.
for distance learning.
in Online Schools.
for school children.
Online Schools in Mississippi http://www.onlineschoolms6.com/ .
Большой выбор дженериков в магазине https://best-viagra.ru с доставкой
по городу и области
Pinco Casino-da real oyunçuların rəyləri və təcrübələri – siz də sınayın!
pinco kazino pincocasinogiris-az.com .
Free online stamp maker – generate professional-quality rubber stamps effortlessly
stamp making online https://make1-stamp-online.com .
Free online stamp creator – perfect for company seals and official documents
stamp maker online free stamps1-creator.com .
Продажа качественных дженериков на сайте https://buytablets.ru/ с бесплатной
доставкой в день покупки
OVI statutes around Ohio might be intricate, just it’s important to maintain a good knowledge of these if one find prices. Operating under on influence of alcohol (DUI) happens to be a serious misdemeanor which is can have actually substantial consequences on your future. In Ohio, on lawful limit for blood ethanol content (BAC) is 8 percentfor some drivers and/or 0.04% commercial people.
If you might be pulled by legal administration and accused of driving while intoxicated, they could carry out roadside sobriety reports or chemical tests, these types of when breathalyzer or blood exams, to determine ones degree of handicap. Refusing they tests can result in mechanical sanctions, including driving license suspension.
driving while intoxicated crimes in Ohio bring various consequences, depending on variables fancy previous prosecutions, BAC range, plus no matter if online is an car accident or injuries used. Repercussions might comprise penalties, license temporary removal, mandatary alcohol in the mouthwash process programs, trial period, and just jail time. Do it again criminal acts and exacerbated situations can result in more severe penalties.
Using a experienced DUI safeguard attorney is essential to navigate the intricacies of Ohio ovi laws. They can possibly examine the indicators, really challenge the lawfulness of the halt, challenge the dependability of tests, and uncover interested barriers to help mitigate the payments. You’ll also, an attorneys can tips you throughout the lawful process, guaranteeing their proper rights are insulated and proposing for the right a possibility direct result.
Remember, being updated pertaining to Ohio’s DUI regulations and attempting the assistance of an adept legal are fundamental actions in correctly managing a DUI bill and guarding our upcoming. DUI homicide counselor
Широкий выбор дженериков на сайте https://cialis24.ru с доставкой курьером
в день заказа отправка в регионы России
Магазин дженериков https://cialisbrand.ru/ большой выбор низкие
цены быстрая доставка по городу отправка в регионы почтой России
Online schools in New Jersey: the best options, with the advantages.
Advantages of online education in New Jersey, challenges.
Compare online schools in New Jersey: what is important to know?, best tips.
New Jersey Educational Resources: online programs, check out.
Online schools in New Jersey: How do I choose the right one?, learn.
How to choose the best online school in New Jersey?, get.
Virtual training in New Jersey: how does it work?, analyze.
New Jersey and online schools: what to choose?, discuss.
Practical tips for choosing online schools in New Jersey, our recommendations.
Online schools in New Jersey: how not to make a mistake in choosing, important details.
Path to success: online education in New Jersey, understand / key aspects.
How to choose an online school in New Jersey for your child?, refresh.
Virtual learning in New Jersey: Pros and cons, next steps.
How to choose an online school for your child in New Jersey?, variety.
Education of the Future: Online schools in New Jersey, in the context of changes.
Success of online education in New Jersey: what do you need to know?, everything that is important.
How to effectively choose an online school in New Jersey?, understand.
How to find the perfect online school in New Jersey?, find out.
Where to apply? Online schools in New Jersey, explore.
Online Schools in New Jersey https://www.onlineschoolnj3.com .
Магазин дженериков по адресу https://cialis-deshevo.ru предлагает
широкий выбор препаратов для повышения потенции с доставкой
Customized drone light show experiences to elevate your brand and captivate your audience
drone lightshow https://www.1drone-show.com/ .
Доставка бу запчастей по всей стране – экономьте время и деньги на ремонте
бу запчасти москва https://www.zapchasti-bu3-moskva.ru/ .
Creatividad y precision en cada coreografia de nuestro espectaculo de drones
show de luces con drones https://1show-de-drones.com .
Контрактный двигатель без пробега по России – гарантия надежности
контрактные двигатели купить https://kontraktnye-dvigateli3-moskva.ru .
супрастин таблетки инструкция по применению взрослым от чего помогает отзывы противопоказания https://xn--80aaihcqsam1bfkn2p.xn--p1ai .
Магазин дженериков https://cialismoscow.ru высокое качество по доступной цене
производство Индии в наличии
Авторазборка – ваш надёжный поставщик оригинальных запчастей
авторазборка https://avtorzborka3-moskva.ru/ .
https://cvetocheg.ru
https://divanov-remont.ru/
https://doctorbest.ru/
The best way to create a rubber stamp online for free – instant access
free online stamp maker http://stamps1-creator.com/ .
Looking for a free rubber stamp maker online? Design your perfect stamp in minutes
stamp maker online free https://www.make1-stamp-online.com/ .
Online Learning in Maryland, make education accessible.
Top-level online tuition in Maryland, learn about benefits.
Quality Online education in Maryland, incorporating innovative techniques.
Choosing an Online School in Maryland, to ensure successful learning.
Review of popular online schools in Maryland, with information about courses.
We understand online learning in Maryland, what is important to consider.
Guide to online education in Maryland, for parents.
How do I compare online schools in Maryland?, analyze and choose.
Why are online schools so popular in Maryland?, find out all the advantages.
Student Reviews of Online Schools in Maryland, how to make the right choice.
A selection of the best courses in Maryland’s online schools, for your child.
Student experience in Maryland’s online schools, how to prepare.
Tuition rates for Online schools in Maryland, for budget planning.
Review of online school programs in Maryland, for different age groups.
Maryland Online Schools: what’s new?, stay tuned.
How to succeed in Online Education, tips from experts.
What hinders successful learning in Maryland’s online schools?, how to overcome them.
Maryland Online Schools: The Complete Guide, for parents and students.
What’s in store for online education in Maryland?, what will be important in the future.
Traditional Education vs Online: What should I choose?, for achieving your goals.
Online Schools in Maryland https://www.nehools-mary.com .
Great post!
You have an incredible knack for making thought-provoking ideas feel approachable. I’d love to see you delve into how these topics intersect with cultural shifts or advancements in biotech. The bigger-picture applications would make for a truly captivating discussion. Thanks for always providing such meaningful perspectives—eagerly awaiting your next piece!
Site – https://gpt4geeks.com
Самый надежный способ купить подписку на Spotify премиум
spotify подписка купить https://www.podpiska-spotify-1.ru .
Производство светодиодных светильников для освещения торговых центров и магазинов
прожектор светодиодный для уличного освещения https://proizvodstvo-svetodiodnih-svetilnikov.ru .
m3ga маркет – это digital service, где анонимность и приватность интегрированы в foundation вашего опыта. Название “Mega Darknet” связано с variety of opportunities и mysteries. Это not just a website; это portal в неизведанный интернет, где standard rules lose meaning.
mega darknet market официальный
Кракен Darknet – это innovative platform, где анонимность и confidentiality превращаются foundation online life. Название “Kraken” associated с разнообразием ресурсов и технологическими прорывами. Эта network обеспечивает доступ к миру скрытых ресурсов, где rules традиционных сетей теряют свою силу.
Kraken ссылка
Большой выбор камер заднего вида с установкой и настройкой
камера заднего вида цена https://camera-zadnego-vida.ru .
Оформи подписку на Spotify и слушай музыку в высоком качестве
spotify купить подписку http://www.podpiska-spotify-1.ru/ .
заказать девушку
Высокие стандарты обслуживания являются основой работы эскорт-агентств. Индивидуалки проходят тщательный отбор, учитывающий их внешний вид, манеры и интеллектуальные качества. Благодаря этому каждая из них способна стать не только украшением любого мероприятия, но и интересной собеседницей. Заказ таких услуг гарантирует конфиденциальность и безопасность, что делает процесс максимально комфортным для клиентов.
Source:
– https://go.leopard-escort.online/modeli/elitnyi-eskort/
Разработка ППР для автодорожного строительства с учетом всех требований
проект производства работ цена https://razrabotka-ppr77.ru .
Долгосрочный пропуск в центр Москвы для Газели без лишних затрат
нужен ли пропуск на газель в москву propusk-v-centr-dlya-gazeli.ru .
элитный досуг в москве
Эскорт услуги в столице также отличаются своей универсальностью. Клиенты могут выбрать формат, который лучше всего соответствует их ожиданиям. Это может быть заказ девушки на час для непринуждённой беседы, длительное сопровождение в роли содержанки или выбор модели для подчёркивания статуса на важных мероприятиях. Каждая из этих опций адаптирована под индивидуальные потребности заказчика.
Source:
элитный досуг в москве
Receive SMS online for free with instant activation and no hidden fees
free phone number [url=https://www.rskswap.com]https://www.rskswap.com[/url] .
Very interesting topic, thanks for putting up.
Unisteam com – производство современной спецтехники в Москве с гарантией
завод по производству спецтехники юнистим unisteam com
https://akril-servis.ru/
I just like the helpful information you supply for
your articles. I’ll bookmark your blog and test again right here
frequently. I am reasonably sure I’ll be informed plenty
of new stuff right here! Good luck for the following!
Кракен Darknet – это breakthrough in digital security, где скрытность и confidentiality become foundation онлайн-жизни. Название “Kraken” ассоциируется с variety of resources и technological breakthroughs. Эта network предлагает доступ к миру цифровой свободы, где rules traditional networks теряют свою силу.
онион ссылка кракен
Услуги наркологической клиники – детоксикация, кодирование, реабилитация
наркологическая больница спб http://platnaya-narkologicheskaya-klinika-01.ru/ .
Полный спектр сантехнических услуг в СПб – стоимость и сроки выполнения
прайс лист сантехника http://www.remont-santehniki-price.ru/ .
Вызов сантехника на дом в СПб – доступные расценки на услуги
прайс на сантехнические работы в спб http://24-santehniki-price.ru/ .
Почему стоит выбрать циклонный фильтр для строительного пылесоса?, откройте для себя.
Как циклонный фильтр улучшает работу строительного пылесоса?, изучите.
Выбор циклонного фильтра: на что обратить внимание?, нашими рекомендациями.
Циклонный фильтр: как это работает?, познакомим.
Как установить циклонный фильтр?, для домашних мастеров.
Основные преимущества циклонного фильтра, подробнее.
Улучшение уборки с помощью циклонного фильтра, научными фактами.
Циклонные фильтры: советы по выбору, всё о рынке циклонов.
Уход за циклонным фильтром: советы, разберём.
Циклонный фильтр: необходимость или излишество?, отзывах пользователей.
Как выбрать фильтр для строительного пылесоса?, узнайте.
Использование циклонного фильтра: что ожидать?, основные функции.
Циклонный фильтр: ваш первый шаг к чистоте, разберитесь.
На что обратить внимание при выборе циклонного фильтра?, рассматриваем.
Циклонный фильтр как часть системы пылесоса, изучите.
Преимущества циклонного фильтра для вашего пылесоса, рассматриваем.
Циклонные фильтры: плата за качество?, все аспекты.
Как циклонные фильтры меняют уборку?, изучаем.
Как выбрать качественный циклонный фильтр?, посмотрите.
циклонный фильтр предварительной очистки воздуха http://wildberries.ru/catalog/353414029/detail.aspx/ .
джили монжаро цена geely-v-spb1.ru/models/monjaro .
1win 1win .
Качественные услуги сантехника в СПб – прайс на все работы
сколько стоит вызов сантехника на дом https://www.santeh1-montazh-price.ru .
1win login nigeria https://1win12.com.ng .
раскрутка сайтов в москве раскрутка сайтов в москве .
раскрутка сайта москва раскрутка сайта москва .
1 win регистрация http://1win6020.ru .
Экран для проекторов с улучшенной цветопередачей – идеальный выбор для фильмов и презентаций
экран проекционный с электроприводом купить https://www.proekcionnye-ehkrany0.ru/proekcionnye-ekrany/ekran-dlya-proektora-s-elektroprivodom .
1win кейсы https://1win6020.ru/ .
how to bet on 1win https://1win12.com.ng/ .
1win website https://1win12.com.ng .
Top New York City Online Schools for Your Learning Experience, of distance learning.
Guide to Online Schools in New York City, from experts.
New York City Online schools: Reviews and ratings, rate.
Get an online education in New York City, your path.
New developments in online education in New York, development.
Best practices for choosing an online school in New York, for parents.
Distance learning in New York: key aspects, for everyone.
Affordable and high-quality online learning, invest in your education.
Innovations in Online Education in New York, innovations.
Top online schools in New York by price and quality, choose favorable offers.
How do I organize the learning process in an online school?, on courses.
What do New York City’s online schools offer?, understand.
High-quality education in New York, how to make the right choice.
How do I protect my data in online education?, learn how to.
Successful stories of graduates of online schools in New York, motivated.
How has the pandemic affected online education in New York?, master.
How to be a successful online student?, use.
Online Schools in New York https://neoo-ork.com .
продвижение сайтов москва продвижение сайтов москва .
мостбет https://mostbet6006.ru/ .
партнёрка 1win https://1win6020.ru .
зайти в 1вин https://familyclub.borda.ru/?1-6-0-00002163-000-0-0-1743051813 .
шиномантаж клин шиномантаж клин .
продвижение сайта москва https://seogift.ru/news/press-release/2463-geymifikaciya-v-prodvizhenii-internet-magazinov-kak-vovlekat-klientov-s-pervogo-kasaniya/ .
партнёрка 1win https://1win6001.ru .
шиномонтаж ивантеевка hondahybrid.ru/forum/topic/2886-kakie-uslugi-okazyvaet-shinomontazh/ .
1вин приложение https://1win6020.ru .
раскрутка сайтов в москве раскрутка сайтов в москве .
продвижение сайта цена продвижение сайта цена .
1win ставки официальный сайт 1win6001.ru .
1win партнёрка https://familyclub.borda.ru/?1-6-0-00002163-000-0-0-1743051813/ .
мосбет https://www.mostbet6006.ru .
1 вин вход http://www.familyclub.borda.ru/?1-6-0-00002163-000-0-0-1743051813 .
1 win вход familyclub.borda.ru/?1-6-0-00002163-000-0-0-1743051813 .
mostbet kg скачать на андроид [url=http://mostbet6006.ru/]mostbet kg скачать на андроид[/url] .
шиномонтаж солнечногорск http://www.hondahybrid.ru/forum/topic/2886-kakie-uslugi-okazyvaet-shinomontazh// .
mostbet игры https://mostbet6006.ru/ .
1win. pro http://www.1win6001.ru .
раскрутка сайтов в москве раскрутка сайтов в москве .
шиномантаж щелково шиномантаж щелково .
1 вин официальный сайт http://1win6001.ru/ .
продвижение сайта москва seogift.ru/news/press-release/2463-geymifikaciya-v-prodvizhenii-internet-magazinov-kak-vovlekat-klientov-s-pervogo-kasaniya/ .
Дженерики на сайте https://cialis-hit.ru/ с доставкой по городу курьером
в день заказа отличное качество по низкой цене
1вин rossvya 1win6002.ru .
дренажные работы на участке стоимость ленинградская область дренажные работы на участке стоимость ленинградская область .
выравнивание участка дренаж выравнивание участка дренаж .
мостбет скачать https://mostbet6007.ru .
дренаж водосточной системы дренаж водосточной системы .
Кодирование и реабилитация в современной наркологической клинике
клиника алкоголизма клиника алкоголизма .
Грамотный подбор и установка сантехники в СПб – прозрачные расценки
прайс на работы сантехника http://www.24-santehniki-price.ru/ .
Профессиональная установка сантехники в СПб – лучшие цены и качество
сантехник стоимость услуг https://remont-santehniki-price.ru .
дренажные системы компании http://www.drenazh-uchastka-rostov.ru .
1win букмекер http://1win6002.ru/ .
Минимизируйте риски с качественной технологической картой на погрузочно-разгрузочные работы
технологическая карта на погрузочно разгрузочные работы назначение и содержание технологическая карта на погрузочно разгрузочные работы назначение и содержание .
mostbet chrono https://www.mostbet6007.ru .
Стильная и долговечная мебель для кафе – широкий ассортимент по доступным ценам
мебель для общепита mebel-dlya-kafe.ru .
мониторинг транспорта эра мониторинг транспорта эра .
что делать с бонусным балансом на 1win https://balashiha.myqip.ru/?1-12-0-00000437-000-0-0-1743258848 .
1win. https://1win6049.ru .
мониторинг навигация транспорта мониторинг навигация транспорта .
1 вин вход http://www.alfatraders.borda.ru/?1-0-0-00004932-000-0-0-1743258210 .
Где приобрести диплом по актуальной специальности?
Мы предлагаем дипломы любой профессии по приятным ценам. Мы предлагаем документы ВУЗов, расположенных на территории всей России. Можно приобрести диплом за любой год, указав необходимую специальность и хорошие оценки за все дисциплины. Документы выпускаются на бумаге высшего качества. Это позволяет делать настоящие дипломы, которые не отличить от оригинала. Документы будут заверены всеми необходимыми печатями и подписями. Всегда стараемся поддерживать для заказчиков адекватную ценовую политику. Важно, чтобы документы были доступными для подавляющей массы наших граждан. okdiplom.com/kupit-svidetelstvo-o-zaklyuchenii-braka-6
Мы предлагаем дипломы психологов, юристов, экономистов и других профессий по приятным тарифам. Цена может зависеть от конкретной специальности, года получения и ВУЗа. Всегда стараемся поддерживать для заказчиков адекватную ценовую политику. Важно, чтобы дипломы были доступными для большого количества граждан. диплом купить технический
Где заказать диплом по необходимой специальности?
Приобрести диплом ВУЗа по невысокой стоимости возможно, обращаясь к надежной специализированной фирме.: magazin-diplomov.ru
Мы изготавливаем дипломы любой профессии по невысоким тарифам. Дипломы изготавливаются на оригинальных бланках государственного образца Приобрести диплом об образовании diplomist.com
купить диплом медицинского вуза купить диплом медицинского вуза .
Заказать документ ВУЗа вы можете у нас. Мы предлагаем документы об окончании любых университетов России. Вы получите необходимый диплом по любой специальности, любого года выпуска, включая документы старого образца. Гарантируем, что в случае проверки документов работодателями, подозрений не появится. portal.woellmarine.com/thread-147589.html
диплом лаборанта купить
Где приобрести диплом специалиста?
Наши специалисты предлагают быстро и выгодно приобрести диплом, который выполнен на бланке ГОЗНАКа и заверен мокрыми печатями, штампами, подписями официальных лиц. Наш документ способен пройти лубую проверку, даже при использовании специальных приборов. Решите свои задачи быстро и просто с нашей компанией. Купить диплом любого ВУЗа! deanonnic.listbb.ru/viewtopic.php?f=5&t=1462
Приобрести документ о получении высшего образования можно в нашей компании в Москве. http://www.billing.blueangelhost.com/submitticket.php?step=2&deptid=15
Заказать диплом института!
Мы можем предложить дипломы любых профессий по приятным тарифам— diplomist.com/kupit-diplom-s-vneseniem-v-bazu-2/
Мы изготавливаем дипломы любой профессии по доступным тарифам.– diplomservis.ru/kupite-diplom-instituta-s-reestrom-legko-i-bistro/
Всех приветствую!
Для некоторых людей, приобрести диплом ВУЗа – это острая необходимость, возможность получить достойную работу. Но для кого-то – это понятное желание не терять время на учебу в ВУЗе. Что бы ни толкнуло вас на такой шаг, мы готовы помочь вам. Оперативно, качественно и недорого сделаем диплом нового или старого образца на подлинных бланках со всеми печатями.
Основная причина, почему многие люди покупают диплом, – желание занять хорошую должность. К примеру, знания и опыт позволяют кандидату устроиться на желаемую работу, но подтверждения квалификации не имеется. В случае если для работодателя важно наличие “корочек”, риск потерять вакантное место довольно высокий.
Приобрести документ института можно в нашей компании. Мы оказываем услуги по производству и продаже документов об окончании любых ВУЗов Российской Федерации. Вы сможете получить необходимый диплом по любой специальности, включая документы СССР. Гарантируем, что в случае проверки документа работодателем, никаких подозрений не появится.
Ситуаций, которые вынуждают приобрести диплом ВУЗа много. Кому-то срочно необходима работа, а значит, нужно произвести впечатление на руководителя на протяжении собеседования. Некоторые желают попасть в престижную компанию, чтобы повысить свой статус и в дальнейшем начать свое дело. Чтобы не тратить драгоценное время, а сразу начать эффективную карьеру, используя имеющиеся знания, можно заказать диплом в онлайне. Вы станете полезным для социума, получите денежную стабильность в кратчайший срок- аттестат за 9 класс купить
Мы можем предложить дипломы любой профессии по доступным тарифам. Преимущества приобретения документов у нас
Вы приобретаете диплом в надежной и проверенной компании. Такое решение позволит сэкономить не только средства, но и ваше драгоценное время.
Плюсов гораздо больше:
• Дипломы делаем на настоящих бланках со всеми отметками;
• Дипломы всех ВУЗов России;
• Цена намного ниже нежели довелось бы платить на очном обучении в университете;
• Доставка в любые регионы Российской Федерации.
Купить диплом академии– http://zeorest.com/read-blog/47_kupit-diplom-s-vneseniem-v-reestr.html/ – zeorest.com/read-blog/47_kupit-diplom-s-vneseniem-v-reestr.html
Приобрести диплом любого ВУЗа!
Мы предлагаем документы учебных заведений, которые находятся на территории всей России. Документы выпускаются на бумаге самого высокого качества: pentan.ru/articles/pgs/kupit_diplom_magistra_bustro_i_nadezghno_2.html
Привет!
Приобрести диплом ВУЗа по выгодной цене возможно, обращаясь к проверенной специализированной фирме. Купить диплом о высшем образовании: diplom-top.ru/kupit-diplom-kolledzha-12/
Где приобрести диплом специалиста?
Полученный диплом с приложением отвечает условиям и стандартам, никто не сможет отличить его от оригинала – даже со специально предназначенным оборудованием. Не следует откладывать собственные цели на потом, реализуйте их с нами – отправьте заявку на изготовление документа сегодня! Купить диплом о среднем специальном образовании – не проблема! diplomservis.ru/kupit-attestat-texnikuma-2/
Приобретение подходящего диплома через проверенную и надежную компанию дарит ряд достоинств. Это решение позволяет сберечь время и значительные средства. Однако, плюсов намного больше.Мы предлагаем дипломы психологов, юристов, экономистов и других профессий. Дипломы производят на оригинальных бланках. Доступная цена сравнительно с серьезными издержками на обучение и проживание в чужом городе. Покупка диплома о высшем образовании из российского института будет разумным шагом.
Купить диплом о высшем образовании: diplomt-v-samare.ru/diplom-kupit-s-vneseniem-v-reestr-bistro-i-nadezhno/
Всегда думал что купить диплом о высшем образовании это миф и нереально, но все оказалось не так, изначально искал информацию про: купить диплом вуза гознак, купить диплом медучилища, купить аттестат за 8 классов, сколько стоит купить аттестат 11 класса, купить диплом программиста, потом про дипломы вузов, подробнее здесь kyc-diplom.com/geography/bryansk.html
Где купить диплом по необходимой специальности?
Мы оказываем услуги по продаже документов об окончании любых ВУЗов РФ. Документы производятся на настоящих бланках. provocation.flybb.ru/viewtopic.php?f=4&t=607
Заказать диплом института !
Покупка диплома любого ВУЗа РФ у нас является надежным процессом, ведь документ заносится в государственный реестр. Печать производится на официальных бланках ГОЗНАКа. Приобрести диплом университета arenadiplom24.online/ptu-moskvy/moskovskoe-professionalnoe-uchilishche-142
Здравствуйте!
Мы изготавливаем дипломы любой профессии по приятным тарифам. Цена может зависеть от конкретной специальности, года получения и ВУЗа: diplomans.com/
Приобрести диплом института по невысокой стоимости возможно, обратившись к проверенной специализированной фирме. Мы предлагаем документы об окончании любых ВУЗов России. Купить диплом любого университета– diploma-groups24.ru/kupit-attestat-shkoly/za-11-klass/s-2014-goda.html
Для удачного продвижения вверх по карьерной лестнице потребуется наличие официального диплома о высшем образовании. Быстро приобрести диплом любого института у проверенной организации: kupitediplom0027.ru/kupit-diplom-po-dostupnim-tsenam-v-omske/
Приобрести диплом института!
Мы изготавливаем дипломы психологов, юристов, экономистов и любых других профессий по невысоким ценам. Вы приобретаете документ в надежной и проверенной временем компании. : skoolyard.biz//create-blog
Диплом ВУЗа РФ!
Без получения диплома очень трудно было продвигаться по карьере. По этой причине решение о заказе диплома стоит считать выгодным и целесообразным. Быстро купить диплом университета homecare.bz/employer/gosznac-diplom-24
Приобрести диплом любого ВУЗа мы поможем. Купить диплом бакалавра в Липецке – diplomybox.com/kupit-diplom-bakalavra-v-lipetske
Мы изготавливаем дипломы психологов, юристов, экономистов и любых других профессий по доступным тарифам. Купить диплом в Астрахани и Астраханской области — kyc-diplom.com/geography/astrakhan.html
Приобрести диплом о высшем образовании!
Мы можем предложить документы ВУЗов, которые расположены в любом регионе России.
diplomist.com/gde-kupit-attestat-9-klassa-2
Где купить диплом специалиста?
Мы изготавливаем дипломы любой профессии по разумным ценам. Мы можем предложить документы ВУЗов, которые находятся на территории всей Российской Федерации. Вы можете заказать качественно сделанный диплом за любой год, указав актуальную специальность и хорошие оценки за все дисциплины. Дипломы и аттестаты печатаются на “правильной” бумаге высшего качества. Это позволяет делать государственные дипломы, которые невозможно отличить от оригиналов. Они заверяются необходимыми печатями и штампами. Стараемся поддерживать для покупателей адекватную ценовую политику. Для нас важно, чтобы документы были доступными для большинства граждан. 10000diplomov.ru/kupit-svidetelstvo-o-rozhdenii-2-5
Заказать документ университета вы имеете возможность в нашем сервисе. diplom-ryssia.com/kupit-diplom-ufa-4-2
1вин официальный сайт мобильная 1вин официальный сайт мобильная .
Где приобрести диплом специалиста?
Наша компания предлагает быстро и выгодно купить диплом, который выполняется на оригинальном бланке и заверен мокрыми печатями, водяными знаками, подписями должностных лиц. Документ способен пройти любые проверки, даже с применением специального оборудования. Решите свои задачи быстро с нашей компанией.
Заказать диплом ВУЗа kupitediplom.ru/kupit-diplom-v-xabarovske-11/
современные дренажные системы официальный сайт http://www.drenazh-uchastka-rostov.ru .
дренаж участка ленинградская область цена дренаж участка ленинградская область цена .
Где купить диплом специалиста?
Наша компания предлагает быстро приобрести диплом, который выполняется на оригинальном бланке и заверен мокрыми печатями, водяными знаками, подписями должностных лиц. Данный документ пройдет любые проверки, даже с использованием специального оборудования. Достигайте свои цели максимально быстро с нашими дипломами. Купить диплом о высшем образовании! justvoip.listbb.ru/viewtopic.php?f=2&t=1818
Быстро и просто приобрести диплом института!
Мы предлагаем дипломы любых профессий по разумным ценам— diplom-onlinex.com/diplom-vracha-lechebnoe-delo-kupit-2/
1win.kg https://1win6049.ru .
Рейтинг лучших компаний по ремонту квартир – проверенные исполнители
рейтинг компаний по ремонту квартир московской области http://www.remont-kvartir-reiting.ru/ .
1win rossvya http://www.1win6002.ru .
мостбет казино https://www.mostbet6007.ru .
What i don’t realize is in reality how you are no longer really much more smartly-appreciated than you may be now. You’re so intelligent. You recognize therefore significantly in terms of this topic, made me in my view consider it from so many various angles. Its like men and women aren’t involved until it’s one thing to do with Woman gaga! Your personal stuffs nice. At all times maintain it up!
1 win 1 win .
бк 1win http://balashiha.myqip.ru/?1-12-0-00000437-000-0-0-1743258848 .
дренажные работы дренажные работы .
дренажные работы спб дренажные работы спб .
глонасс мониторинг транспорта москва глонасс мониторинг транспорта москва .
купить диплом пгс купить диплом пгс .
Где приобрести диплом специалиста?
Купить диплом университета по выгодной цене возможно, обращаясь к проверенной специализированной компании.: diplom-kuplu.ru
Мы изготавливаем дипломы любой профессии по приятным ценам. Дипломы изготавливаются на фирменных бланках государственного образца Купить диплом института diplomj-irkutsk.ru
Приобрести документ университета вы сможете в нашей компании. Мы предлагаем документы об окончании любых университетов Российской Федерации. Вы получите диплом по любым специальностям, любого года выпуска, включая документы образца СССР. Даем гарантию, что в случае проверки документов работодателем, каких-либо подозрений не возникнет. vetreriameliante.it/index.php/kforum/jm-slideshow-module/11265-img#11265
ван вин ван вин .
мостбет зеркало mostbet6007.ru .
контроль движения транспорта контроль движения транспорта .
Купить диплом о высшем образовании !
Покупка диплома университета РФ у нас является надежным процессом, потому что документ будет заноситься в реестр. При этом печать выполняется на фирменных бланках, установленных государством. Купить диплом о высшем образовании arenadiplom24.online/vuzy/ntf-uieuip
Задался вопросом: можно ли на самом деле купить диплом государственного образца в Москве? Был приятно удивлен — это реально и легально!
Сначала искал информацию в интернете на тему: купить дипломы москва, купить средне специальное образование, купить диплом старого образца в тюмени, купить диплом мфюа, диплома нет и получил базовые знания. В итоге остановился на материале: diplomybox.com/kupit-diplom-magistra-v-sochi
OVI regulations as part of Ohio can be complex, nonetheless it’s essential to posses a great comprehension of any of them if us find allegations. Driving below their influence of alcohol (DUI) is actually a serious criminal offenses this can have actually significant consequences on your very own life. In Ohio, ones legal threshold for blood flow ethanol content (BAC) is 8 percentfor nearly all motorists plus four per cent business truckers.
If you may be pulled over by legal administration and alleged of DUI, they might carryout field soberness tests or chemical tests, that while breathalyzer or body examinations, to determine their degree of disability. Refusing they tests can cause mechanical sanctions, including driving license suspension.
ovi offensive activity in Ohio bear various penalties, corresponding to on factors similar to prior convictions, BAC level, and/or irrespective of whether there was basically an accident or injuries concerned. Implications might feature fees, license temporary removal, imperative alcoholic beverages cures training, trial period, and regular prison time. Returning offensive activity and aggravated conditions can result in more terrible penalties.
Creating a knowledgeable DUI a good defense attorney is vital to navigate the intricacies of Ohio drunk driving regulations. They can review the evidence, dispute the lawfulness of the cure, inquire the precision of checks, and check out potential defense to help alleviate the premiums. In addition, an legal practitioner can help you via the judiciary process, confirming ones proper rights are screened and advocating for the recommended plausible final result.
Remember, being notified regarding Ohio’s DUI statutes and finding the assistance of an full-fledged lawyer or attorney are required actions in properly holding a DUI price as well as defending ones forthcoming. credit card fraud lawyer
Мы изготавливаем дипломы любой профессии по приятным ценам.– diplomv-v-ruki.ru/kupit-diplom-s-reestrom-otzivi-bistro-i-bezopasno-4/
1вин бет официальный сайт http://1win6049.ru .
Заказать диплом любого университета!
Мы можем предложить документы институтов, которые расположены в любом регионе Российской Федерации. Документы печатаются на “правильной” бумаге самого высокого качества: ruminus.ru/incs/pgs/kupit_attestat_51.html
Приобрести диплом о высшем образовании!
Мы готовы предложить документы институтов, которые находятся в любом регионе Российской Федерации.
diplom-zentr.com/kupit-diplom-s-reestrom-26/
Мы готовы предложить дипломы любых профессий по приятным ценам. Основные преимущества заказа документов у нас
Вы приобретаете диплом в надежной и проверенной временем компании. Это решение сэкономит не только массу денег, но и время.
Преимуществ гораздо больше:
• Дипломы печатаются на оригинальных бланках со всеми печатями;
• Предлагаем дипломы любого ВУЗа России;
• Цена намного ниже той, которую потребовалось бы заплатить на очном и заочном обучении в университете;
• Удобная доставка как по Москве, так и в любые другие регионы России.
Приобрести диплом академии– http://pastvu-forum.flybb.ru/viewtopic.php?f=8&t=603/ – pastvu-forum.flybb.ru/viewtopic.php?f=8&t=603
Где приобрести диплом по нужной специальности?
Мы оказываем услуги по производству и продаже документов об окончании любых университетов РФ. Документы производят на подлинных бланках. Рєniceroleplay.getbb.ru/viewtopic.phpf=1&t=4241
Заказ официального диплома через качественную и надежную компанию дарит ряд достоинств для покупателя. Данное решение помогает сберечь как дорогое время, так и значительные деньги. Однако, только на этом выгоды не ограничиваются, плюсов значительно больше.Мы изготавливаем дипломы любых профессий. Дипломы производятся на фирменных бланках государственного образца. Доступная цена по сравнению с крупными тратами на обучение и проживание. Заказ диплома института станет рациональным шагом.
Заказать диплом о высшем образовании: vacshidiplom.com/bistro-kupit-diplom-s-zaneseniem-bez-xlopot/
1win официальный сайт скачать balashiha.myqip.ru/?1-12-0-00000437-000-0-0-1743258848 .
Здравствуйте!
Без университета трудно было продвинуться вверх по карьерной лестнице. Сегодня же документ не дает никаких гарантий, что удастся получить привлекательную работу. Куда более важное значение имеют практические навыки специалиста, а также его постоянный опыт. Именно из-за этого решение о заказе диплома следует считать мудрым и целесообразным. Заказать диплом об образовании flowsocial.xyz/read-blog/3960_attestat-za-9-klass-cena.html
Привет!
Мы предлагаем дипломы любой профессии по разумным ценам. Стоимость будет зависеть от выбранной специальности, года выпуска и ВУЗа: diplomanc.com/
Для успешного продвижения по карьерной лестнице потребуется наличие диплома университета. Быстро и просто приобрести диплом о высшем образовании у проверенной организации: diploml-174.ru/diplom-kupit-v-ekaterinburge-3/
Привет!
Для некоторых людей, приобрести диплом о высшем образовании – это острая потребность, шанс получить достойную работу. Но для кого-то – это банальное желание не терять время на учебу в ВУЗе. Что бы ни толкнуло вас на это решение, наша фирма готова помочь. Быстро, качественно и недорого сделаем диплом любого года выпуска на настоящих бланках с реальными подписями и печатями.
Ключевая причина, почему многие покупают документ, – получить хорошую работу. К примеру, знания дают возможность человеку устроиться на работу, а подтверждения квалификации нет. В том случае если работодателю важно присутствие “корочки”, риск потерять место работы очень высокий.
Приобрести документ о получении высшего образования можно в нашем сервисе. Мы оказываем услуги по продаже документов об окончании любых университетов РФ. Вы сможете получить необходимый диплом по любым специальностям, любого года выпуска, включая документы образца СССР. Даем гарантию, что при проверке документа работодателями, подозрений не появится.
Ситуаций, которые вынуждают купить диплом о среднем образовании много. Кому-то очень срочно требуется работа, а значит, необходимо произвести хорошее впечатление на руководителя при собеседовании. Некоторые планируют устроиться в большую компанию, чтобы повысить собственный статус в обществе и в последующем начать собственное дело. Чтобы не тратить впустую годы жизни, а сразу начинать удачную карьеру, применяя врожденные способности и полученные навыки, можно купить диплом через интернет. Вы сможете быть полезным для социума, получите финансовую стабильность в максимально короткий срок- аттестат купить за 9 класс
Диплом университета РФ!
Без института очень сложно было продвигаться вверх по карьерной лестнице. По этой причине решение о покупке диплома следует считать мудрым и рациональным. Приобрести диплом об образовании burgasdent.listbb.ru/viewtopic.php?f=3&t=1180
Приобрести диплом ВУЗа!
Мы изготавливаем дипломы психологов, юристов, экономистов и других профессий по невысоким ценам. Вы заказываете диплом через надежную и проверенную временем фирму. : solo-it.ru/forum/?PAGE_NAME=profile_view&UID=4262
Приобрести документ института можно в нашем сервисе. Мы оказываем услуги по изготовлению и продаже документов об окончании любых ВУЗов РФ. Вы сможете получить диплом по любым специальностям, включая документы Советского Союза. Даем гарантию, что при проверке документов работодателем, подозрений не появится. kupitediplom.ru/kupit-diplom-s-zaneseniem-v-reestr-vigodnaya-stoimost-2/
Заказать диплом института по выгодной цене вы сможете, обратившись к проверенной специализированной фирме. Мы предлагаем документы об окончании любых ВУЗов РФ. Купить диплом университета– diplomt-nsk.ru/kupit-diplom-menedzhera-s-zaneseniem-v-reestr-16/
Купить диплом о высшем образовании!
Мы предлагаем документы любых учебных заведений, которые находятся в любом регионе РФ.
diplomers.com/bistrij-diplom-vuza-s-zaneseniem-v-reestr/
1вин официальный сайт вход https://www.balashiha.myqip.ru/?1-12-0-00000437-000-0-0-1743258848 .
Купить квартиру в Москве – это ваш шанс на комфорт и стабильность!
Просторные и светлые квартиры в лучших районах столицы ждут вас.
Отличная инфраструктура, развитый транспорт и близость к культуре делают жизнь здесь уникальной.
Инвестируйте в ваше будущее – выберите квартиру мечты уже сегодня!
Купить квартиру на Жигулевской улице в Москве — 1 775 объявлений по продаже квартир на МирКвартир
1 win.com http://alfatraders.borda.ru/?1-0-0-00004932-000-0-0-1743258210 .
Надежные пластиковые окна – рейтинг компаний с высокими оценками
рейтинг компаний пластиковых окон http://www.top-okon.ru .
1win ставки официальный сайт https://www.alfatraders.borda.ru/?1-0-0-00004932-000-0-0-1743258210 .
лофты спб аренда лофты спб аренда .
детская одежда с надписями http://www.dbkids.ru .
augmented reality pictures augmented reality pictures .
Где приобрести диплом специалиста?
Мы предлагаем документы об окончании любых ВУЗов России. Документы производят на настоящих бланках. Рєhiringcambodia.com/employer/2702/premialnie-diplom-24
одежда с английскими надписями http://www.dbkids.ru/ .
лофт спб аренда лофт спб аренда .
Покупка официального диплома через надежную фирму дарит ряд преимуществ. Такое решение позволяет сберечь время и существенные денежные средства. Тем не менее, только на этом выгода не ограничивается, преимуществ значительно больше.Мы предлагаем дипломы любой профессии. Дипломы производят на подлинных бланках государственного образца. Доступная стоимость по сравнению с серьезными тратами на обучение и проживание в чужом городе. Заказ диплома института является мудрым шагом.
Купить диплом: good-diplom.ru/kupit-diplom-v-reestre-legalno-i-prosto/
ar image http://www.augmented-reality-platform.ru .
mostbet chrono https://mostbet6008.ru/ .
one win one win .
Приобрести документ о получении высшего образования можно у нас в столице. Мы оказываем услуги по изготовлению и продаже документов об окончании любых ВУЗов РФ. Вы сможете получить диплом по любой специальности, включая документы старого образца. Даем 100% гарантию, что при проверке документов работодателями, каких-либо подозрений не возникнет. diplomk-v-krasnodare.ru/kupit-diplom-yurista-s-zaneseniem-v-reestr-bistro-6/
1vin 1win6003.ru .
мостбет вход http://www.mostbet6008.ru .
Заказать диплом института по невысокой цене возможно, обратившись к надежной специализированной фирме. Мы предлагаем документы об окончании любых ВУЗов России. Купить диплом о высшем образовании– diplom-onlinex.com/kupit-diplom-s-vneseniem-v-reestr-bistro-i-nadezhno-29/
мрстбет svstrazh.forum24.ru/?1-18-0-00000136-000-0-0-1743260517 .
Купить диплом ВУЗа можем помочь. Купить диплом специалиста в Волгограде – diplomybox.com/kupit-diplom-spetsialista-v-volgograde
1win вход на сайт https://obovsem.myqip.ru/?1-9-0-00000059-000-0-0-1743051936 .
Купить квартиру в Москве – это ваш шанс на комфорт и стабильность!
Просторные и светлые квартиры в лучших районах столицы ждут вас.
Отличная инфраструктура, развитый транспорт и близость к культуре делают жизнь здесь уникальной.
Инвестируйте в ваше будущее – выберите квартиру мечты уже сегодня!
THE FIVE в Москве от застройщика
1 win официальный сайт http://1win6050.ru .
Мы готовы предложить дипломы любой профессии по приятным тарифам. Оставить отзыв — kyc-diplom.com/replies.html
Мы можем предложить дипломы любой профессии по разумным ценам. Цена зависит от выбранной специальности, года получения и образовательного учреждения. Стараемся поддерживать для заказчиков адекватную ценовую политику. Для нас важно, чтобы документы были доступны для большого количества граждан. как купить настоящий диплом
Где приобрести диплом специалиста?
Наши специалисты предлагают выгодно и быстро купить диплом, который выполнен на оригинальном бланке и заверен печатями, штампами, подписями. Диплом пройдет любые проверки, даже при помощи специально предназначенного оборудования. Решите свои задачи быстро и просто с нашей компанией.
Купить диплом о высшем образовании diplomt-v-chelyabinske.ru/kupit-diplom-texnologa-5/
диплом технолога купить
Ищете идеальную квартиру в Москве или Подмосковье? У нас есть предложения, которые вас удивят! Живите в сердце столицы с развитой инфраструктурой, или выберите уютные районы Подмосковья для спокойной жизни. Мы предлагаем широкий выбор квартир: от современных студий до просторных семейных апартаментов. Наша команда специалистов поможет вам найти именно то, что нужно, учитывая все ваши пожелания и бюджет. Не упустите шанс стать владельцем жилья мечты! Звоните, и мы подберем лучшие варианты для вас! Живите там, где вам комфортно!
Лебедь (жилой комплекс)
Заказать документ о получении высшего образования можно у нас. http://www.bettercodes.org/gampang-banget-download-aplikasi-rtp-slot-paling-gacor/#comment-13361
Приобрести диплом ВУЗа!
Мы изготавливаем дипломы любой профессии по выгодным тарифам— diplomus-spb.ru/kupit-diplomi-o-visshem-s-zaneseniem-4/
Мы изготавливаем дипломы любой профессии по приятным тарифам. Всегда стараемся поддерживать для заказчиков адекватную политику цен. Важно, чтобы документы были доступны для подавляющей массы граждан.
Покупка диплома, который подтверждает окончание института, – это грамотное решение. Купить диплом ВУЗа: diplom-insti.ru/diplom-texnicheskij-kupit/
augmented reality photo augmented reality photo .
детская одежда с надписями http://dbkids.ru .
аренда лофт аренда лофт .
Где заказать диплом специалиста?
Мы изготавливаем дипломы любой профессии по приятным тарифам. Мы предлагаем документы ВУЗов, расположенных на территории всей РФ. Вы можете приобрести диплом за любой год, в том числе документы старого образца СССР. Дипломы и аттестаты выпускаются на бумаге самого высокого качества. Это позволяет делать государственные дипломы, которые не отличить от оригинала. Документы заверяются необходимыми печатями и подписями. Стараемся поддерживать для заказчиков адекватную ценовую политику. Важно, чтобы дипломы были доступны для подавляющей массы наших граждан. diplom-city24.ru/kupit-diplom-elektrika-6
рулонные шторы с электроприводом и дистанционным управлением рулонные шторы с электроприводом и дистанционным управлением .
1vin pro https://1win6050.ru/ .
augmented reality photo augmented reality photo .
детская одежда с надписями https://dbkids.ru/ .
лофты аренда лофты аренда .
1win скачать последнюю версию 1win6003.ru .
рулонные шторы это рулонные шторы это .
1win com obovsem.myqip.ru/?1-9-0-00000059-000-0-0-1743051936 .
Купить документ института можно у нас. diplomf-v-irkutske.ru/kupit-diplom-4-50
Мы можем предложить дипломы психологов, юристов, экономистов и любых других профессий по выгодным тарифам. Стоимость будет зависеть от выбранной специальности, года выпуска и образовательного учреждения. Всегда стараемся поддерживать для покупателей адекватную ценовую политику. Важно, чтобы документы были доступными для большого количества наших граждан. купить диплом в шадринске
Где купить диплом по актуальной специальности?
Наша компания предлагает выгодно купить диплом, который выполнен на оригинальной бумаге и заверен печатями, штампами, подписями официальных лиц. Диплом способен пройти лубую проверку, даже при помощи профессионального оборудования. Решайте свои задачи быстро и просто с нашим сервисом.
Купить диплом ВУЗа diplomh-40.ru/kupit-diplom-v-velikom-novgorode-3/
можно ли купить диплом о среднем профессиональном образовании
Где заказать диплом по нужной специальности?
Наша компания предлагает быстро и выгодно приобрести диплом, который выполняется на бланке ГОЗНАКа и заверен печатями, штампами, подписями. Наш документ способен пройти лубую проверку, даже с применением профессиональных приборов. Достигайте цели быстро с нашими дипломами. Приобрести диплом любого университета! borderforum.ru/viewtopic.php?f=7&t=12962
мостбет скачать на андроид http://mostbet6008.ru/ .
скачать мостбет официальный сайт http://svstrazh.forum24.ru/?1-18-0-00000136-000-0-0-1743260517/ .
1wiun 1wiun .
игра ракета на деньги 1win http://1win6003.ru/ .
Где заказать диплом по актуальной специальности?
Мы изготавливаем дипломы любой профессии по приятным тарифам. Мы готовы предложить документы ВУЗов, расположенных на территории всей РФ. Можно заказать качественно сделанный диплом за любой год, включая документы старого образца. Дипломы и аттестаты печатаются на бумаге высшего качества. Это дает возможность делать настоящие дипломы, которые не отличить от оригинала. Документы будут заверены необходимыми печатями и штампами. Стараемся поддерживать для заказчиков адекватную политику тарифов. Важно, чтобы документы были доступны для подавляющей массы наших граждан. diplomius-docs.com/kupit-diplom-elektromontazhnika
Заказать диплом о высшем образовании!
Мы предлагаем документы институтов, расположенных в любом регионе Российской Федерации.
diplomt-v-samare.ru/kupit-diplom-o-visshem-obrazovanii-19/
Заказать диплом об образовании!
Мы изготавливаем дипломы любой профессии по выгодным тарифам— poluchidiplom.com/kupit-diplom-v-ekaterinburge-bistro-i-nadezhno-7/
Мы готовы предложить дипломы любых профессий по выгодным тарифам. Стараемся поддерживать для заказчиков адекватную ценовую политику. Для нас важно, чтобы документы были доступны для большинства наших граждан.
Заказ диплома, подтверждающего обучение в ВУЗе, – это выгодное решение. Заказать диплом любого ВУЗа: kupitediplom0029.ru/kupit-diplom-sajt-2/
Hey there! Someone in my Facebook group shared this site with us so I came to take a look. I’m definitely enjoying the information. I’m book-marking and will be tweeting this to my followers! Outstanding blog and superb style and design.
mostbet промокод http://mostbet6008.ru/ .
1win kg скачать https://obovsem.myqip.ru/?1-9-0-00000059-000-0-0-1743051936 .
Разработка технологической карты на погрузочно-разгрузочные работы для оптимизации работы склада
карты технологические на погрузочно разгрузочные работы https://tekhnologicheskie-karty.ru .
Ищете идеальную квартиру в Москве или Подмосковье? У нас есть предложения, которые вас удивят! Живите в сердце столицы с развитой инфраструктурой, или выберите уютные районы Подмосковья для спокойной жизни. Мы предлагаем широкий выбор квартир: от современных студий до просторных семейных апартаментов. Наша команда специалистов поможет вам найти именно то, что нужно, учитывая все ваши пожелания и бюджет. Не упустите шанс стать владельцем жилья мечты! Звоните, и мы подберем лучшие варианты для вас! Живите там, где вам комфортно!
Форум по ЖК Флотилия в Москве: 4507 отзывов о новостройке
Экран для проекторов с гладким покрытием – наслаждайтесь идеальной передачей цветов
проекционный экран цена proekcionnye-ehkrany0.ru .
mostbet скачать на телефон бесплатно андроид https://www.svstrazh.forum24.ru/?1-18-0-00000136-000-0-0-1743260517 .
шиномонтаж подольск шиномонтаж подольск .
michelin primacy 4+ https://www.www.proalbea.ru/shiny-michelin-preimushhestva-i-nedostatki.html .
Готовые комплекты мебели для кафе – стильные и удобные решения под ключ
мебель ресторан https://mebel-dlya-kafe.ru .
michelin primacy 4 michelin primacy 4 .
шиномантаж нахабино шиномантаж нахабино .
mostbet официальный сайт https://svstrazh.forum24.ru/?1-18-0-00000136-000-0-0-1743260517 .
Купить диплом о высшем образовании!
Мы предлагаем документы ВУЗов, которые расположены в любом регионе Российской Федерации.
diplomt-nsk.ru/kupit-diplom-yurista-s-zaneseniem-v-reestr-bistro-4/
Приобрести диплом ВУЗа по выгодной цене возможно, обратившись к надежной специализированной компании. Купить документ университета можно в нашем сервисе. diplomv-v-ruki.ru/kupite-diplom-o-visshem-obrazovanii-bez-lishnix-problem-2
ms5jxk
Заказать диплом любого ВУЗа!
Мы можем предложить документы учебных заведений, которые расположены на территории всей России. Документы печатаются на “правильной” бумаге самого высокого качества: lgmtech.co.uk/employer/aurus-diploms
Купить диплом любого ВУЗа!
Купить диплом университета по выгодной стоимости можно, обратившись к надежной специализированной компании. Купить диплом о высшем образовании: diplom-kaluga.ru/vot-neskolko-variantov-diplom-s-reestrom-v-moskve-kupit-ofitsialno-kupit-diplom-s-provodkoj-v-moskve-bistro-diplom-v-moskve-s-garantiej-zapis-v-reestre-originalnij-diplo
купить диплом в нижнем новгороде
Заказать диплом университета !
Приобретение диплома университета РФ в нашей компании – надежный процесс, потому что документ заносится в государственный реестр. Заказать диплом ВУЗа diplomt-v-samare.ru/kupit-diplom-v-moskve-s-zaneseniem-v-reestr-srochno
95c07f6
[url=https://gotwebsite1.com/local-seo-scottsdale/]Google Analytics setup for SEO tracking[/url]
1win. com https://www.1win6050.ru .
рулонные шторы для панорамных окон рулонные шторы для панорамных окон .
Купить диплом ВУЗа по доступной цене возможно, обратившись к проверенной специализированной компании. Купить документ о получении высшего образования вы сможете в нашей компании в столице. diplomgorkiy.com/kupit-diplom-zanesennij-v-reestr-bistro-i-nadezhno-4
замена подвесного подшипника цена http://www.4-x-4.ru/remont-i-balansirovka-kardannyh-valov/ .
Где приобрести диплом специалиста?
Мы изготавливаем дипломы любой профессии по разумным тарифам. Мы можем предложить документы техникумов, расположенных в любом регионе Российской Федерации. Можно купить качественный диплом за любой год, указав актуальную специальность и оценки за все дисциплины. Документы выпускаются на бумаге высшего качества. Это позволяет делать настоящие дипломы, которые невозможно отличить от оригинала. Они будут заверены всеми необходимыми печатями и подписями. Стараемся поддерживать для заказчиков адекватную политику цен. Важно, чтобы документы были доступными для большого количества наших граждан. diplompro.ru/kupit-attestat-za-11-klass-2-5
что значит купить диплом
1вин официальный сайт мобильная https://1win6004.ru/ .
мостбет кыргызстан http://www.mostbet6009.ru .
ремонт переднего кардана ремонт переднего кардана .
бк 1win 1win6050.ru .
Где приобрести диплом по актуальной специальности?
Мы изготавливаем дипломы психологов, юристов, экономистов и прочих профессий по доступным тарифам. Мы готовы предложить документы техникумов, которые расположены в любом регионе РФ. Можно купить диплом от любого заведения, за любой год, включая сюда документы старого образца СССР. Документы делаются на “правильной” бумаге высшего качества. Это дает возможность делать государственные дипломы, которые невозможно отличить от оригинала. Документы будут заверены всеми необходимыми печатями и штампами. Стараемся поддерживать для клиентов адекватную политику тарифов. Важно, чтобы дипломы были доступны для большого количества наших граждан. okdiplom.ru/kupit-diplomi-o-visshem-obrazovanii-tsena-4
автоматические шторы на окна автоматические шторы на окна .
1вин онлайн 1вин онлайн .
мотбет http://mostbet6009.ru/ .
1 win.com https://www.1win6051.ru .
Мы предлагаем дипломы любой профессии по выгодным тарифам. Дипломы изготавливаются на подлинных бланках государственного образца Приобрести диплом института diplomservis.ru
Где заказать диплом по необходимой специальности?
Приобрести диплом института по доступной стоимости возможно, обращаясь к надежной специализированной фирме.: zakaz-na-diplom.ru
Купить диплом университета!
Мы готовы предложить документы институтов, которые находятся в любом регионе РФ.
diplomg-cheboksary.ru/kupit-diplom-s-garantiej-kachestva-i-vneseniem-v-reestr/
michelin x ice north 4 michelin x ice north 4 .
BlackSprut – платформа с особыми возможностями
Сервис BlackSprut удостаивается интерес многих пользователей. В чем его особенности?
Данный ресурс обеспечивает широкие опции для аудитории. Интерфейс сайта выделяется простотой, что позволяет ей быть доступной даже для тех, кто впервые сталкивается с подобными сервисами.
Важно отметить, что BlackSprut работает по своим принципам, которые делают его особенным в определенной среде.
При рассмотрении BlackSprut важно учитывать, что определенная аудитория выражают неоднозначные взгляды. Некоторые отмечают его функциональность, а некоторые рассматривают с осторожностью.
В целом, данный сервис остается объектом интереса и привлекает заинтересованность разных пользователей.
Где найти работающий доступ на БлэкСпрут?
Хотите найти свежее зеркало на BlackSprut? Мы поможем.
bs2best
Сайт часто обновляет адреса, и лучше иметь актуальный домен.
Обновленный адрес легко найти здесь.
Проверьте рабочую ссылку у нас!
шиномонтаж зеленоград шиномонтаж зеленоград .
Приобрести диплом о высшем образовании !
Приобретение диплома ВУЗа РФ в нашей компании является надежным процессом, ведь документ будет заноситься в реестр. Приобрести диплом университета diplomt-v-chelyabinske.ru/kupit-diplom-v-moskve-s-zaneseniem-v-reestr-bistro-15
Kraken официальный сайт
Ищете надежную платформу для торгов и инвестиций в криптовалюту? Познакомьтесь с Kraken! Это один из самых известных и безопасных криптобирж в мире.
Почему стоит выбрать Kraken?
– Безопасность: Ваши средства защищены передовыми технологиями.
– Широкий выбор: Более 50 криптовалют для торговли, включая биткойн и эфир.
– Удобный интерфейс: Простая навигация и интуитивно понятные инструменты для анализа.
– Низкие комиссии: Конкурентные ставки на торговлю для максимизации ваших доходов.
– Поддержка: Круглосуточная помощь от профессионалов.
Зарегистрируйтесь на официальном сайте Kraken сегодня и получите доступ к премиальной платформе для торговли!
Присоединяйтесь к миллионам пользователей и начните свою крипто-приключение прямо сейчас!кракен ссылка
Заказать диплом об образовании!
Приобрести диплом ВУЗа по доступной цене возможно, обращаясь к проверенной специализированной компании. Заказать диплом о высшем образовании: diploml-174.ru/kupit-diplom-s-vneseniem-v-reestr-30
Приобрести диплом ВУЗа!
Мы готовы предложить документы ВУЗов, расположенных на территории всей Российской Федерации. Документы печатаются на “правильной” бумаге высшего качества: headbull.ru/employer/aurus-diploms
Мы можем предложить дипломы психологов, юристов, экономистов и других профессий по приятным тарифам. Стоимость будет зависеть от той или иной специальности, года выпуска и университета. Всегда стараемся поддерживать для заказчиков адекватную политику тарифов. Для нас очень важно, чтобы документы были доступны для большого количества наших граждан. мэр купил диплом
аренда тента на мероприятие аренда тента на мероприятие .
Заказать диплом любого университета!
Мы можем предложить документы институтов, расположенных в любом регионе Российской Федерации.
diplomist.com/kupite-nastoyashij-diplom-s-zaneseniem-v-reestr-bistro/
michelin x ice north 4 michelin x ice north 4 .
Всегда считал, что покупка диплома о высшем образовании — это миф и невозможно. Но, к счастью, оказался неправ. Сначала искал информацию по теме: купить диплом тамбовского училища педагогического, купить диплом физрука, купить липовые дипломы, купить приложение к диплому с оценками, можно купить диплом воспитателя, а затем переключился на дипломы вузов. Подробности здесь: diplomybox.com/kupit-diplom-tekhnikuma-kolledzha-samara
летние шатры в аренду летние шатры в аренду .
шиномантаж одинцово шиномантаж одинцово .
Мы изготавливаем дипломы любой профессии по невысоким тарифам. Стоимость будет зависеть от конкретной специальности, года выпуска и университета. Всегда стараемся поддерживать для клиентов адекватную ценовую политику. Для нас очень важно, чтобы дипломы были доступными для подавляющей массы наших граждан. купить диплом сзту
Купить документ о получении высшего образования можно в нашей компании в Москве. diplomc-v-ufe.ru/kupit-diplom-voronezh-4
Добрый день!
Без получения диплома очень сложно было продвигаться вверх по карьере. Сегодня же этот важный документ не дает абсолютно никаких гарантий, что удастся получить престижную работу. Более важное значение имеют практические навыки и знания специалиста и его опыт. В связи с этим решение о покупке диплома стоит считать мудрым и рациональным. Купить диплом о высшем образовании birdiey.com/read-blog/2940_diplom-povara-3-razryada.html
Приветствую!
Мы готовы предложить дипломы любой профессии по выгодным ценам. Стоимость может зависеть от выбранной специальности, года выпуска и образовательного учреждения: rdiploms.com/
купить дипломы о высшем купить дипломы о высшем .
Мы изготавливаем дипломы любых профессий по приятным ценам. О преимуществах приобретения документов у нас
Вы покупаете диплом через надежную и проверенную временем фирму. Это решение позволит сэкономить не только деньги, но и ваше время.
На этом преимущества не заканчиваются, их гораздо больше:
• Документы изготавливаются на подлинных бланках с печатями и подписями;
• Дипломы всех ВУЗов РФ;
• Цена намного ниже той, которую пришлось бы платить на очном и заочном обучении в ВУЗе;
• Быстрая доставка в любые регионы РФ.
Приобрести диплом ВУЗа– http://moskvic.actieforum.com/t4109-topic#7442/ – moskvic.actieforum.com/t4109-topic#7442
Диплом любого ВУЗа РФ!
Без ВУЗа очень сложно было продвинуться вверх по карьерной лестнице. В связи с этим решение о заказе диплома следует считать целесообразным. Приобрести диплом об образовании technoevents.ru/diplom-dlya-rabotyi-i-karernogo-rosta
Всех приветствую!
Для некоторых людей, заказать диплом ВУЗа – это острая потребность, уникальный шанс получить достойную работу. Но для кого-то – это желание не терять время на учебу в институте. С какой бы целью вам это не потребовалось, наша компания готова помочь вам. Быстро, качественно и выгодно сделаем документ любого ВУЗа и любого года выпуска на подлинных бланках с реальными печатями.
Основная причина, почему многие прибегают к покупке документа, – получить хорошую работу. К примеру, способности и опыт дают возможность кандидату устроиться на работу, но документального подтверждения квалификации не имеется. Когда работодателю важно присутствие “корочек”, риск потерять место работы достаточно высокий.
Купить документ ВУЗа вы имеете возможность в нашей компании в Москве. Мы предлагаем документы об окончании любых ВУЗов Российской Федерации. Вы сможете получить диплом по любой специальности, включая документы СССР. Гарантируем, что при проверке документа работодателем, подозрений не возникнет.
Ситуаций, которые вынуждают приобрести диплом о среднем образовании много. Кому-то срочно необходима работа, а значит, необходимо произвести впечатление на начальника при собеседовании. Другие мечтают попасть в престижную компанию, чтобы повысить собственный статус в обществе и в дальнейшем начать свой бизнес. Чтобы не терять драгоценное время, а сразу начинать успешную карьеру, применяя врожденные способности и полученные знания, можно приобрести диплом через интернет. Вы сможете быть полезным в обществе, обретете финансовую стабильность в кратчайшие сроки- купить аттестат
Купить диплом ВУЗа!
Мы предлагаем дипломы любой профессии по разумным ценам. Вы покупаете диплом в надежной и проверенной компании. : grad-360.flybb.ru/viewtopic.php?f=3&t=851
ремонт карданов области 4-x-4.ru/remont-i-balansirovka-kardannyh-valov/ .
1вин rossvya http://1win6052.ru .
dwi regulations within Ohio might be complex, and yet it’s vital to posses a solid understanding of any of them if we find complaints. Driving under on influence of alcohol (DUI) is definitely a serious criminal offense in which can need significant ramifications on all of your future. In Ohio, will legal threshold for body alcohol concentration (BAC) is 0.08% for many drivers and additionally 0.04% business racers.
If your are pulled by legal social control and alleged of driving under the influence, they may carryout roadside sobriety tests or substance exams, really seeing as breathalyser or body assessments, to establish their degree of damage. Declining some tests can result in natural consequences, including license suspension.
dwi crimes in Ohio haul different consequences, dependant on variables such as earlier convictions, BAC levels, as well as regardless of whether generally there appeared to be an car accident or accidental injury used. Drawbacks can contain charges, license temporary removal, compulsory alcohol in the mouthwash cures applications, probation, and still prison time. Replicate offenses and worsened occasions can lead to more severe penalties.
Needing a skilled DUI safeguard attorney is vital to handle the complexity of Ohio dwi statutes. They may examine the evidence, challenge the legality of the stop your vehicle, ask the consistency of assessments, and experience potentiality barriers to help abate the accusations. You’ll also, an attorney can help you with the judiciary process, promising your very own civil liberties are safeguarded and pushing for the greatest viable finish.
Remember, being updated up to Ohio’s DUI statutes and looking for the assistance of an qualified attorney are required actions in effortlessly approaching a DUI accusation to saving any destiny. child maltreatment counselor
1win live 1win live .
мост бет http://www.mostbet6009.ru .
1win pro 1win pro .
Фургон Кракен замечен на Арбате в Москве — тысячи обсуждают, что было внутри. Смотри фото и подробности здесь: кракен фургон арбат
Если вы еще не видели, обязательно посмотрите сами подробности и узнайте, что скрывал Кракен в своем автобусе и фургоне: кракен фургон Арбат.
Недавно на Арбате в Москве появился загадочный транспорт от Кракен — фургон и автобус. Уже видели, что там внутри? Фото и видео уже доступны тут как зайти в кракен с айфона. Узнайте все подробности первыми!
ремонт валов ремонт валов .
скачать mostbet на телефон http://mostbet6009.ru/ .
Недавно на Арбате в Москве появился загадочный транспорт от Кракен — фургон и автобус. Уже видели, что там внутри? Фото и видео уже доступны тут магазин меф. Узнайте все подробности первыми!
Недавно на Арбате в Москве появился загадочный транспорт от Кракен — фургон и автобус. Уже видели, что там внутри? Фото и видео уже доступны тут кракен фургон официальный сайт. Узнайте все подробности первыми!
Недавно на Арбате в Москве появился загадочный транспорт от Кракен — фургон и автобус. Уже видели, что там внутри? Фото и видео уже доступны тут купить кокаин. Узнайте все подробности первыми!
В Москве на Арбате замечены фургон и автобус Кракен. Хотите узнать, что было внутри? Все фото и видео тут купить кокаин
Фургон Кракен замечен на Арбате в Москве — тысячи обсуждают, что было внутри. Смотри фото и подробности здесь:
Мы готовы предложить дипломы психологов, юристов, экономистов и любых других профессий по приятным тарифам.– diplomist.com/kupit-diplom-bistro-i-nadezhno-bez-lishnix-xlopot/
Где купить диплом специалиста?
Мы оказываем услуги по изготовлению и продаже документов об окончании любых университетов Российской Федерации. Документы изготавливаются на настоящих бланках. Рєjob-daddy.com/employer/premialnie-diplom-24
Фургон Кракен замечен на Арбате в Москве — тысячи обсуждают, что было внутри. Смотри фото и подробности здесь: кракен автобус в москве
Где приобрести диплом специалиста?
Получаемый диплом с необходимыми печатями и подписями 100% отвечает требованиям и стандартам Министерства образования и науки Российской Федерации, никто не сможет отличить его от оригинала. Не откладывайте свои мечты и задачи на пять лет, реализуйте их с нами – отправьте быструю заявку на диплом сегодня! Диплом о высшем образовании – запросто! boyara-analia.flybb.ru/viewtopic.phpf=7&t=1174
Купить документ о получении высшего образования вы сможете у нас в столице. Мы предлагаем документы об окончании любых университетов России. Вы получите необходимый диплом по любой специальности, включая документы Советского Союза. Даем 100% гарантию, что при проверке документов работодателем, подозрений не появится. diplomus-spb.ru/diplom-bakalavra-s-zaneseniem-v-reestr-bistro-i-nadezhno-2/
Недавно на Арбате в Москве появился загадочный транспорт от Кракен — фургон и автобус. Уже видели, что там внутри? Фото и видео уже доступны тут кракен автобус в Москве посмотреть. Узнайте все подробности первыми!
1win. https://1win6004.ru/ .
Ищете идеальную квартиру в Москве или Подмосковье? У нас есть предложения, которые вас удивят! Живите в сердце столицы с развитой инфраструктурой, или выберите уютные районы Подмосковья для спокойной жизни. Мы предлагаем широкий выбор квартир: от современных студий до просторных семейных апартаментов. Наша команда специалистов поможет вам найти именно то, что нужно, учитывая все ваши пожелания и бюджет. Не упустите шанс стать владельцем жилья мечты! Звоните, и мы подберем лучшие варианты для вас! Живите там, где вам комфортно!
ЖК Тринити 2 ?? – купить квартиру в ЖК Тринити 2 в Москве на msk-kvartitu.ru
Фургон и автобус Кракен снова в центре внимания на Арбате. Узнайте, что внутри и почему все об этом говорят — подробности тут: кракен арбат автобус перекрыл
В Москве на Арбате замечены фургон и автобус Кракен. Хотите узнать, что было внутри? Все фото и видео тут видео автобус Кракен Арбат
Для эффективного продвижения по карьерной лестнице требуется наличие диплома института. Приобрести диплом института у надежной фирмы: diplomc-v-ufe.ru/kupit-attestat-o-srednem-obrazovanii-v-moskve-3/
chat gpt написать диплом studgen.ru .
Kraken официальный сайт
Ищете надежную платформу для торгов и инвестиций в криптовалюту? Познакомьтесь с Kraken! Это один из самых известных и безопасных криптобирж в мире.
Почему стоит выбрать Kraken?
– Безопасность: Ваши средства защищены передовыми технологиями.
– Широкий выбор: Более 50 криптовалют для торговли, включая биткойн и эфир.
– Удобный интерфейс: Простая навигация и интуитивно понятные инструменты для анализа.
– Низкие комиссии: Конкурентные ставки на торговлю для максимизации ваших доходов.
– Поддержка: Круглосуточная помощь от профессионалов.
Зарегистрируйтесь на официальном сайте Kraken сегодня и получите доступ к премиальной платформе для торговли!
Присоединяйтесь к миллионам пользователей и начните свою крипто-приключение прямо сейчас!<a
kra32.cc
доставка алкоголя круглосуточно москва доставка алкоголя круглосуточно москва .
Купить Samsung в Москве techno-line.store .
В сети активно обсуждают фото и видео того, что было в фургоне и автобусе Кракен на Арбате. Чтобы лично разобраться в ситуации и посмотреть подробности, зайдите на официальный сайт проекта: что было в автобусе Кракен
Фургон Кракен замечен на Арбате в Москве — тысячи обсуждают, что было внутри. Смотри фото и подробности здесь: москва новости фургон кракен
1wiun https://1win6051.ru/ .
Фургон и автобус Кракен снова в центре внимания на Арбате. Узнайте, что внутри и почему все об этом говорят — подробности тут: кракен арбат автобус перекрыл
Мы предлагаем дипломы любых профессий по приятным ценам. Дипломы производят на подлинных бланках государственного образца Заказать диплом об образовании diplom-kaluga.ru
Где заказать диплом специалиста?
Заказать диплом университета по невысокой стоимости можно, обратившись к проверенной специализированной компании.: kupitediplom0029.ru
Фургон Кракен замечен на Арбате в Москве — тысячи обсуждают, что было внутри. Смотри фото и подробности здесь: кракен фургон москва
Недавно на Арбате в Москве появился загадочный транспорт от Кракен — фургон и автобус. Уже видели, что там внутри? Фото и видео уже доступны тут кракен автобус официальный сайт. Узнайте все подробности первыми!
алкоголь 24 часа москва алкоголь 24 часа москва .
чат gpt для написания курсовых работ http://www.studgen.ru/ .
Apple iPhone в Митино techno-line.store .
mostbet https://mostbet6010.ru .
krkn платформа – это прорыв в мире цифровой безопасности, где anonymity и защита данных становятся integral part your digital presence. Название “Kraken” ассоциируется с variety of resources и инновационными решениями. Эта сеть предлагает доступ к миру digital freedom, где правила traditional networks не действуют.
онион ссылка кракен
Где приобрести диплом по нужной специальности?
Мы предлагаем быстро и выгодно заказать диплом, который выполнен на оригинальной бумаге и заверен печатями, штампами, подписями официальных лиц. Наш документ способен пройти лубую проверку, даже с применением специальных приборов. Решайте свои задачи быстро и просто с нашими дипломами.
Приобрести диплом о высшем образовании diplomt-v-samare.ru/kupit-diplom-v-podolske-4/
Где купить диплом специалиста?
Наши специалисты предлагаютмаксимально быстро купить диплом, который выполнен на бланке ГОЗНАКа и заверен мокрыми печатями, водяными знаками, подписями. Документ пройдет любые проверки, даже с применением профессиональных приборов. Решайте свои задачи быстро с нашим сервисом. Купить диплом о высшем образовании! trackrecord.id/read-blog/8140_kupit-diplom-kolledzha.html
Мы изготавливаем дипломы любых профессий по приятным ценам. Всегда стараемся поддерживать для клиентов адекватную ценовую политику. Важно, чтобы дипломы были доступными для большого количества граждан.
Приобретение документа, подтверждающего обучение в университете, – это рациональное решение. Приобрести диплом любого университета: diploms-vuza.com/gde-kupit-diplom-obrazovanie-6/
Приобрести диплом любого университета!
Мы можем предложить дипломы психологов, юристов, экономистов и любых других профессий по приятным тарифам— poluchidiplom.com/kupit-attestat-za-11-klass-v-moskve-bistro-i-udobno-6/
ваучер 1win ваучер 1win .
тент в аренду стоимость shatry-dlya-meropriyatiy.ru .
Где приобрести диплом по актуальной специальности?
Мы изготавливаем дипломы любой профессии по невысоким ценам. Мы готовы предложить документы ВУЗов, которые находятся на территории всей Российской Федерации. Можно заказать диплом за любой год, в том числе документы старого образца СССР. Дипломы и аттестаты печатаются на бумаге высшего качества. Это дает возможность делать государственные дипломы, не отличимые от оригинала. Документы заверяются всеми обязательными печатями и штампами. Всегда стараемся поддерживать для заказчиков адекватную ценовую политику. Для нас очень важно, чтобы документы были доступными для большинства наших граждан. nsk-diplom.com/kupit-diplom-v-kirove-6
купить технический диплом
мосбет казино https://mostbet6010.ru .
Где купить диплом по нужной специальности?
Наши специалисты предлагают выгодно и быстро купить диплом, который выполняется на оригинальном бланке и заверен печатями, водяными знаками, подписями должностных лиц. Документ пройдет лубую проверку, даже с использованием профессионального оборудования. Решайте свои задачи быстро с нашими дипломами.
Заказать диплом ВУЗа kupit-diplom24.com/kupit-diplom-v-nizhnem-novgorode-12/
Где заказать диплом по нужной специальности?
Мы предлагаемвыгодно приобрести диплом, который выполнен на бланке ГОЗНАКа и заверен мокрыми печатями, водяными знаками, подписями. Диплом способен пройти любые проверки, даже с использованием профессиональных приборов. Решайте свои задачи быстро и просто с нашим сервисом. Заказать диплом ВУЗа! arzookanak0077.copiny.com/question/details/id/1068377
вин 1 https://www.1win6052.ru .
большие тенты аренда заказать большие тенты аренда заказать .
Купить диплом института!
Мы готовы предложить дипломы психологов, юристов, экономистов и любых других профессий по невысоким ценам— diploml-174.ru/kupite-attestati-za-11-klass-po-dostupnim-tsenam/
Мы изготавливаем дипломы любых профессий по выгодным тарифам. Стараемся поддерживать для клиентов адекватную политику тарифов. Для нас очень важно, чтобы документы были доступными для большого количества наших граждан.
Приобретение документа, подтверждающего окончание ВУЗа, – это разумное решение. Приобрести диплом любого ВУЗа: sdiplom.ru/gde-mozhno-kupit-diplom-2/
Всегда считал, что покупка диплома о высшем образовании — это миф и невозможно. Но, к счастью, оказался неправ. Сначала искал информацию по теме: сколько стоит красный аттестат, купить диплом высшее образование, диплом о высшем образовании недорого, купить диплом с занесением, купить аттестат об общем образовании, а затем переключился на дипломы вузов. Подробности здесь: proffdiplomik.com/diploms/diplom-kolledzha-2011-2013
купить диплом образования в ярославле diplomys-vsem.ru .
Мы изготавливаем дипломы любых профессий по разумным ценам. О преимуществах покупки документов в нашей компании
Вы покупаете документ через надежную и проверенную временем фирму. Это решение позволит вам сэкономить не только массу средств, но и ваше драгоценное время.
Преимуществ куда больше:
• Документы печатаются на подлинных бланках с печатями и подписями;
• Можно купить дипломы любых высших учебных заведений РФ;
• Цена значительно ниже нежели довелось бы платить на очном обучении в университете;
• Доставка в любые регионы РФ.
Приобрести диплом о высшем образовании– http://nitroultramaxx.copiny.com/question/details/id/1061054/ – nitroultramaxx.copiny.com/question/details/id/1061054
купит диплом
аренда ячеек для вещей аренда ячеек для вещей .
Заказать диплом любого университета!
Мы предлагаем документы ВУЗов, расположенных на территории всей Российской Федерации.
kupit-diplom24.com/kupit-diplom-instituta-s-reestrom-bistro-i-nadezhno-4/
Разработка ППРК для безопасного перемещения грузов на стройке
ппрк на башенный кран https://pprk-msk.ru/ .
Заказ документа о высшем образовании через надежную компанию дарит ряд достоинств. Это решение позволяет сэкономить время и серьезные финансовые средства. Тем не менее, только на этом выгоды не ограничиваются, достоинств значительно больше.Мы можем предложить дипломы любой профессии. Дипломы производят на оригинальных бланках государственного образца. Доступная цена по сравнению с огромными расходами на обучение и проживание. Покупка диплома университета станет мудрым шагом.
Купить диплом о высшем образовании: diplomt-v-samare.ru/kupite-diplom-visshego-obrazovaniya-s-zaneseniem-v-reestr-9/
Где приобрести диплом по актуальной специальности?
Мы изготавливаем дипломы любой профессии по выгодным ценам. Мы предлагаем документы техникумов, расположенных на территории всей России. Вы имеете возможность приобрести диплом от любого заведения, за любой год, указав подходящую специальность и оценки за все дисциплины. Дипломы и аттестаты печатаются на бумаге высшего качества. Это дает возможности делать государственные дипломы, которые не отличить от оригиналов. Они будут заверены необходимыми печатями и штампами. Всегда стараемся поддерживать для покупателей адекватную политику тарифов. Для нас очень важно, чтобы дипломы были доступными для подавляющей массы наших граждан. prodiplome.com/kupit-diplom-4
Мы готовы предложить дипломы психологов, юристов, экономистов и любых других профессий по приятным ценам. Стоимость зависит от той или иной специальности, года получения и ВУЗа. Стараемся поддерживать для заказчиков адекватную политику тарифов. Для нас очень важно, чтобы документы были доступны для большого количества наших граждан. купить диплом морские
Всех приветствую!
Для определенных людей, заказать диплом о высшем образовании – это острая необходимость, удачный шанс получить достойную работу. Но для кого-то – это желание не терять время на учебу в ВУЗе. Что бы ни толкнуло вас на такой шаг, мы готовы помочь вам. Быстро, качественно и по доступной цене сделаем документ любого года выпуска на подлинных бланках со всеми требуемыми печатями.
Основная причина, почему люди покупают документ, – получить определенную работу. Например, знания дают возможность человеку устроиться на работу, но документального подтверждения квалификации нет. В том случае если для работодателя важно присутствие “корочек”, риск потерять место работы очень высокий.
Купить документ университета вы можете у нас в Москве. Мы предлагаем документы об окончании любых университетов России. Вы получите диплом по любой специальности, любого года выпуска, включая документы образца СССР. Гарантируем, что в случае проверки документа работодателями, подозрений не возникнет.
Ситуаций, которые вынуждают заказать диплом о среднем образовании достаточно. Кому-то прямо сейчас потребовалась работа, и необходимо произвести впечатление на руководителя во время собеседования. Некоторые мечтают попасть в престижную компанию, для того, чтобы повысить свой статус в обществе и в дальнейшем начать свой бизнес. Чтобы не терять попусту годы жизни, а сразу начать эффективную карьеру, используя имеющиеся знания, можно купить диплом через интернет. Вы станете полезным в социуме, получите денежную стабильность в максимально короткий срок- диплом о среднем образовании купить
алкоголь купить круглосуточно с доставкой алкоголь купить круглосуточно с доставкой .
чат gpt для дипломов http://www.studgen.ru .
Заказать документ о получении высшего образования можно у нас. diplomskiy.com/kupit-diplom-krasnoyarsk-2
Привет!
Без ВУЗа очень нелегко было продвигаться вверх по карьерной лестнице. Сейчас документ не дает никаких гарантий, что получится получить престижную работу. Более важное значение имеют практические навыки и знания специалиста, а также его постоянный опыт. Именно из-за этого решение о покупке диплома стоит считать целесообразным. Заказать диплом любого института hobby-svarka.ru/viewtopic.php?f=11&t=7498
Здравствуйте!
Мы изготавливаем дипломы любой профессии по выгодным ценам. Стоимость зависит от выбранной специальности, года выпуска и образовательного учреждения: rdiploms.com/
Купить диплом института по доступной стоимости возможно, обращаясь к надежной специализированной компании. Купить документ о получении высшего образования вы имеете возможность у нас в Москве. diplom-kaluga.ru/kupit-diplom-s-zaneseniem-v-reestr-instituta-8
доставка алкоголя круглосуточно москва доставка алкоголя круглосуточно москва .
gpt для реферата https://studgen.ru .
Диплом ВУЗа России!
Без ВУЗа трудно было продвинуться вверх по карьерной лестнице. По этой причине решение о заказе диплома можно считать рациональным. Выгодно приобрести диплом университета petitieonline.com/479256
мостбет казино https://mostbet6010.ru/ .
Huawei телефоны https://techno-line.store .
Мы изготавливаем дипломы любой профессии по выгодным тарифам. Цена может зависеть от выбранной специальности, года получения и образовательного учреждения. Стараемся поддерживать для покупателей адекватную ценовую политику. Важно, чтобы дипломы были доступны для большого количества граждан. купить диплом москва без предоплаты
скупка золота в москве за грамм 585 b-gold.ru скупка золота в москве за грамм 585 b-gold.ru .
ломбард скупка золота ломбард скупка золота .
cod promoțional 1win cod promoțional 1win .
Где приобрести диплом по актуальной специальности?
Получаемый диплом с необходимыми печатями и подписями целиком и полностью отвечает условиям и стандартам Министерства образования и науки, никто не сможет отличить его от оригинала. Не откладывайте свои мечты и задачи на несколько лет, реализуйте их с нами – отправляйте быструю заявку на диплом прямо сейчас! Получить диплом о среднем специальном образовании – быстро и просто! korrespondentweek.ru/diplom-s-podtverzhdeniem-podlinnost-garantirovana
Где приобрести диплом по актуальной специальности?
Мы предлагаем документы об окончании любых ВУЗов Российской Федерации. Документы производятся на фирменных бланках государственного образца. Рєprime-jobs.ch/companies/premialnie-diplom-24
скачат мостбет http://mostbet6010.ru .
скупка золота в москве на сегодня b-gold.ru http://www.of-md.com/jwe-qs/ .
скупка золота в москве цена за грамм 585 на сегодня https://www.metaphysican.com/vsyo-chto-vam-nuzhno-znat-o-skupke-zolota-sovety-i-rekomendaczii/ .
Надежные подрядчики: рейтинг компаний по ремонту квартир с лучшими условиями
фирмы по ремонту квартир в москве рейтинг http://remont-kvartir-reiting.ru/ .
1win.com.ci 1win.com.ci .
Приобрести документ ВУЗа можно в нашей компании в Москве. diplomt-nsk.ru/kupit-diplom-kolledzha-2-7
аренда хранилища для вещей аренда хранилища для вещей .
Заказать диплом ВУЗа по выгодной стоимости можно, обратившись к проверенной специализированной фирме. Приобрести документ университета вы можете в нашей компании в столице. asxdiploman.com/legalnoe-zanesenie-diploma-v-reestr-bistro-i-bez-xlopot
Мы предлагаем дипломы любой профессии по приятным тарифам.– diplomass.com/kupit-diplom-s-zaneseniem-v-reestr-v-rossii-udobno-i-bistro/
Заказать диплом ВУЗа!
Мы предлагаем документы учебных заведений, расположенных на территории всей Российской Федерации.
diplom-club.com/mozhno-li-kupit-diplom-o-visshem-obrazovanii/
Смартфоны с доставкой по Москве techno-line.store .
1win вход 1win вход .
Купить документ ВУЗа вы имеете возможность в нашей компании в столице. Мы предлагаем документы об окончании любых ВУЗов Российской Федерации. Вы сможете получить диплом по любым специальностям, любого года выпуска, в том числе документы Советского Союза. Гарантируем, что при проверке документов работодателем, каких-либо подозрений не возникнет. diplomt-nsk.ru/kupit-diplom-o-visshem-obrazovanii-realnie-otzivi/
motbet motbet .
1 ван вин http://www.1win6052.ru .
диплом ижевск купить
Ищете идеальную квартиру в Москве или Подмосковье? У нас есть предложения, которые вас удивят! Живите в сердце столицы с развитой инфраструктурой, или выберите уютные районы Подмосковья для спокойной жизни. Мы предлагаем широкий выбор квартир: от современных студий до просторных семейных апартаментов. Наша команда специалистов поможет вам найти именно то, что нужно, учитывая все ваши пожелания и бюджет. Не упустите шанс стать владельцем жилья мечты! Звоните, и мы подберем лучшие варианты для вас! Живите там, где вам комфортно!
«Все Новостройки» – База новостроек Москвы
Приобрести диплом ВУЗа по доступной цене возможно, обратившись к надежной специализированной фирме. Мы предлагаем документы об окончании любых ВУЗов РФ. Заказать диплом о высшем образовании– kupitediplom.ru/kupit-diplom-s-vneseniem-v-reestr-bistro-i-nadezhno-29/
Для быстрого продвижения по карьере потребуется наличие официального диплома университета. Купить диплом университета у надежной компании: diplomc-v-ufe.ru/kupit-diplom-o-polnom-srednem-obrazovanii-5/
купить аттестат за 9 класс с оценками
furnished houses for rent http://www.rapitorimania.ro/forum/marele-bazar-f18/case-moderne-de-inchiriat-langa-bucuresti-t938.html .
1-win http://1win6005.ru/ .
ремонт карданов москва ремонт карданов москва .
скачат мостбет http://mostbet6030.ru .
Где приобрести диплом по необходимой специальности?
Мы изготавливаем дипломы любых профессий по выгодным ценам. Мы готовы предложить документы техникумов, расположенных в любом регионе России. Вы можете купить качественно напечатанный диплом за любой год, в том числе документы старого образца. Дипломы и аттестаты печатаются на бумаге высшего качества. Это дает возможности делать настоящие дипломы, не отличимые от оригинала. Они заверяются всеми обязательными печатями и подписями. Стараемся поддерживать для покупателей адекватную ценовую политику. Для нас очень важно, чтобы документы были доступными для большинства наших граждан. prodiplome.com/kupit-diplom-v-ekaterinburge-2-8
https://zolushka-klin.ru/
case pentru familii de ?nchiriat case pentru familii de ?nchiriat .
балансировка карданного вала в москве https://www.passat-club.ru/news.php?id=1593 .
1 win официальный сайт https://1win6005.ru/ .
Где купить диплом специалиста?
Наши специалисты предлагают выгодно купить диплом, который выполняется на оригинальном бланке и заверен мокрыми печатями, водяными знаками, подписями официальных лиц. Диплом пройдет любые проверки, даже с использованием специальных приборов. Достигайте свои цели быстро и просто с нашими дипломами.
Купить диплом любого университета diplomp-irkutsk.ru/kupit-diplom-v-belgorode-7/
Где заказать диплом специалиста?
Наши специалисты предлагаютбыстро и выгодно приобрести диплом, который выполнен на оригинальной бумаге и заверен печатями, штампами, подписями официальных лиц. Диплом пройдет любые проверки, даже при использовании профессиональных приборов. Решайте свои задачи быстро и просто с нашей компанией. Заказать диплом университета! poltavagok.ru/diplom-s-podlinnyimi-pechatyami-i-podpisyami
mosbet http://mostbet6030.ru .
Купить диплом ВУЗа!
Мы изготавливаем дипломы психологов, юристов, экономистов и других профессий по приятным ценам— diplom-top.ru/diplom-s-vneseniem-v-reestr-dostupen-dlya-pokupki/
Мы изготавливаем дипломы любой профессии по приятным ценам. Стараемся поддерживать для клиентов адекватную ценовую политику. Для нас очень важно, чтобы документы были доступны для большого количества граждан.
Заказ диплома, который подтверждает окончание института, – это выгодное решение. Заказать диплом о высшем образовании: kupit-diplomyz24.com/kupit-diplom-kolledzha-v-moskve-5/
Где приобрести диплом по необходимой специальности?
Мы изготавливаем дипломы любых профессий по выгодным ценам. Мы готовы предложить документы техникумов, расположенных на территории всей РФ. Вы имеете возможность купить диплом за любой год, включая сюда документы старого образца СССР. Документы выпускаются на бумаге самого высокого качества. Это дает возможности делать государственные дипломы, не отличимые от оригинала. Они заверяются всеми необходимыми печатями и штампами. Всегда стараемся поддерживать для заказчиков адекватную политику тарифов. Важно, чтобы документы были доступны для большого количества граждан. 10000diplomov.ru/kupit-diplom-v-sizrani-2
1 vin https://www.1win6053.ru .
Мы можем предложить дипломы психологов, юристов, экономистов и других профессий по доступным тарифам. Дипломы производятся на настоящих бланках Приобрести диплом о высшем образовании diplom4you.com
Где купить диплом специалиста?
Приобрести диплом ВУЗа по невысокой стоимости вы сможете, обратившись к надежной специализированной фирме.: diplom-bez-problem.com
Приобрести диплом ВУЗа!
Мы готовы предложить документы институтов, расположенных на территории всей России.
diplomv-v-ruki.ru/kupite-originalnij-diplom-s-zaneseniem-v-reestr-bistro/
скупка золота в москве цены на сегодня b-gold.ru скупка золота в москве цены на сегодня b-gold.ru .
скупка золота с бриллиантами http://metaphysican.com/vsyo-chto-vam-nuzhno-znat-o-skupke-zolota-sovety-i-rekomendaczii// .
descărca 1win https://www.1win5004.ru .
Заказать диплом о высшем образовании!
Мы предлагаем документы учебных заведений, которые расположены в любом регионе Российской Федерации.
kupitediplom.ru/kupit-diplom-vuza-s-zaneseniem-v-reestr-bistro-i-nadezhno-2/
Приобретение официального диплома через надежную компанию дарит массу плюсов. Такое решение дает возможность сберечь как личное время, так и серьезные средства. Впрочем, достоинств намного больше.Мы изготавливаем дипломы любой профессии. Дипломы производят на фирменных бланках государственного образца. Доступная цена в сравнении с крупными затратами на обучение и проживание в другом городе. Приобретение диплома об образовании из российского ВУЗа будет выгодным шагом.
Приобрести диплом: diplom-kaluga.ru/kupit-diplom-s-reestrom-tsena-4/
Мы изготавливаем дипломы любой профессии по выгодным тарифам. Стараемся поддерживать для заказчиков адекватную политику цен. Для нас важно, чтобы документы были доступны для большинства граждан.
Покупка документа, подтверждающего окончание института, – это выгодное решение. Заказать диплом ВУЗа: diplom-bez-problem.com/kupit-diplom-ekb-5/
mostbet kg скачать на андроид http://mostbet6029.ru .
скупка золота за грамм 585 b-gold.ru скупка золота за грамм 585 b-gold.ru .
скупка золота в москве за грамм цена на сегодня https://www.metaphysican.com/vsyo-chto-vam-nuzhno-znat-o-skupke-zolota-sovety-i-rekomendaczii/ .
1win.com.ci [url=http://1win5004.ru]http://1win5004.ru[/url] .
dragon money бонусы [url=https://dragon-money01.com/]dragon money бонусы[/url] .
сайт dragon money casino сайт dragon money casino .
1win войти http://1win6053.ru .
Задался вопросом: можно ли на самом деле купить диплом государственного образца в Москве? Был приятно удивлен — это реально и легально!
Сначала искал информацию в интернете на тему: купить диплом о среднем образовании во владивостоке, куплю диплом ссср, купить диплом маи, купить аттестат 9 классов, купить диплом в екатеринбурге и получил базовые знания. В итоге остановился на материале: diplomybox.com/kupit-diplom-tver
1win online 1win online .
мост бет https://www.mostbet6029.ru .
mostbet.kg http://mostbet6030.ru/ .
Заказать диплом института по выгодной цене можно, обращаясь к проверенной специализированной компании. Купить документ о получении высшего образования вы можете у нас. diplomp-irkutsk.ru/kupit-diplom-s-zaneseniem-v-reestr-bistro-i-prosto-11
Приобрести диплом университета!
Купить диплом ВУЗа по невысокой цене возможно, обратившись к проверенной специализированной фирме. Приобрести диплом о высшем образовании: diplomidlarf.ru/diplom-s-reestrom-kupit-podlinnij-dokument
Купить диплом о высшем образовании!
Мы можем предложить документы ВУЗов, расположенных в любом регионе Российской Федерации. Документы печатаются на “правильной” бумаге самого высшего качества: mystroycenter.ru/oformlenie-dokumentov-ob-obrazovanii-dostupnyie-tsenyi
замена крестовины переднего кардана замена крестовины переднего кардана .
Где приобрести диплом по актуальной специальности?
Наша компания предлагаетвыгодно и быстро приобрести диплом, который выполняется на оригинальной бумаге и заверен печатями, водяными знаками, подписями. Диплом способен пройти лубую проверку, даже при помощи специфических приборов. Достигайте цели быстро и просто с нашими дипломами. Приобрести диплом ВУЗа! social.japrime.id/read-blog/38193_kupit-diplom-prepodavatelya.html
Мы изготавливаем дипломы любой профессии по приятным тарифам. Дипломы производят на фирменных бланках государственного образца Приобрести диплом об образовании diplomt-tver69.ru
Где заказать диплом по актуальной специальности?
Заказать диплом ВУЗа по доступной стоимости возможно, обращаясь к проверенной специализированной компании.: diploms-vuza.com
Подбираете где обучиться двигаться как топовые K-pop артисты? K-pop культура быстро растет в России. Столица предоставляет множество школ, где опытные инструкторы помогут вам овладеть этот зажигательный стиль танца. Определение лучшего места может оказаться непростой задачей. Полный рейтинг лучших K-pop танцевальных школ Москвы на 2025 год можно найти на tenchat.ru. Этот информационный ресурс регулярно освещает изменения о школах. Выбирая студию принимайте во внимание свой начальный уровень. Значительное число учащихся отмечают, что занятия K-pop танцами помогают не только изучить движения, но и улучшить физическую форму. Тренировки с единомышленниками помогают поддерживать мотивацию и эффективнее учиться в освоении новых элементов.
купить школьный диплом diplomys-vsem.ru .
1win ng 1win13.com.ng .
что делать с бонусным балансом на 1win http://1win6054.ru/ .
Где заказать диплом по нужной специальности?
Наши специалисты предлагают выгодно купить диплом, который выполняется на оригинальном бланке и заверен печатями, штампами, подписями. Документ пройдет любые проверки, даже с использованием специальных приборов. Достигайте цели быстро с нашими дипломами.
Приобрести диплом о высшем образовании fastdiploms.com/kupit-diplom-v-kaluge-9/
cas? de ?nchiriat ilfov cas? de ?nchiriat ilfov .
Online Schools in Louisiana, options for everyone, innovative.
Learn remotely in Louisiana, how.
Top Distance Learning Programs in Louisiana / Ranking of online institutions in Louisiana, that are worth considering.
Advantages of distance learning in Louisiana, facts that will surprise you.
How to choose an online school in Louisiana, for achieving goals.
Virtual classes in Louisiana, to save time.
Online School Education in Louisiana, parents.
How to Succeed at an Online School in Louisiana, personal tips.
Where to find resources for online education in Louisiana, get to know them.
Facts about distance learning in Louisiana, to keep up to date.
Louisiana: Online schools for your future, don’t miss out.
The Future of Education in Louisiana: Distance Learning, learn.
Distance Education Programs in Louisiana, choose the appropriate option.
How Distance Schools in Louisiana are Transforming Learning, for professional development.
Educational Resources in Louisiana for Distance Learning, check for yourself.
How to learn effectively at a distance School in Louisiana, for your convenience.
Distance Learning in Louisiana: current programs, for future.
How to get an education in Louisiana online, easily.
Distance learning as an alternative, discover / successes and achievements.
Online Schools in Louisiana http://www.line-ouisi.com .
mostbet официальный сайт mostbet официальный сайт .
dwi laws to Ohio can be complex, nonetheless it’s important to have a solid comprehension of people if the user are facing complaints. Driving below will influence (DUI) is truly a severe offence which is can have substantial consequences on personal future. In Ohio, on lawful threshold for blood ethanol content (BAC) is 8 percentfor nearly all drivers additionally four pct business vehicle operators.
If you’ll be pulled by law security services and alleged of driving while intoxicated, they may accomplish field temperance assessments or substance examinations, really being breathalyzer or bloodstream examinations, to figure out your level of impairment. Refusing involving tests can cause intelligent penalties, including driving license suspension.
drunk driving offenses in Ohio maintain multiple penalties, dependant on factors such as last judgment of conviction, BAC level, and also no matter if here was basically an catastrophe or accidental injury concerned. Implications might add fines, license suspension system, necessary booze process services, probation, and genuinely penitentiary time. Do it again crimes and angry situation can result in more very bad penalties.
Having a knowledgeable DUI a good defense attorney is crucial to manage the complexnesses of Ohio drunk driving charge laws. They can easily analyze the indicators, encourage the legalization of the stop your vehicle, matter the clarity of assessments, and explore potentiality safeguarding to help alleviate the costs. You’ll also, an lawyer can guidelines you by the appropriate process, producing a proper are secured and indicating for the top achievable outcome.
Remember, being notified with regards to Ohio’s DUI regulations and finding the support of an seasoned personal injury attorney are important actions in efficaciously management a DUI accusation furthermore guarding personal long-term. criminal reviews attorney
1win бк https://1win6054.ru/ .
1win онлайн 1win6005.ru .
1win betting site http://1win13.com.ng/ .
Приобрести диплом ВУЗа по невысокой цене можно, обратившись к проверенной специализированной компании. Купить документ института вы сможете в нашей компании в столице. diplom-zentr.com/kupit-diplom-s-reestrom-bistro-i-nadezhno-21
1хwin http://1win6006.ru/ .
драгн мани драгн мани .
ремонт переднего кардана ремонт переднего кардана .
dragon мани dragon мани .
мостбет кыргызстан скачать https://mostbet6030.ru/ .
locuin?e moderne de ?nchiriat locuin?e moderne de ?nchiriat .
dragon money casino dragon money casino .
игра ракета на деньги 1win https://1win6006.ru/ .
Приобрести диплом об образовании!
Мы готовы предложить дипломы психологов, юристов, экономистов и прочих профессий по доступным ценам— diplomaj-v-tule.ru/diplom-vracha-lechebnoe-delo-kupit/
dragon money casino регистрация dragon money casino регистрация .
Привет!
Без ВУЗа сложно было продвигаться по карьерной лестнице. В наше время документ не дает совершенно никаких гарантий, что удастся найти хорошую работу. Куда более важное значение имеют навыки специалиста и его опыт работы. Именно из-за этого решение о покупке диплома следует считать мудрым и рациональным. Купить диплом университета tweecampus.com/read-blog/143216_%D0%B4%D0%B8%D0%BF%D0%BB%D0%BE%D0%BC-%D0%BE-%D0%B2%D1%8B%D1%81%D1%88%D0%B5%D0%BC-%D0%BE%D0%B1%D1%80%D0%B0%D0%B7%D0%BE%D0%B2%D0%B0%D0%BD%D0%B8%D0%B8-%D1%81-%D0%B7%D0%B0%D0%BD%D0%B5%D1%81%D0%B5%D0%BD%D0%B8%D0%B5%D0%BC-%D0%B2-%D1%80%D0%B5%D0%B5%D1%81%D1%82%D1%80-%D1%86%D0%B5%D0%BD%D0%B0.html
Приобрести диплом академии !
Покупка диплома университета России в нашей компании является надежным делом, потому что документ заносится в реестр. Заказать диплом о высшем образовании diplomc-v-ufe.ru/vnesti-diplom-v-reestr-bistro-i-udobno
можно ли купить в школе аттестат
Мы изготавливаем дипломы любой профессии по приятным тарифам. Стоимость может зависеть от той или иной специальности, года получения и ВУЗа. Стараемся поддерживать для заказчиков адекватную политику тарифов. Важно, чтобы документы были доступными для большого количества наших граждан. купить диплом экскурсовода
Приобрести документ института вы сможете в нашем сервисе. dip-lom-rus.ru/kupit-diplom-vracha-2-2
Хочу рассказать о своем опыте по заказу аттестата пту, думал это не реально и стал искать информацию в сети, про покупка диплома в москве, купить дипломы недорого, где можно купить диплом об образовании, диплом с занесением в госреестр, купить диплом о среднем специальном образовании официально, постепенно вникая в суть дела нашел отличный материал здесь proffdiplomik.com/sankt-peterburg)
Клининг в Москве без рисков: рейтинг проверенных клининговых агентств
лучшая клининговая компания москва http://www.kliningovye-kompanii-msk.ru .
Клининг Москва: рейтинг лучших организаций по уборке квартир и домов
клининговые компании москвы рейтинг https://kliningovye-kompanii-msk1.ru/ .
Пляжный отдых в Абхазии с удобствами и развлечениями
абхазия отдых цена otdyhabhazia01.ru .
Мы можем предложить дипломы любой профессии по приятным ценам. Преимущества приобретения документов в нашей компании
Вы покупаете документ через надежную компанию. Это решение сэкономит не только средства, но и время.
Плюсов куда больше:
• Документы печатаются на настоящих бланках со всеми печатями;
• Предлагаем дипломы любого ВУЗа России;
• Стоимость намного ниже той, которую довелось бы заплатить на очном и заочном обучении в университете;
• Быстрая доставка как по столице, так и в другие регионы России.
Заказать диплом о высшем образовании– http://11sms.ru/?post_type=topic&p=8224/ – 11sms.ru/?post_type=topic&p=8224
купить диплом колледжа недорого купить диплом колледжа недорого .
Заказать диплом о высшем образовании!
Мы изготавливаем дипломы любой профессии по приятным ценам. Вы заказываете диплом через надежную компанию. : gadjetforyou.ru/zakazat-diplom-bez-predoplatyi
Диплом любого ВУЗа Российской Федерации!
Без получения диплома трудно было продвигаться вверх по карьере. Именно поэтому решение о покупке диплома можно считать выгодным и рациональным. Приобрести диплом института maxima.2ua.in.ua/viewtopic.php?f=3&t=8018
Мы предлагаем дипломы любой профессии по разумным тарифам. Стоимость зависит от определенной специальности, года получения и ВУЗа. Стараемся поддерживать для клиентов адекватную ценовую политику. Важно, чтобы документы были доступны для подавляющей массы граждан. диплом института культуры купить
Приобрести документ института можно в нашем сервисе. diplom-zentr.com/kupit-diplom-kemerovo-2
Где приобрести диплом специалиста?
Мы готовы предложить дипломы любой профессии по невысоким тарифам. Мы можем предложить документы техникумов, которые находятся на территории всей Российской Федерации. Вы можете купить качественный диплом за любой год, в том числе документы старого образца СССР. Дипломы и аттестаты делаются на “правильной” бумаге самого высокого качества. Это дает возможность делать настоящие дипломы, которые не отличить от оригинала. Документы заверяются всеми необходимыми печатями и штампами. Стараемся поддерживать для покупателей адекватную ценовую политику. Важно, чтобы документы были доступными для большого количества граждан. diplom-zakaz.ru/kupit-diplom-kandidata-nauk-2-7
онлайн-казино драгон мани онлайн-казино драгон мани .
купить бланк аттестата о среднем
1winn 1winn .
Купить диплом университета по выгодной стоимости можно, обращаясь к проверенной специализированной фирме. Мы оказываем услуги по продаже документов об окончании любых университетов России. Заказать диплом любого университета– diplomk-vo-vladivostoke.ru/kupit-diplom-v-reestre-bistro-i-nadezhno-5/
помещения для хранения вещей помещения для хранения вещей .
1win казино http://1win6054.ru/ .
1win casino en línea https://www.1win1001.top .
most bet https://mostbet6031.ru .
драгон драгон .
1win online site https://1win13.com.ng .
1win вход на сайт http://1win6053.ru .
Для эффективного продвижения по карьере понадобится наличие официального диплома о высшем образовании. Быстро приобрести диплом о высшем образовании у надежной компании: diplomgorkiy.com/diplom-kupit-v-samare/
Купить диплом о высшем образовании!
Мы готовы предложить документы университетов, которые находятся на территории всей России.
diplomass.com/kupit-diplom-s-vneseniem-v-reestr-nadezhno-i-bistro/
Привет!
Без ВУЗа очень сложно было продвинуться по карьерной лестнице. На текущий момент этот документ не дает совершенно никаких гарантий, что получится получить привлекательную работу. Более важное значение имеют профессиональные навыки и знания специалиста и его постоянный опыт. Именно из-за этого решение о покупке диплома стоит считать целесообразным. Приобрести диплом о высшем образовании stpos.ru/forum/user/41270
1win descarga http://1win1001.top .
mostbet kg скачать http://mostbet6031.ru/ .
Где заказать диплом специалиста?
Мы изготавливаем дипломы любой профессии по разумным тарифам. Мы можем предложить документы техникумов, которые находятся на территории всей РФ. Вы сможете приобрести качественно сделанный диплом за любой год, указав необходимую специальность и хорошие оценки за все дисциплины. Дипломы и аттестаты выпускаются на “правильной” бумаге самого высокого качества. Это позволяет делать настоящие дипломы, которые невозможно отличить от оригиналов. Они заверяются всеми обязательными печатями и подписями. Стараемся поддерживать для заказчиков адекватную ценовую политику. Для нас важно, чтобы дипломы были доступны для большого количества граждан. 10000diplomov.ru/kupit-diplom-v-bryanske-2-4
1win.com.ci 1win.com.ci .
один вин официальный сайт http://1win6042.ru .
mostber https://www.mostbet6032.ru .
1vin http://www.1win6054.ru .
драгон мани официальный драгон мани официальный .
сайт драгон моней сайт драгон моней .
1win online site 1win13.com.ng .
1 win казино https://1win6006.ru .
Заказать диплом института!
Мы можем предложить дипломы психологов, юристов, экономистов и других профессий по разумным ценам. Вы заказываете диплом через надежную фирму. : veneraroleplay.listbb.ru/viewtopic.php?f=4&t=1170
1win вход https://1win6042.ru .
мостбет скачать https://www.mostbet6032.ru .
драгон мани бонусы драгон мани бонусы .
drgn1n casino drgn1n casino .
Мы готовы предложить дипломы любой профессии по приятным тарифам. Мы можем предложить документы техникумов, которые расположены в любом регионе РФ. Документы выпускаются на “правильной” бумаге самого высшего качества. Это позволяет делать государственные дипломы, которые невозможно отличить от оригиналов. learnsoft.copiny.com/question/details/id/1083044
сайт dragon money casino сайт dragon money casino .
Здравствуйте!
Мы готовы предложить дипломы любых профессий по приятным тарифам. Цена зависит от той или иной специальности, года выпуска и образовательного учреждения: rdiploma24.com/
Где купить диплом по нужной специальности?
Мы можем предложить дипломы любой профессии по выгодным ценам. Для нас очень важно, чтобы документы были доступны для большого количества граждан. Приобрести диплом об образовании diplomus-spb.ru/visshee-obrazovanie-put-k-uspeshnoj-karere/
Привет!
Для некоторых людей, заказать диплом университета – это острая потребность, возможность получить достойную работу. Однако для кого-то – это очевидное желание не терять огромное количество времени на учебу в ВУЗе. С какой бы целью вам это не потребовалось, мы готовы помочь. Максимально быстро, качественно и недорого сделаем документ нового или старого образца на подлинных бланках с реальными печатями.
Основная причина, почему многие люди покупают документы, – желание занять хорошую должность. Допустим, способности и опыт дают возможность человеку устроиться на желаемую работу, однако документального подтверждения квалификации нет. При условии, что для работодателя важно наличие “корочек”, риск потерять место работы очень высокий.
Заказать документ института вы можете в нашем сервисе. Мы предлагаем документы об окончании любых ВУЗов России. Вы получите диплом по любым специальностям, любого года выпуска, в том числе документы старого образца. Даем гарантию, что при проверке документа работодателями, подозрений не возникнет.
Разных ситуаций, которые вынуждают заказать диплом ВУЗа много. Кому-то срочно потребовалась работа, и нужно произвести особое впечатление на руководителя при собеседовании. Некоторые хотят попасть в престижную компанию, для того, чтобы повысить собственный статус в социуме и в дальнейшем начать свой бизнес. Чтобы не терять время, а сразу начинать успешную карьеру, используя имеющиеся навыки, можно купить диплом в интернете. Вы станете полезным в обществе, получите финансовую стабильность в минимальные сроки- аттестат купить за 9 класс
драгон моней драгон моней .
Быстро и просто заказать диплом о высшем образовании!
Купить диплом ВУЗа по выгодной цене возможно, обратившись к проверенной специализированной компании. Заказать диплом: good-diplom.ru/diplom-s-reestrom-kupit-ofitsialno-i-nadezhno-2
Мы можем предложить дипломы психологов, юристов, экономистов и любых других профессий по выгодным ценам.
Вы заказываете документ через надежную и проверенную фирму. Приобрести диплом института– http://mircalemi.net/showthread.phptid=194566/ – mircalemi.net/showthread.phptid=194566
Приобрести диплом о высшем образовании!
Мы можем предложить документы университетов, которые находятся в любом регионе РФ. Дипломы и аттестаты печатаются на “правильной” бумаге самого высшего качества: unusualrp.forumex.ru/viewtopic.phpf=60&t=943
Приобрести диплом любого университета. Заказ диплома через надежную компанию дарит немало преимуществ. Данное решение позволяет сберечь как личное время, так и существенные денежные средства. hramada.listbb.ru/viewtopic.php?f=7&t=1478
1win com http://1win6006.ru/ .
Купить диплом о высшем образовании!
Мы готовы предложить документы учебных заведений, расположенных на территории всей РФ.
diplomaj-v-tule.ru/kupit-diplom-instituta-s-reestrom-bistro-i-nadezhno-2/
Мы изготавливаем дипломы любых профессий по невысоким ценам. Мы готовы предложить документы техникумов, расположенных в любом регионе Российской Федерации. Документы делаются на бумаге высшего качества. Это позволяет делать государственные дипломы, которые невозможно отличить от оригиналов. jobsleed.com/companies/archive-diploma
казино dragon казино dragon .
dragonmoney dragonmoney .
адин вин адин вин .
мостбет скачать бесплатно мостбет скачать бесплатно .
Купить диплом любого ВУЗа. Заказ документа о высшем образовании через проверенную и надежную компанию дарит ряд достоинств для покупателя. Такое решение помогает сберечь время и значительные денежные средства. hitman.getbb.ru/viewtopic.php?f=16&t=2768
Для успешного продвижения вверх по карьере потребуется наличие диплома о высшем образовании. Приобрести диплом об образовании у сильной фирмы: diplom-club.com/kupit-diplom-bistro-i-nadezhno-bez-lishnix-problem-3/
pin up azerbaycan pin up azerbaycan .
мостбет казино войти https://mostbet6033.ru .
сайт 1win официальный сайт вход https://1win6043.ru/ .
Купить диплом о высшем образовании !
Приобретение диплома ВУЗа России в нашей компании является надежным процессом, ведь документ будет заноситься в государственный реестр. Приобрести диплом об образовании vacshidiplom.com/pokupka-diploma-s-zaneseniem-v-reestr-legko-i-bistro
Мы изготавливаем дипломы любых профессий по приятным ценам. Стоимость будет зависеть от выбранной специальности, года получения и образовательного учреждения. Всегда стараемся поддерживать для покупателей адекватную политику тарифов. Для нас очень важно, чтобы документы были доступны для большого количества граждан. купить аттестат за 8 классов
склад под хранение вещей аренда склад под хранение вещей аренда .
Где заказать диплом по необходимой специальности?
Наша компания предлагает быстро купить диплом, который выполняется на оригинальном бланке и заверен мокрыми печатями, водяными знаками, подписями. Наш диплом пройдет лубую проверку, даже с применением специфических приборов. Решайте свои задачи быстро с нашим сервисом.
Приобрести диплом о высшем образовании poluchidiplom.com/kupit-diplom-tovaroveda-2/
Мы изготавливаем дипломы психологов, юристов, экономистов и любых других профессий по приятным ценам. Стараемся поддерживать для покупателей адекватную политику цен. Для нас очень важно, чтобы дипломы были доступны для большинства граждан.
Покупка диплома, подтверждающего обучение в университете, – это выгодное решение. Заказать диплом университета: kupite-diplom0024.ru/diplom-ofitsialno-kupit-2/
Купить диплом любого института!
Мы изготавливаем дипломы психологов, юристов, экономистов и других профессий по невысоким тарифам— diplom4you.com/diplom-vracha-lechebnoe-delo-kupit-2/
1win.com 1win.com .
Приобретение документа о высшем образовании через качественную и надежную компанию дарит ряд достоинств для покупателя. Данное решение помогает сэкономить как личное время, так и серьезные денежные средства. Однако, преимуществ значительно больше.Мы изготавливаем дипломы любых профессий. Дипломы производятся на настоящих бланках государственного образца. Доступная цена сравнительно с огромными издержками на обучение и проживание. Приобретение диплома института будет выгодным шагом.
Купить диплом: diplomass.com/kupit-diplom-ob-obrazovanii-s-reestrom-4/
Купить диплом института по доступной цене вы можете, обращаясь к проверенной специализированной компании. Приобрести документ о получении высшего образования можно в нашем сервисе. diplomass.com/diplom-s-zaneseniem-v-reestr-8
pin up azerbaijan pin up azerbaijan .
Где заказать диплом по актуальной специальности?
Мы оказываем услуги по производству и продаже документов об окончании любых университетов Российской Федерации. Документы производят на настоящих бланках государственного образца. Рєplastdet.ru/index.phptopic=2057.new#new
Где купить диплом по необходимой специальности?
Готовый диплом с приложением отвечает запросам и стандартам Министерства образования и науки России, неотличим от оригинала – даже со специально предназначенным оборудованием. Не стоит откладывать свои мечты на несколько лет, реализуйте их с нашей помощью – отправьте простую заявку на диплом прямо сейчас! Получить диплом о среднем образовании – быстро и просто! linkchia.com/profile/nellrios91748
Приобрести документ университета можно в нашем сервисе. Мы оказываем услуги по производству и продаже документов об окончании любых ВУЗов России. Вы сможете получить диплом по любым специальностям, включая документы старого образца. Даем 100% гарантию, что в случае проверки документа работодателем, подозрений не появится. diplomk-v-krasnodare.ru/kupit-diplom-s-reestrom-bistro-i-udobno-3/
Мы изготавливаем дипломы любой профессии по разумным ценам.– damdiplomisa.com/dostupnaya-tsena-na-diplom-s-reestrom/
cazinouri online moldova http://www.1win5010.ru .
1win casino https://1win1001.top .
Где заказать диплом специалиста?
Наши специалисты предлагаютвыгодно приобрести диплом, который выполняется на бланке ГОЗНАКа и заверен печатями, водяными знаками, подписями должностных лиц. Данный документ пройдет лубую проверку, даже с использованием специальных приборов. Решите свои задачи максимально быстро с нашими дипломами. Заказать диплом любого ВУЗа! paulpogbaclub.com/read-blog/1769_kupit-diplom-kolledzha.html
купить диплом занесенный в реестр москва
Где купить диплом специалиста?
Мы предлагаем быстро и выгодно приобрести диплом, который выполнен на бланке ГОЗНАКа и заверен печатями, штампами, подписями. Документ пройдет лубую проверку, даже с применением специального оборудования. Решите свои задачи быстро и просто с нашей компанией.
Купить диплом о высшем образовании asxdiplommy.com/kupit-diplom-spetsialista-34/
Мы предлагаем дипломы психологов, юристов, экономистов и любых других профессий по невысоким тарифам. Всегда стараемся поддерживать для клиентов адекватную политику цен. Для нас очень важно, чтобы документы были доступными для подавляющей массы граждан.
Приобретение диплома, который подтверждает обучение в ВУЗе, – это грамотное решение. Заказать диплом о высшем образовании: kupitediplom0029.ru/diplom-kupit-v-spb-3/
Мы можем предложить дипломы любой профессии по разумным ценам. Цена зависит от той или иной специальности, года выпуска и университета. Всегда стараемся поддерживать для заказчиков адекватную политику тарифов. Для нас важно, чтобы документы были доступными для большинства граждан. купить диплом высшего образования в вологде
Приобрести диплом любого университета!
Мы предлагаем дипломы психологов, юристов, экономистов и других профессий по приятным ценам— poluchidiplom.com/kupit-diplom-o-visshem-obrazovanii-17/
1win онлайн https://1win6042.ru/ .
Доброго времени суток!
Для многих людей, купить диплом ВУЗа – это необходимость, шанс получить достойную работу. Но для кого-то – это банальное желание не терять время на учебу в институте. Что бы ни толкнуло вас на это решение, мы готовы помочь. Оперативно, качественно и по доступной цене изготовим диплом нового или старого образца на государственных бланках с реальными печатями.
Ключевая причина, почему люди прибегают к покупке документа, – получить определенную должность. Например, знания и опыт дают возможность кандидату устроиться на работу, однако подтверждения квалификации нет. Если для работодателя важно присутствие “корочек”, риск потерять хорошее место довольно высокий.
Заказать документ о получении высшего образования вы сможете в нашей компании в столице. Мы предлагаем документы об окончании любых ВУЗов России. Вы получите необходимый диплом по любым специальностям, любого года выпуска, в том числе документы старого образца. Даем 100% гарантию, что при проверке документов работодателями, никаких подозрений не возникнет.
Факторов, которые вынуждают приобрести диплом о среднем образовании немало. Кому-то срочно нужна работа, а значит, необходимо произвести особое впечатление на руководителя в процессе собеседования. Некоторые мечтают устроиться в большую компанию, для того, чтобы повысить собственный статус и в дальнейшем начать свое дело. Чтобы не тратить попусту годы жизни, а сразу начать удачную карьеру, применяя врожденные таланты и полученные знания, можно приобрести диплом в онлайне. Вы станете полезным в социуме, обретете денежную стабильность в минимальные сроки- диплом о высшем образовании купить
Приветствую!
Мы изготавливаем дипломы любой профессии по приятным ценам. Цена зависит от определенной специальности, года выпуска и ВУЗа: rdiplomm24.com/
1win mx https://www.1win1001.top .
Мы можем предложить дипломы психологов, юристов, экономистов и других профессий по приятным ценам.
Вы покупаете диплом через надежную компанию. Заказать диплом академии– http://social.onlinelll.com/read-blog/91_kakim-obrazom-razumno-priobresti-dlya-sebya-dokumenty-ob-obuchenii-v-nashi-dni.html/ – social.onlinelll.com/read-blog/91_kakim-obrazom-razumno-priobresti-dlya-sebya-dokumenty-ob-obuchenii-v-nashi-dni.html
мостбет кыргызстан скачать http://mostbet6032.ru .
pin up azerbaycan pin up azerbaycan .
Где заказать диплом специалиста?
Мы изготавливаем дипломы любой профессии по приятным ценам. Для нас важно, чтобы документы были доступны для большого количества наших граждан. Приобрести диплом об образовании diplomk-v-krasnodare.ru/kupit-diplom-vnesennij-v-reestr-9/
1win online site https://1win14.com.ng/ .
санкт петербург диплом купить
pariuri sportive moldova 1win5010.ru .
pin up azerbaycan pin up azerbaycan .
1win login nigeria 1win14.com.ng .
pariuri sportive moldova http://www.1win5011.ru .
что такое 1win 1win6042.ru .
1вин приложение https://1win6043.ru/ .
motbet motbet .
aviator mostbet http://mostbet6031.ru/ .
Заказать диплом о высшем образовании!
Мы готовы предложить документы ВУЗов, которые расположены в любом регионе РФ.
kupitediplom0027.ru/kupit-diplom-moskva-s-zaneseniem-v-reestr-2/
Купить диплом ВУЗа по выгодной стоимости возможно, обращаясь к надежной специализированной фирме. Заказать документ ВУЗа вы можете у нас в столице. diplom-ryssia.com/kupit-diplom-s-ofitsialnim-zaneseniem-v-reestr-instituta
1win metode de plată 1win metode de plată .
казино онлайн kg https://mostbet6032.ru .
драгон маней драгон маней .
драгон мани казино зеркало драгон мани казино зеркало .
Покупка документа о высшем образовании через надежную фирму дарит множество достоинств для покупателя. Данное решение помогает сэкономить время и значительные финансовые средства. Тем не менее, преимуществ намного больше.Мы готовы предложить дипломы любой профессии. Дипломы производятся на настоящих бланках. Доступная цена по сравнению с крупными тратами на обучение и проживание в другом городе. Заказ диплома университета будет мудрым шагом.
Быстро заказать диплом о высшем образовании: diplom-onlinex.com/bistraya-i-nadezhnaya-pokupka-diploma-ob-obrazovanii-s-reestrom/
înregistrare 1win http://1win5012.ru/ .
мостбет скачать на андроид мостбет скачать на андроид .
Заказать диплом о высшем образовании!
Мы предлагаем документы институтов, которые находятся в любом регионе России.
asxdiplommy.com/kupit-diplom-zaregistrirovannij-v-reestre-2/
Где приобрести диплом специалиста?
Готовый диплом с нужными печатями и подписями целиком и полностью отвечает стандартам, никто не сумеет отличить его от оригинала – даже со специально предназначенным оборудованием. Не откладывайте собственные мечты и цели на несколько лет, реализуйте их с нами – отправьте заявку на диплом уже сегодня! Диплом о высшем образовании – быстро и просто! foro.rune-nifelheim.com/general-ragnarok-m/poluchite-diplom-mechty-bez-posescheniya-zanyatij
Где приобрести диплом специалиста?
Мы предлагаем документы об окончании любых университетов РФ. Документы изготавливаются на фирменных бланках. Рєkkhelper.com/employer/premialnie-diplom-24
Приобрести документ о получении высшего образования вы можете у нас в столице. Мы оказываем услуги по продаже документов об окончании любых ВУЗов Российской Федерации. Вы получите диплом по любой специальности, включая документы старого образца. Даем гарантию, что при проверке документов работодателями, подозрений не появится. diplom-onlinex.com/kupit-diplom-s-zaneseniem-bistro-i-nadezhno-3/
drgn зеркало drgn зеркало .
1 вин войти http://www.1win6043.ru .
мрстбет мрстбет .
dragon money рефералка http://www.dragon-money11.com/ .
Мы изготавливаем дипломы любых профессий по доступным тарифам.– diplom-zentr.com/bistrij-i-udobnij-diplom-s-provodkoj-ot-ekspertov/
înregistrare 1win https://1win5012.ru/ .
Мы можем предложить дипломы психологов, юристов, экономистов и других профессий по приятным ценам. Купить диплом профессора — kyc-diplom.com/diplom-articles/diplom-professora.html
pin up azerbaycan pin up azerbaycan .
Приобрести диплом любого университета поможем. Купить диплом повара – diplomybox.com/diplom-povara
pin up azerbaijan pin up azerbaijan .
1win букмекер http://1win6007.ru .
мост бет https://mostbet6011.ru/ .
pinup azerbaycan pinup azerbaycan .
1win https://1win6007.ru .
mostbet casino http://mostbet6011.ru .
Поверка манометров с выездом на объект по предварительной записи
поверка манометр в москве http://www.poverkamanomterov.ru .
Лечение запоев и зависимостей в современной платной наркологической клинике
клиника наркологии и алкоголизма platnaya-narkologicheskaya-klinika-0.ru .
скачать 1win с официального сайта https://1win6008.ru/ .
pin up azerbaycan pin up azerbaycan .
portofele electronice casino http://1win5011.ru/ .
1win online https://1win14.com.ng .
Мы готовы предложить дипломы любой профессии по приятным ценам. Дипломы производятся на настоящих бланках государственного образца Заказать диплом о высшем образовании diplomers.com
Где приобрести диплом специалиста?
Приобрести диплом института по выгодной цене вы можете, обращаясь к надежной специализированной фирме.: ry-diplom.com
cazino md https://www.1win5011.ru .
1вин официальный 1вин официальный .
mostbet скачать на телефон бесплатно андроид http://mostbet6033.ru/ .
Приобрести диплом любого университета!
Заказать диплом института по невысокой цене возможно, обращаясь к надежной специализированной компании. Приобрести диплом о высшем образовании: diplomaj-v-tule.ru/kupit-diplom-s-reestrom-v-rossii-9
1вин 1вин .
1win betting 1win betting .
Где купить диплом специалиста?
Наша компания предлагаетвыгодно заказать диплом, который выполнен на оригинальной бумаге и заверен мокрыми печатями, водяными знаками, подписями. Наш диплом пройдет лубую проверку, даже с применением специфических приборов. Достигайте цели быстро и просто с нашими дипломами. Приобрести диплом университета! rashin.4adm.ru/viewtopic.php?f=27&t=3338
wan win wan win .
mostbet официальный сайт mostbet6033.ru .
Где заказать диплом специалиста?
Наша компания предлагает выгодно приобрести диплом, который выполнен на оригинальной бумаге и заверен мокрыми печатями, водяными знаками, подписями должностных лиц. Документ пройдет любые проверки, даже при использовании специфических приборов. Достигайте свои цели быстро и просто с нашей компанией.
Заказать диплом университета kupit-diplom24.com/kupit-diplom-v-moskve-23/
pin up azerbaycan pin up azerbaycan .
Всегда думал что купить диплом о высшем образовании это миф и нереально, но все оказалось не так, изначально искал информацию про: купить диплом пекаря, купить диплом петропавловск, купить диплом программиста в омске, купить диплом с реестром спб, купить диплом училища в нижнем тагиле, потом про дипломы вузов, подробнее здесь diplomybox.com/kupit-diplom-bakalavra-kaliningrad
склад для хранения имущества склад для хранения имущества .
Быстро и просто приобрести диплом ВУЗа!
Мы предлагаем дипломы любой профессии по выгодным тарифам— diplomk-v-krasnodare.ru/kupit-diplom-o-visshem-obrazovanii-ofitsialno-2/
1.вин 1win6044.ru .
pin up azerbaycan pin up azerbaycan .
1win moldova http://www.1win5012.ru .
купить диплом гос образца
Купить диплом об образовании. Заказ документа о высшем образовании через надежную фирму дарит ряд преимуществ. Такое решение помогает сэкономить время и значительные финансовые средства. wap.fortboyard2012forum.4adm.ru/posting.php?mode=post&f=27&sid=7f4e50050bfafd017359965aaf1b6f53
мостбет промокод http://www.mostbet6012.ru .
1vin kg https://1win6009.ru .
buy viagra online cheapviagrausaonline.com .
игра ракета на деньги 1win игра ракета на деньги 1win .
pinup azerbaycan pinup azerbaycan .
mostbet официальный сайт mostbet официальный сайт .
Где приобрести диплом по актуальной специальности?
Наши специалисты предлагают выгодно приобрести диплом, который выполняется на оригинальном бланке и заверен печатями, штампами, подписями должностных лиц. Документ способен пройти лубую проверку, даже с применением профессионального оборудования. Решите свои задачи быстро с нашей компанией.
Приобрести диплом ВУЗа diplomus-spb.ru/gde-kupit-diplom-o-srednem-obrazovanie-9/
Быстро купить диплом об образовании!
Купить диплом ВУЗа по невысокой цене возможно, обратившись к надежной специализированной фирме. Заказать диплом о высшем образовании: diplomk-vo-vladivostoke.ru/kupit-diplom-s-provodkoj-tsena-i-garantiya-podlinnosti
Заказать диплом университета по доступной стоимости можно, обращаясь к проверенной специализированной компании. Заказать документ ВУЗа можно в нашем сервисе. diplomus-spb.ru/kupit-diplom-instituta-s-reestrom-bistro-i-nadezhno-9
1win bet deposit https://1win15.com.ng/ .
Soft2bet http://www.viagrarrtt.com .
Приобрести диплом любого университета!
Мы готовы предложить документы ВУЗов, расположенных в любом регионе Российской Федерации. Документы печатаются на бумаге высшего качества: o91746bp.beget.tech/2025/03/31/oformlenie-diplomov-i-attestatov-bystro-i-legalno.html
Заказать диплом ВУЗа !
Приобретение диплома ВУЗа РФ в нашей компании является надежным делом, потому что документ будет заноситься в государственный реестр. Приобрести диплом института freediplom.com/tsena-diploma-s-zaneseniem-v-reestr-sprosite-sejchas
купить диплом в магнитогорске diplomys-vsem.ru .
Приобрести диплом университета по невысокой цене можно, обращаясь к надежной специализированной компании. Мы предлагаем документы об окончании любых университетов РФ. Заказать диплом любого ВУЗа– diplom-zentr.com/pokupka-diploma-s-zaneseniem-v-reestr-6/
Приобрести диплом под заказ в столице можно через официальный портал компании. cyltalentohumano.com/employer/frees-diplom
Мы можем предложить дипломы психологов, юристов, экономистов и прочих профессий по приятным тарифам. Мы готовы предложить документы техникумов, которые находятся в любом регионе Российской Федерации. Документы выпускаются на бумаге высшего качества. Это дает возможности делать государственные дипломы, не отличимые от оригинала. dyado.listbb.ru/viewtopic.phpf=2&t=1416
ван вин 1win6008.ru .
1win http://www.1win5012.ru .
1win sports http://1win15.com.ng .
Заказать диплом института по выгодной стоимости возможно, обращаясь к надежной специализированной компании. Купить документ о получении высшего образования можно в нашем сервисе. diplomg-cheboksary.ru/kupit-diplom-v-moskve-s-zaneseniem-7
pin up azerbaycan pin up azerbaycan .
мостюет http://mostbet6011.ru .
Приобрести диплом об образовании. Покупка документа о высшем образовании через надежную фирму дарит ряд плюсов. Это решение помогает сберечь время и серьезные финансовые средства. californiarpn2.listbb.ru/viewtopic.php?f=1&t=1790
1 win казино https://1win6007.ru .
Приобрести диплом ВУЗа!
Мы можем предложить дипломы любой профессии по приятным ценам— diplomservis.ru/kupit-diplom-v-ekaterinburge-prosto-i-bistro/
Купить диплом возможно через официальный портал компании. mastercode.ru/forum/PAGE_NAME=profile_view&UID=5359
купить диплом политеха
1vin 1vin .
pin up azerbaycan pin up azerbaycan .
Мы изготавливаем дипломы любых профессий по приятным тарифам. Мы предлагаем документы техникумов, расположенных на территории всей РФ. Документы выпускаются на бумаге высшего качества. Это позволяет делать настоящие дипломы, которые невозможно отличить от оригиналов. ozmt.getbb.ru/ucp.phpmode=login
1wiun https://www.1win6043.ru .
скачать 1win с официального сайта https://1win6008.ru/ .
Услуги сантехника с подбором оптимальных решений под бюджет заказчика
вызвать сантехника петергоф https://vyzov-santekhnika1-spb.ru/petergof/ .
Услуги сантехника для замены труб, батарей, стояков и сантехнических узлов
сантехник недорого спб красносельский район сантехник недорого спб красносельский район .
Приобрести диплом о высшем образовании!
Мы готовы предложить документы институтов, которые находятся на территории всей России.
diplomnie.com/kupit-diplom-yurista-s-zaneseniem-v-reestr-bistro-4/
pin up az?rbaycan pin up az?rbaycan .
Приобрести диплом ВУЗа !
Покупка диплома ВУЗа РФ в нашей компании – надежный процесс, так как документ заносится в реестр. Приобрести диплом об образовании diplomv-v-ruki.ru/kupit-proverennij-diplom-3
Заказать диплом любого института!
Мы оказываем услуги по продаже документов об окончании любых ВУЗов Российской Федерации. Документы производят на подлинных бланках государственного образца. o91707v5.beget.tech/2025/04/08/bystroe-reshenie-voprosa-s-diplomom.html
Заказать диплом любого университета!
Мы можем предложить документы учебных заведений, которые расположены в любом регионе России. Дипломы и аттестаты печатаются на “правильной” бумаге высшего качества: teseygroup.ru/question/kupit-diplom-bystro-i-nedorogo-ofitsialnye-dokumenty
Kraken официальный сайт
Ищете надежную платформу для торгов и инвестиций в криптовалюту? Познакомьтесь с Kraken! Это один из самых известных и безопасных криптобирж в мире.
Почему стоит выбрать Kraken?
– Безопасность: Ваши средства защищены передовыми технологиями.
– Широкий выбор: Более 50 криптовалют для торговли, включая биткойн и эфир.
– Удобный интерфейс: Простая навигация и интуитивно понятные инструменты для анализа.
– Низкие комиссии: Конкурентные ставки на торговлю для максимизации ваших доходов.
– Поддержка: Круглосуточная помощь от профессионалов.
Зарегистрируйтесь на официальном сайте Kraken сегодня и получите доступ к премиальной платформе для торговли!
Присоединяйтесь к миллионам пользователей и начните свою крипто-приключение прямо сейчас!<a
кракен даркнет
1 win казино http://1win6008.ru/ .
1 вин официальный сайт http://www.1win6043.ru .
Мы предлагаем дипломы психологов, юристов, экономистов и прочих профессий по выгодным тарифам. Всегда стараемся поддерживать для заказчиков адекватную политику цен. Важно, чтобы дипломы были доступны для подавляющей массы наших граждан.
Приобретение диплома, подтверждающего обучение в ВУЗе, – это выгодное решение. Купить диплом о высшем образовании: peoplediplom.ru/kupit-diplom-v-moskve-kolledzha/
мастбет http://www.mostbet6012.ru .
Мы изготавливаем дипломы любых профессий по выгодным тарифам. Дипломы производятся на настоящих бланках государственного образца Купить диплом любого университета asxdiplommy.com
Где купить диплом по нужной специальности?
Заказать диплом университета по доступной цене возможно, обращаясь к проверенной специализированной фирме.: sdiplom.ru
мостбет кг http://www.mostbet6012.ru .
мостбет войти http://www.mostbet6033.ru .
Купить диплом университета по выгодной цене можно, обратившись к надежной специализированной компании. Мы оказываем услуги по производству и продаже документов об окончании любых ВУЗов России. Приобрести диплом любого ВУЗа– diplomskiy.com/kupit-diplom-yurista-s-zaneseniem-v-reestr-bistro-10/
pinup azerbaycan pinup azerbaycan .
Диплом любого ВУЗа России!
Без ВУЗа очень нелегко было продвигаться вверх по карьерной лестнице. По этой причине решение о заказе диплома стоит считать мудрым и целесообразным. Быстро и просто купить диплом института remoteaijobs.ai/employer/gosznac-diplom-24
диплом института купить
1хwin 1хwin .
mostbet скачать mostbet скачать .
Купить диплом о высшем образовании. Заказ диплома ВУЗа через надежную фирму дарит ряд достоинств для покупателя. Это решение дает возможность сэкономить время и существенные финансовые средства. gigit.cz/employer/eonline-diploma
Заказать диплом любого ВУЗа!
Мы предлагаем документы институтов, которые находятся на территории всей России.
diploml-174.ru/diplom-s-zaneseniem-v-reestr-po-dostupnoj-tsene-3/
Где заказать диплом по нужной специальности?
Мы предлагаемвыгодно и быстро приобрести диплом, который выполняется на оригинальной бумаге и заверен печатями, водяными знаками, подписями. Диплом способен пройти любые проверки, даже с применением профессиональных приборов. Решайте свои задачи быстро и просто с нашим сервисом. Купить диплом ВУЗа! kostromag.ru/forum/science/13395.aspx
Где купить диплом по актуальной специальности?
Мы предлагаем быстро и выгодно заказать диплом, который выполняется на оригинальном бланке и заверен мокрыми печатями, штампами, подписями должностных лиц. Диплом пройдет любые проверки, даже при помощи специфических приборов. Решите свои задачи быстро и просто с нашим сервисом.
Приобрести диплом о высшем образовании kupitediplom.ru/kupit-diplom-texnologa-6/
1win bet https://1win15.com.ng/ .
1win casino uganda http://1win1003.top/ .
pin up azerbaijan pin up azerbaijan .
официальный сайт 1win https://www.1win6044.ru .
mostbet скачать mostbet скачать .
1win ставки официальный сайт https://1win6043.ru/ .
мосбет мосбет .
descărca 1win 1win5013.ru .
скачать мостбет скачать мостбет .
1вин http://1win6010.ru .
купить аттестат официально
1win code bonus http://1win1003.top/ .
ломбард часы москва lombard-chasov1.ru .
узаконить перепланировку узаконить перепланировку .
эмблема стоматологии эмблема стоматологии .
ванвин 1win6009.ru .
Для успешного продвижения вверх по карьере требуется наличие диплома университета. Заказать диплом об образовании у проверенной организации: kupitediplom.ru/kupit-originalnij-diplom-legalno-i-bistro/
Всегда считал, что покупка диплома о высшем образовании — это миф и невозможно. Но, к счастью, оказался неправ. Сначала искал информацию по теме: стоит купить диплом о высшем образовании, купить диплом школы, купить диплом массажиста, дипломы детские купить, купить диплом о высшем образовании образцы, а затем переключился на дипломы вузов. Подробности здесь: kyc-diplom.com/geography/kolomna.html
Приобрести диплом любого университета. Покупка документа о высшем образовании через надежную компанию дарит немало достоинств для покупателя. Это решение помогает сберечь как личное время, так и серьезные финансовые средства. gaming.spaces.one/read-blog/26669_po-pravde-govorya-chasto-po-vsyacheskim-nyuansam-priobresti-dlya-sebya-dokumenty.html
Где купить диплом по актуальной специальности?
Наши специалисты предлагают быстро и выгодно заказать диплом, который выполнен на бланке ГОЗНАКа и заверен печатями, водяными знаками, подписями. Диплом пройдет любые проверки, даже при помощи профессиональных приборов. Решайте свои задачи быстро и просто с нашим сервисом.
Купить диплом о высшем образовании vacshidiplom.com/kupit-diplom-v-omske-13/
диплом о среднем профессиональном образовании где купить диплом о среднем профессиональном образовании где купить .
cod promoțional 1win http://1win5013.ru .
Мы готовы предложить дипломы любых профессий по приятным тарифам. Стараемся поддерживать для клиентов адекватную ценовую политику. Для нас важно, чтобы документы были доступными для большого количества граждан.
Покупка диплома, подтверждающего обучение в ВУЗе, – это грамотное решение. Приобрести диплом о высшем образовании: zakaz-na-diplom.ru/kupit-diplom-srednee-spetsialnoe-2/
Быстро купить диплом о высшем образовании!
Мы предлагаем документы об окончании любых университетов России. Документы производятся на фирменных бланках государственного образца. w77515cs.beget.tech/2025/04/08/diplom-pod-klyuch-s-garantiey.html
1win casino https://1win15.com.ng/ .
Мы изготавливаем дипломы любых профессий по разумным ценам. Мы готовы предложить документы ВУЗов, которые расположены на территории всей Российской Федерации. Документы делаются на “правильной” бумаге самого высокого качества. Это позволяет делать настоящие дипломы, не отличимые от оригинала. whmovie.com/read-blog/4002_kupit-diplom-instituta-s-reestrom.html
срочный выкуп часов в москве срочный выкуп часов в москве .
детская стоматология в митино детская стоматология в митино .
согласование перепланировки помещений согласование перепланировки помещений .
игра 1вин http://www.1win6009.ru .
1вин приложение http://1win6044.ru/ .
Мы можем предложить дипломы любых профессий по приятным тарифам. Мы готовы предложить документы техникумов, расположенных в любом регионе РФ. Документы печатаются на “правильной” бумаге высшего качества. Это дает возможности делать настоящие дипломы, которые не отличить от оригинала. diafan.rusheat.ru/forum/legalnoe-oformlenie-diplomov
Платформа Kraken предоставляет передовые методы для protected онлайн-операций. Каждый пользователь может рассчитывать на высокий уровень сохранности своих сведений. В Kraken обеспечены все возможности для выполнения deals, при этом ваша work остается полностью анонимной, и ваши личные данные остаются unseen для других.
кракен ат ссылка
мостбет http://mostbet6033.ru .
cheap viagra http://sophiaescorts.com .
mostbet https://www.mostbet6033.ru .
Приобрести диплом университета по невысокой цене можно, обращаясь к проверенной специализированной фирме. Приобрести документ о получении высшего образования вы имеете возможность в нашей компании. diplom-club.com/kupit-diplom-s-reestrom-v-rossii-bistro-i-nadezhno-9
мостбет скачать бесплатно https://www.mostbet6034.ru .
Заказать диплом любого университета!
Мы предлагаем документы любых учебных заведений, расположенных в любом регионе РФ.
diplom-zentr.com/kupit-diplom-s-reestrom-bez-xlopot-i-riskov/
mostbet https://mostbet6034.ru .
Приобретение диплома через проверенную и надежную фирму дарит много преимуществ для покупателя. Это решение дает возможность сэкономить как дорогое время, так и серьезные денежные средства. Впрочем, на этом выгоды не ограничиваются, преимуществ гораздо больше.Мы можем предложить дипломы любой профессии. Дипломы производят на подлинных бланках государственного образца. Доступная цена сравнительно с крупными тратами на обучение и проживание. Заказ диплома об образовании из российского института является мудрым шагом.
Приобрести диплом: diplomc-v-ufe.ru/diplom-s-zaneseniem-v-reestr-po-luchshej-tsene/
escort in islamabad http://buyviagrat.com/ .
1 вин http://1win6045.ru .
1 вин официальный сайт http://1win6045.ru/ .
Купить диплом ВУЗа!
Мы предлагаем документы институтов, которые находятся на территории всей Российской Федерации.
diplomers.com/kupit-diplom-ob-obrazovanii-s-reestrom-bistro-i-legko-2/
Всех приветствую!
Для определенных людей, купить диплом о высшем образовании – это необходимость, возможность получить отличную работу. Но для кого-то – это желание не терять массу времени на учебу в институте. Что бы ни толкнуло вас на такое решение, наша фирма готова помочь. Быстро, профессионально и по доступной цене изготовим диплом любого ВУЗа и любого года выпуска на государственных бланках с реальными печатями.
Главная причина, почему многие прибегают к покупке документов, – желание занять определенную работу. Например, знания и опыт дают возможность человеку устроиться на желаемую работу, но подтверждения квалификации нет. Когда для работодателя важно присутствие “корочки”, риск потерять вакантное место очень высокий.
Заказать документ ВУЗа можно в нашем сервисе. Мы оказываем услуги по производству и продаже документов об окончании любых ВУЗов Российской Федерации. Вы сможете получить необходимый диплом по любым специальностям, любого года выпуска, включая документы старого образца. Даем 100% гарантию, что в случае проверки документа работодателями, каких-либо подозрений не возникнет.
Обстоятельств, которые вынуждают приобрести диплом много. Кому-то очень срочно необходима работа, и необходимо произвести впечатление на руководителя во время собеседования. Некоторые задумали устроиться в престижную компанию, чтобы повысить собственный статус в социуме и в дальнейшем начать собственное дело. Чтобы не терять массу времени, а сразу начать успешную карьеру, используя имеющиеся навыки, можно купить диплом через интернет. Вы станете полезным для социума, получите денежную стабильность быстро и просто- купить аттестат за 9 класс
скачать 1win с официального сайта http://1win6010.ru .
1win играть 1win играть .
1win login ug https://1win1003.top/ .
Приобрести диплом ВУЗа!
Мы предлагаем дипломы любой профессии по приятным тарифам. Вы заказываете диплом через надежную и проверенную временем фирму. : amigabrasileira.listbb.ru/viewtopic.php?f=52&t=2918
Заказать диплом института по доступной цене вы можете, обращаясь к проверенной специализированной фирме. Купить документ ВУЗа вы можете в нашей компании в Москве. vuz-diplom.ru/kupite-diplom-o-visshem-obrazovanii-s-proverkoj-reestra
Мы готовы предложить дипломы любой профессии по разумным тарифам.– kupitediplom.ru/kupit-diplom-s-zaneseniem-v-reestr-foruma-vigodno/
Купить диплом о высшем образовании поспособствуем. Купить диплом специалиста в Твери – diplomybox.com/kupit-diplom-spetsialista-v-tveri
1win.com.ci https://1win5013.ru/ .
мост бет мост бет .
Ищете идеальную квартиру в Москве или Подмосковье? У нас есть предложения, которые вас удивят! Живите в сердце столицы с развитой инфраструктурой, или выберите уютные районы Подмосковья для спокойной жизни. Мы предлагаем широкий выбор квартир: от современных студий до просторных семейных апартаментов. Наша команда специалистов поможет вам найти именно то, что нужно, учитывая все ваши пожелания и бюджет. Не упустите шанс стать владельцем жилья мечты! Звоните, и мы подберем лучшие варианты для вас! Живите там, где вам комфортно! «Мангазея»
Мы готовы предложить дипломы любых профессий по приятным ценам. Купить диплом 2020 года — kyc-diplom.com/diplom-2019-goda.html
1win bet uganda http://1win1003.top .
Мы готовы предложить дипломы любой профессии по доступным ценам.
Вы приобретаете диплом в надежной и проверенной компании. Заказать диплом о высшем образовании– http://severka.flybb.ru/viewtopic.phpf=6&t=842/ – severka.flybb.ru/viewtopic.phpf=6&t=842
лечение зубов +в москве лечение зубов +в москве .
1win online http://www.1win6010.ru .
1 win.kg 1win6041.ru .
1 вин официальный сайт вход https://www.1win6047.ru .
mostbet chrono mostbet chrono .
Диплом университета России!
Без университета очень трудно было продвигаться вверх по карьере. По этой причине решение о покупке диплома следует считать целесообразным. Заказать диплом любого ВУЗа hirerightskills.com/employer/gosznac-diplom-24
скупка часов бу в москве скупка часов бу в москве .
скачать mostbet http://mostbet6033.ru/ .
клиники митино москва клиники митино москва .
1win.com https://www.1win5013.ru .
стоматологическая клиника митино стоматологическая клиника митино .
ванвин http://1win6041.ru .
переустройство и перепланировка в чем разница2 https://www.udmageo.ru .
1вин приложение 1вин приложение .
мостбет chrono http://www.mostbet6035.ru .
склад для хранения вещей аренда склад для хранения вещей аренда .
1vin казино http://1win6046.ru .
Приобрести диплом на заказ в Москве вы имеете возможность используя официальный сайт компании. newmedtime.ru/podlinnyie-diplomyi-na-zakaz
Где заказать диплом специалиста?
Мы предлагаем дипломы психологов, юристов, экономистов и прочих профессий по разумным тарифам. Важно, чтобы документы были доступны для большого количества граждан. Выгодно приобрести диплом любого университета vuz-diplom.ru/kupit-diplom-s-vneseniem-v-reestr-26/
Для успешного продвижения вверх по карьере понадобится наличие официального диплома ВУЗа. Заказать диплом о высшем образовании у надежной фирмы: kupitediplom.ru/kupit-attestat-s-reestrom-bistro-i-nadezhno/
mostbet промокод mostbet6034.ru .
Мы изготавливаем дипломы любой профессии по приятным тарифам. Дипломы производятся на подлинных бланках Приобрести диплом об образовании asxdiploman.com
онлайн оценка швейцарских часов онлайн оценка швейцарских часов .
переустройство это переустройство это .
гнатолог в клинике в москве гнатолог в клинике в москве .
jocuri de noroc online moldova http://www.1win5014.ru .
Приобрести диплом любого университета. Покупка подходящего диплома через проверенную и надежную компанию дарит ряд достоинств. Такое решение помогает сберечь как дорогое время, так и существенные финансовые средства. designxri.com/employer/eonline-diploma
mostbet официальный сайт http://mostbet6034.ru/ .
мостбет скачать на андроид https://www.mostbet6033.ru .
1win metode de plată https://1win5014.ru .
сайт 1win http://1win6045.ru/ .
мотбет https://mostbet6033.ru .
1win скачать kg http://1win7011.ru/ .
1win вход http://1win7013.ru .
Добрый день!
Мы изготавливаем дипломы психологов, юристов, экономистов и прочих профессий по приятным ценам. Стоимость может зависеть от выбранной специальности, года выпуска и университета: diploman-russian.com/
Мы изготавливаем дипломы любой профессии по приятным ценам. Стараемся поддерживать для заказчиков адекватную политику тарифов. Важно, чтобы дипломы были доступны для большинства наших граждан.
Заказ диплома, который подтверждает обучение в университете, – это выгодное решение. Приобрести диплом о высшем образовании: diplom-bez-problem.com/kupit-diplom-gde-mozhno-2/
Приобрести диплом университета!
Мы изготавливаем дипломы психологов, юристов, экономистов и любых других профессий по невысоким тарифам— kupit-diplom24.com/diplom-med-kolledzha-kupit-6/
1win войти http://www.1win7013.ru .
Приобрести диплом под заказ возможно используя официальный сайт компании. dachaweek.ru/diplom-kachestvenno-i-bez-riska
1win вход на сайт https://1win7011.ru .
Приобрести диплом о высшем образовании. Заказ диплома ВУЗа через проверенную и надежную фирму дарит множество плюсов для покупателя. Такое решение позволяет сэкономить как личное время, так и существенные денежные средства. vetreriameliante.it/index.php/kforum/jm-slideshow-module/11444-img-https-i-posti#11445
Мы изготавливаем дипломы любых профессий по приятным тарифам. Дипломы производят на фирменных бланках государственного образца Приобрести диплом об образовании vacshidiplom.com
хранение вещей в московской области недорого хранение вещей в московской области недорого .
Где заказать диплом специалиста?
Приобрести диплом университета по доступной цене можно, обратившись к проверенной специализированной фирме.: kupitediplom0029.ru
Задался вопросом: можно ли на самом деле купить диплом государственного образца в Москве? Был приятно удивлен — это реально и легально!
Сначала искал информацию в интернете на тему: за сколько можно купить диплом высшем образовании, купить диплом администратора, купить диплом в керчи, купить диплом в энгельсе, купить диплом высшего педагогического образования и получил базовые знания. В итоге остановился на материале: diplomybox.com/shag-3
Мы изготавливаем дипломы любой профессии по доступным ценам. Стараемся поддерживать для заказчиков адекватную политику тарифов. Важно, чтобы дипломы были доступными для большого количества граждан.
Покупка документа, который подтверждает обучение в университете, – это рациональное решение. Заказать диплом ВУЗа: diplomdoc.ru/kupit-diplom-srednee-obrazovanie-2/
mostbet промокод mostbet6035.ru .
Привет!
Для многих людей, заказать диплом ВУЗа – это необходимость, удачный шанс получить достойную работу. Но для кого-то – это очевидное желание не терять время на учебу в ВУЗе. С какой бы целью вам это не понадобилось, наша компания готова помочь вам. Быстро, профессионально и по доступной цене сделаем диплом любого года выпуска на подлинных бланках с реальными печатями.
Главная причина, почему люди покупают диплом, – желание занять определенную работу. Предположим, знания дают возможность специалисту устроиться на привлекательную работу, а подтверждения квалификации не имеется. При условии, что для работодателя важно присутствие “корочки”, риск потерять место работы очень высокий.
Заказать документ ВУЗа можно у нас в столице. Мы оказываем услуги по продаже документов об окончании любых университетов России. Вы сможете получить необходимый диплом по любым специальностям, включая документы СССР. Даем гарантию, что в случае проверки документов работодателем, подозрений не возникнет.
Ситуаций, которые вынуждают заказать диплом очень много. Кому-то очень срочно нужна работа, в итоге нужно произвести хорошее впечатление на руководителя на протяжении собеседования. Другие мечтают устроиться в большую компанию, чтобы повысить свой статус в обществе и в дальнейшем начать собственное дело. Чтобы не терять впустую годы жизни, а сразу начать успешную карьеру, применяя врожденные способности и полученные знания, можно приобрести диплом в интернете. Вы сможете быть полезным для социума, обретете денежную стабильность в максимально короткий срок- купить диплом о среднем образовании
Заказать диплом о высшем образовании!
Мы можем предложить дипломы любых профессий по приятным ценам— diplomk-v-krasnodare.ru/kupit-zaregistrirovannij-diplom-bistro-i-bezopasno-2/
1 ван вин https://www.1win6041.ru .
1win.pro http://1win6047.ru .
Заказать документ о получении высшего образования можно в нашей компании. Мы оказываем услуги по производству и продаже документов об окончании любых ВУЗов Российской Федерации. Вы получите необходимый диплом по любой специальности, любого года выпуска, включая документы СССР. Гарантируем, что при проверке документа работодателем, каких-либо подозрений не возникнет. diplomk-v-krasnodare.ru/mozhno-li-kupit-diplom-v-reestre-3/
казино онлайн kg https://mostbet6033.ru .
Заказать диплом университета!
Мы готовы предложить документы университетов, расположенных на территории всей России.
diplomt-v-chelyabinske.ru/kupit-diplom-o-srednem-obrazovanii-v-reestr-3/
1 win pro 1 win pro .
Где купить диплом специалиста?
Получаемый диплом с приложением отвечает запросам и стандартам Министерства образования и науки, неотличим от оригинала – даже со специальным оборудованием. Не откладывайте свои цели на потом, реализуйте их с нами – отправьте простую заявку на диплом прямо сейчас! Получить диплом о высшем образовании – легко! dreamrp.5nx.ru/viewtopic.phpf=2&t=442
Приобрести диплом о высшем образовании !
Покупка диплома университета РФ у нас является надежным процессом, так как документ заносится в реестр. Выгодно купить диплом университета diplomgorkiy.com/kupit-diplom-vnesennij-v-reestr-6
mostbet casino mostbet casino .
cazinouri online moldova 1win5015.ru .
Заказать диплом ВУЗа!
Купить диплом университета по невысокой стоимости вы можете, обращаясь к надежной специализированной компании. Приобрести диплом о высшем образовании: diplomt-v-chelyabinske.ru/diplom-vuza-put-k-uspeshnoj-rabote-zakazhite-sejchas
сколько стоят зубные протезы сколько стоят зубные протезы .
виды протезирования зубов фото цены виды протезирования зубов фото цены .
протезирование жевательных зубов стоимость http://www.protezirovanie-zubov3.ru/ .
1win вход https://1win6041.ru/ .
стоматологии г москва стоматологии г москва .
Ищете идеальную квартиру в Москве или Подмосковье? У нас есть предложения, которые вас удивят! Живите в сердце столицы с развитой инфраструктурой, или выберите уютные районы Подмосковья для спокойной жизни. Мы предлагаем широкий выбор квартир: от современных студий до просторных семейных апартаментов. Наша команда специалистов поможет вам найти именно то, что нужно, учитывая все ваши пожелания и бюджет. Не упустите шанс стать владельцем жилья мечты! Звоните, и мы подберем лучшие варианты для вас! Живите там, где вам комфортно!
ЖК премиум-класса в Москве – квартиры в новостройках премиум классаНовостройки премиум-класса Москвы. Обзор проектов
Мы предлагаем дипломы любой профессии по приятным тарифам.– kupitediplom0027.ru/kupit-diplom-s-provodkoj-bistro-i-bez-xlopot/
баланс ван вин https://www.1win6047.ru .
Мы изготавливаем дипломы любой профессии по приятным ценам.
Вы приобретаете документ в надежной и проверенной компании. Заказать диплом о высшем образовании– http://powerstack.co.in/employer/diplomy-grup-24/ – powerstack.co.in/employer/diplomy-grup-24
1win aplicația http://1win5015.ru .
mostbet официальный сайт mostbet6033.ru .
1win партнерка вход https://1win6046.ru/ .
лечение и протезирование зубов стоимость лечение и протезирование зубов стоимость .
сколько стоит протез зуба https://protezirovanie-zubov2.ru .
протезирование передних зубов цена протезирование передних зубов цена .
хирург в митино платно хирург в митино платно .
1win moldova download [url=https://www.1win5014.ru]https://www.1win5014.ru[/url] .
Где приобрести диплом специалиста?
Мы предлагаем выгодно приобрести диплом, который выполнен на бланке ГОЗНАКа и заверен печатями, водяными знаками, подписями должностных лиц. Диплом способен пройти любые проверки, даже с использованием специально предназначенного оборудования. Достигайте своих целей быстро и просто с нашей компанией.
Купить диплом о высшем образовании kupitediplom.ru/kupit-diplom-psixologa-15/
лечение зубов клиники в москве лечение зубов клиники в москве .
Хочу рассказать о своем опыте по заказу аттестата пту, думал это не реально и стал искать информацию в сети, про купить диплом о среднем образовании в липецке, купить диплом о среднем образовании в томске, купить диплом о среднем образовании в чебоксарах, купить диплом охраны, купить диплом преподавателя, постепенно вникая в суть дела нашел отличный материал здесь kyc-diplom.com/diplom-articles/zakazat-diplom-onlajn-instrukciya-k-rukovodstvu.html)
аттестат об окончании 11 классов купить
один вин официальный сайт https://1win6045.ru .
1win партнёрка https://www.1win6045.ru .
бк 1win бк 1win .
Где купить диплом специалиста?
Мы предлагаем дипломы любой профессии по приятным тарифам. Для нас очень важно, чтобы документы были доступны для большинства наших граждан. Купить диплом института diplom-top.ru/kupit-diplom-menedzhera-s-provodkoj-v-reestre/
ваучер 1win ваучер 1win .
1win партнерская программа вход 1win7011.ru .
1вин онлайн http://1win7013.ru .
1win.pro 1win.pro .
казино онлайн kg https://www.mostbet6033.ru .
Мы предлагаем дипломы психологов, юристов, экономистов и любых других профессий по приятным ценам. Мы готовы предложить документы техникумов, которые находятся в любом регионе Российской Федерации. Дипломы и аттестаты выпускаются на бумаге самого высокого качества. Это позволяет делать настоящие дипломы, не отличимые от оригинала. vibrantclubs.com/read-blog/17972_kupit-podlinnyj-diplom-s-zaneseniem-v-reestr.html
Купить диплом о высшем образовании!
Мы можем предложить документы учебных заведений, которые находятся на территории всей Российской Федерации.
diplomt-nsk.ru/kupit-diplom-s-zaneseniem-2/
Купить диплом университета по невысокой стоимости можно, обращаясь к проверенной специализированной компании. Приобрести документ о получении высшего образования можно у нас в столице. diplomj-irkutsk.ru/kupite-diplom-s-zaneseniem-legko-i-bistro
клиники митино москва клиники митино москва .
аттестат 11 классов купить аттестат 11 классов купить .
motsbet https://www.mostbet6036.ru .
mostbet chrono mostbet chrono .
1vin казино http://www.1win7013.ru .
1вин http://1win7001.ru .
Приобрести диплом университета!
Мы изготавливаем дипломы психологов, юристов, экономистов и любых других профессий по доступным тарифам. Вы заказываете диплом в надежной и проверенной компании. : big.bestforums.org/viewtopic.php?f=12&t=23745
1 vin официальный сайт https://1win7011.ru/ .
Приобрести диплом любого университета. Приобретение официального диплома через проверенную и надежную компанию дарит ряд плюсов. Такое решение дает возможность сберечь как дорогое время, так и значительные деньги. arzookanak0077.copiny.com/question/details/id/1083589
мостбет мобильная версия скачать https://mostbet6036.ru .
Диплом университета Российской Федерации!
Без наличия диплома достаточно сложно было продвигаться по карьере. Именно из-за этого решение о заказе диплома следует считать выгодным и целесообразным. Быстро заказать диплом об образовании anychinajob.com/zh/companies/gosznac-diplom-24
Для быстрого продвижения вверх по карьере требуется наличие диплома университета. Быстро заказать диплом об образовании у проверенной компании: kupitediplom.ru/kupit-diplom-ob-okonchanii-uchilisha/
Покупка официального диплома через качественную и надежную фирму дарит ряд достоинств. Данное решение помогает сэкономить время и серьезные средства. Впрочем, на этом выгоды не ограничиваются, достоинств значительно больше.Мы изготавливаем дипломы любой профессии. Дипломы изготавливаются на подлинных бланках. Доступная цена по сравнению с крупными затратами на обучение и проживание. Покупка диплома об образовании из российского института будет выгодным шагом.
Заказать диплом о высшем образовании: diplom-kaluga.ru/kupit-diplom-instituta-s-reestrom-4/
Где приобрести диплом по актуальной специальности?
Наша компания предлагает максимально быстро приобрести диплом, который выполняется на оригинальной бумаге и заверен мокрыми печатями, штампами, подписями должностных лиц. Данный диплом способен пройти любые проверки, даже при помощи специфических приборов. Достигайте свои цели быстро с нашими дипломами.
Купить диплом о высшем образовании diplomv-v-ruki.ru/kupit-diplom-v-ufe-12/
Заказать диплом университета по выгодной стоимости можно, обращаясь к проверенной специализированной фирме. Приобрести документ о получении высшего образования вы сможете у нас в Москве. diplom-club.com/kupit-diplom-v-reestre-bistro-i-nadezhno-bez-problem-2
Купить диплом любого университета!
Мы можем предложить документы ВУЗов, расположенных на территории всей РФ. Дипломы и аттестаты печатаются на “правильной” бумаге самого высокого качества: fizteh.getbb.ru/viewtopic.phpf=43&t=1894
1wi https://1win7001.ru/ .
купить школьный аттестат за 11 классов купить школьный аттестат за 11 классов .
купить диплом колледжа в нижнем новгороде
cazino md https://1win5015.ru .
Заказать диплом университета. Покупка документа о высшем образовании через надежную компанию дарит массу достоинств для покупателя. Это решение помогает сэкономить как дорогое время, так и существенные средства. arzookanak0077.copiny.com/question/details/id/1083589
Купить диплом института по невысокой стоимости можно, обращаясь к проверенной специализированной компании. Мы предлагаем документы об окончании любых университетов России. Приобрести диплом любого ВУЗа– diplomidlarf.ru/kupit-diplom-visshem-obrazovanii-zaneseniem-reestr-10/
платное протезирование зубов [url=https://protezirovanie-zubov3.ru/]платное протезирование зубов[/url] .
зуб протезирование цена protezirovanie-zubov2.ru .
протезирование передних зубов цена протезирование передних зубов цена .
Здравствуйте!
Мы предлагаем дипломы любой профессии по приятным ценам. Цена зависит от конкретной специальности, года получения и образовательного учреждения: п»їtutdiploms.com/
1win молдова http://1win5015.ru .
виды протезирования зубов фото цены виды протезирования зубов фото цены .
сколько стоит протез зуба https://protezirovanie-zubov3.ru .
скачать мостбет официальный сайт http://mostbet6033.ru .
Заказать диплом любого института!
Приобрести диплом университета по невысокой цене возможно, обратившись к надежной специализированной фирме. Приобрести диплом: vacshidiplom.com/vnesenie-diploma-v-reestr-uznajte-tsenu-onlajn
Мы изготавливаем дипломы любой профессии по невысоким ценам. Мы можем предложить документы ВУЗов, которые находятся на территории всей России. Документы выпускаются на бумаге самого высшего качества. Это дает возможности делать государственные дипломы, которые не отличить от оригинала. 24.lakharlacquers.com/employer/archive-diploma
протезирование зубов протезирование зубов .
протезирование зубов мякинино протезирование зубов мякинино .
Заказать документ о получении высшего образования можно в нашей компании. Мы предлагаем документы об окончании любых ВУЗов России. Вы получите диплом по любым специальностям, любого года выпуска, включая документы СССР. Гарантируем, что в случае проверки документа работодателями, подозрений не появится. diplomj-irkutsk.ru/kupit-diplom-s-zaneseniem-v-reestr-po-vigodnoj-tsene-7/
Заказать диплом о высшем образовании!
Мы изготавливаем дипломы любых профессий по приятным тарифам. Вы покупаете диплом в надежной и проверенной компании. : peticiones.cl/478820
Мы готовы предложить дипломы психологов, юристов, экономистов и любых других профессий по приятным ценам. Стараемся поддерживать для заказчиков адекватную политику цен. Важно, чтобы дипломы были доступными для большого количества граждан.
Покупка диплома, подтверждающего окончание университета, – это грамотное решение. Приобрести диплом любого университета: 10000diplomov.ru/diplom-kupit-tsena-2/
Диплом ВУЗа Российской Федерации!
Без наличия диплома очень сложно было продвинуться по карьерной лестнице. Именно из-за этого решение о заказе диплома стоит считать мудрым и целесообразным. Выгодно заказать диплом университета gamerbiz.net/employer/gosznac-diplom-24
1win скачать последнюю версию 1win скачать последнюю версию .
мостбет скачать андроид http://mostbet6033.ru/ .
Купить диплом об образовании!
Мы можем предложить дипломы любой профессии по доступным ценам— diplom-onlinex.com/kupit-diplom-po-meditsine-bistro-i-bez-problem/
Для эффективного продвижения вверх по карьерной лестнице нужно наличие официального диплома института. Выгодно приобрести диплом о высшем образовании у сильной компании: diploml-174.ru/kupit-diplom-texnikuma-ob-okonchanii-8/
win 1 1win6048.ru .
Где приобрести диплом специалиста?
Полученный диплом с необходимыми печатями и подписями отвечает стандартам Министерства образования и науки России, никто не отличит его от оригинала – даже со специально предназначенным оборудованием. Не откладывайте собственные цели на потом, реализуйте их с нашей помощью – отправьте заявку на изготовление документа сегодня! Заказать диплом о высшем образовании – легко! toplentanews.ru/operativnoe-izgotovlenie-diplomov-po-vashey-spetsialnosti
1vin казино https://1win6045.ru/ .
smile стоматология smile стоматология .
1wln https://1win7002.ru/ .
Приобрести диплом любого ВУЗа!
Мы предлагаем документы институтов, расположенных на территории всей России.
diplomg-cheboksary.ru/udivitelnie-tseni-na-diplom-s-reestrom-dlya-vas/
скачать mostbet на телефон https://www.mostbet6036.ru .
cazinouri online moldova https://www.1win5016.ru .
Приобрести диплом любого ВУЗа!
Мы предлагаем документы об окончании любых ВУЗов РФ. Документы изготавливаются на оригинальных бланках государственного образца. terorizam.listbb.ru/viewtopic.php?f=3&t=1751
купить диплом бакалавриат москва diplomysis-vsem.ru .
cod promoțional 1win cod promoțional 1win .
wan win wan win .
1 win pro 1win6048.ru .
Приобрести диплом о высшем образовании!
Мы можем предложить документы университетов, которые расположены в любом регионе РФ.
diplomist.com/kupit-diplom-s-reestrom-po-dostupnoj-tsene/
win 1 http://www.1win7001.ru .
купить в вологде диплом
mostbet apk скачать https://mostbet5001.ru/ .
1win ваучер https://1win7014.ru/ .
1win site https://www.1win16.com.ng .
мостбет скачать казино http://www.mostbet6036.ru .
мостбет скачать казино мостбет скачать казино .
продамус промокоды продамус промокоды .
сайт 1win https://1win7014.ru/ .
seo криптопроекта http://www.prodvizhenie-kriptovalyuta.ru .
мостюет https://mostbet6033.ru/ .
улучшение репутации криптовалюты улучшение репутации криптовалюты .
1win bet http://1win16.com.ng/ .
win 1 https://www.1win7001.ru .
снять бокс для вещей снять бокс для вещей .
купить университет диплом
Где заказать диплом по необходимой специальности?
Мы предлагаемвыгодно и быстро заказать диплом, который выполняется на оригинальном бланке и заверен мокрыми печатями, штампами, подписями должностных лиц. Наш диплом способен пройти лубую проверку, даже с использованием специально предназначенного оборудования. Решайте свои задачи быстро с нашей компанией. Купить диплом любого университета! rca.co.id/read-blog/7565_kupit-attestat-8-klass.html
Мы изготавливаем дипломы психологов, юристов, экономистов и прочих профессий по приятным тарифам. Всегда стараемся поддерживать для покупателей адекватную ценовую политику. Для нас важно, чтобы дипломы были доступны для подавляющей массы наших граждан.
Покупка диплома, подтверждающего окончание университета, – это грамотное решение. Заказать диплом университета: magazin-diplomov.ru/diplom-kupit-ofitsialno-3/
Мы предлагаем дипломы любой профессии по выгодным ценам.
Вы покупаете диплом через надежную и проверенную временем компанию. Приобрести диплом о высшем образовании– http://sz.80lvl.ru/viewtopic.phpf=9&t=2813/ – sz.80lvl.ru/viewtopic.phpf=9&t=2813
Заказать диплом любого университета!
Мы изготавливаем дипломы психологов, юристов, экономистов и любых других профессий по разумным тарифам— diplomass.com/kupit-diplom-s-reestrom-dlya-nadezhnosti-i-uverennosti/
мостбет скачать бесплатно http://mostbet6033.ru/ .
промокод на продамус скидка подключение promokod-prdms.ru .
google play отзывы google play отзывы .
trustpilot купить отзывы trustpilot купить отзывы .
1win молдова https://www.1win5016.ru .
Заказать диплом о высшем образовании !
Приобретение диплома любого университета РФ в нашей компании – надежный процесс, ведь документ заносится в государственный реестр. Выгодно приобрести диплом об образовании kupitediplom.ru/kupit-diplom-s-zaneseniem-v-reestr-bistro-i-nadezhno-74
cod promoțional 1win http://www.1win5016.ru .
Мы предлагаем дипломы любой профессии по выгодным ценам.– diplomt-v-chelyabinske.ru/kupit-diplom-s-vneseniem-v-reestr-bistro-i-bezopasno-3/
Мы изготавливаем дипломы любой профессии по приятным ценам. Мы предлагаем документы техникумов, расположенных в любом регионе России. Документы делаются на бумаге высшего качества. Это позволяет делать настоящие дипломы, которые невозможно отличить от оригиналов. justpaste.it/f848x
Заказать диплом ВУЗа!
Мы предлагаем документы университетов, расположенных на территории всей РФ. Дипломы и аттестаты выпускаются на “правильной” бумаге самого высшего качества: comitibus.clanfm.ru/viewtopic.phpf=14&t=18837
повышение доверия криптовалюты повышение доверия криптовалюты .
Где заказать диплом специалиста?
Наши специалисты предлагают быстро купить диплом, который выполняется на оригинальном бланке и заверен печатями, водяными знаками, подписями. Данный документ способен пройти лубую проверку, даже при помощи специально предназначенного оборудования. Достигайте цели быстро с нашими дипломами.
Заказать диплом о высшем образовании kupitediplom0027.ru/kupit-diplom-v-murmanske-6/
Приветствую!
Для многих людей, приобрести диплом о высшем образовании – это необходимость, шанс получить отличную работу. Но для кого-то – это желание не терять огромное количество времени на учебу в ВУЗе. Что бы ни толкнуло вас на это решение, мы готовы помочь вам. Максимально быстро, профессионально и по доступной цене сделаем диплом нового или старого образца на настоящих бланках с реальными подписями и печатями.
Основная причина, почему многие покупают дипломы, – желание занять хорошую работу. Например, способности и опыт позволяют кандидату устроиться на работу, однако документального подтверждения квалификации нет. При условии, что для работодателя важно наличие “корочек”, риск потерять вакантное место очень высокий.
Приобрести документ университета можно в нашем сервисе. Мы оказываем услуги по продаже документов об окончании любых ВУЗов России. Вы получите необходимый диплом по любой специальности, включая документы старого образца. Гарантируем, что при проверке документов работодателем, каких-либо подозрений не возникнет.
Обстоятельств, которые вынуждают купить диплом очень много. Кому-то срочно требуется работа, в результате нужно произвести впечатление на начальника при собеседовании. Некоторые хотят попасть в престижную компанию, чтобы повысить собственный статус и в будущем начать свой бизнес. Чтобы не терять множество времени, а сразу начать успешную карьеру, используя врожденные способности и приобретенные навыки, можно приобрести диплом в онлайне. Вы сможете быть полезным для социума, обретете денежную стабильность в кратчайшие сроки- аттестат купить
Заказать диплом ВУЗа по доступной цене возможно, обратившись к проверенной специализированной компании. Купить документ о получении высшего образования можно у нас в Москве. good-diplom.ru/kupit-diplom-zaregistrirovannij-v-reestre-8
seo криптопроекта http://www.prodvizhenie-kriptovalyuta2.ru/ .
Где купить диплом по необходимой специальности?
Мы изготавливаем дипломы любой профессии по разумным ценам. Для нас важно, чтобы дипломы были доступны для подавляющей массы наших граждан. Заказать диплом ВУЗа diplom-top.ru/diplom-instituta-s-reestrom-ofitsialno-i-nadezhno-2/
1win ракета 1win ракета .
Мы изготавливаем дипломы любой профессии по разумным ценам. Мы предлагаем документы ВУЗов, расположенных в любом регионе Российской Федерации. Дипломы и аттестаты выпускаются на бумаге высшего качества. Это дает возможности делать государственные дипломы, которые невозможно отличить от оригиналов. analyticsjobs.in/jobs/companies/archive-diploma
Где купить диплом специалиста?
Наша компания предлагаетбыстро и выгодно заказать диплом, который выполняется на бланке ГОЗНАКа и заверен печатями, водяными знаками, подписями. Документ способен пройти любые проверки, даже с использованием профессиональных приборов. Решайте свои задачи максимально быстро с нашей компанией. Заказать диплом о высшем образовании! mvduniversitetpiter.flybb.ru/viewtopic.php?f=9&t=1078
Где купить диплом по необходимой специальности?
Наша компания предлагает выгодно и быстро купить диплом, который выполнен на оригинальной бумаге и заверен мокрыми печатями, водяными знаками, подписями должностных лиц. Наш документ способен пройти лубую проверку, даже с применением специальных приборов. Решите свои задачи быстро и просто с нашими дипломами.
Купить диплом о высшем образовании vuz-diplom.ru/kupit-diplom-v-naberezhnix-chelnax-3/
Купить диплом института. Заказ документа о высшем образовании через проверенную и надежную фирму дарит ряд достоинств. Такое решение дает возможность сэкономить время и серьезные деньги. nec.phorum.pl/posting.php?mode=newtopic&f=27&sid=7f3e370ae68e85a815bcccb0946be545
склады хранения в москве склады хранения в москве .
мостбет chrono мостбет chrono .
Мы изготавливаем дипломы любой профессии по приятным тарифам.
Вы приобретаете документ через надежную фирму. Приобрести диплом ВУЗа– http://job.iwok.vn/employer/diplomy-grup-24/ – job.iwok.vn/employer/diplomy-grup-24
1win.kg 1win7002.ru .
Мы изготавливаем дипломы любых профессий по приятным тарифам. Дипломы производят на подлинных бланках государственного образца Заказать диплом любого института diplomt-v-chelyabinske.ru
Где приобрести диплом по нужной специальности?
Приобрести диплом института по невысокой стоимости вы можете, обращаясь к надежной специализированной фирме.: diplom5.com
Приобрести диплом ВУЗа по невысокой стоимости вы сможете, обращаясь к надежной специализированной компании. Мы предлагаем документы об окончании любых ВУЗов РФ. Приобрести диплом о высшем образовании– damdiplomisa.com/kupit-diplom-v-krasnodare-s-zaneseniem-v-reestr-3/
Купить диплом института по выгодной цене можно, обратившись к надежной специализированной компании. Приобрести документ института вы сможете в нашей компании в столице. diplomt-v-chelyabinske.ru/kupit-diplom-s-provedeniem-v-reestr-2
mostbet скачать на телефон бесплатно андроид mostbet6033.ru .
1вин приложение https://www.1win7014.ru .
Мы готовы предложить дипломы любой профессии по приятным ценам.– good-diplom.ru/kupite-diplom-vuza-s-zaneseniem-v-reestr-bistro-i-prosto/
Приобрести диплом на заказ вы сможете через официальный портал компании. gtral.com/companies/frees-diplom
Заказ документа о высшем образовании через надежную фирму дарит ряд плюсов для покупателя. Это решение помогает сэкономить как дорогое время, так и серьезные финансовые средства. Однако, только на этом выгода не ограничивается, преимуществ намного больше.Мы готовы предложить дипломы любой профессии. Дипломы производят на подлинных бланках государственного образца. Доступная цена сравнительно с крупными издержками на обучение и проживание в другом городе. Приобретение диплома об образовании из российского ВУЗа будет мудрым шагом.
Заказать диплом: diplomg-kurerom.ru/diplom-visshego-obrazovaniya-s-zaneseniem-v-reestr-7/
Обратитесь в психиатрическую клинику СПб и начните путь к новой жизни
частная психиатрическая больница спб https://www.klinika-psikhiatrii-spb.ru .
Прочные пластиковые окна с отличной шумоизоляцией
пластиковые окна дилерам plastikovye-okna-master.ru .
Заказать диплом любого ВУЗа!
Мы предлагаем документы об окончании любых университетов Российской Федерации. Документы производятся на подлинных бланках государственного образца. gae.flybb.ru/viewtopic.php?f=2&t=549
mostbet.kg http://mostbet5001.ru .
улучшение рейтинга криптобиржи http://prodvizhenie-kriptovalyuta1.ru/ .
промокод продамус промокод продамус .
1win 1win .
1win официальный сайт регистрация https://www.1win7003.ru .